I saw another bookshelf today in color order, and it just reminded me how much a little reorganizing can change the entire look of a shelf. Sure there are those who this kind of organizing drives INSANE... but if you think you can handle it, I think you should definitely do it. I was worried I wouldn't be able to find anything, but to my surprise, I usually remember what the book looks like - and have been able to find the book i'm looking for pretty easily.
Your shelves can go from ordinary to extraordinary in a matter of hours. How to tackle this? Just pull those books off, put them in color piles, and try to organize each section by hue. For example, notice how the green isn't just green... the similar greens stick together, and slowly fade to the neighboring color. I'm not going to lie, this takes a lot of time, so put on a favorite movie & a pair of sweats, you're in for the night!
Pages
▼
Sunday, November 28, 2010
Tuesday, November 16, 2010
Squares
Here's another newbie for the bunch. I saw this table and had an immediate flashback to my childhood. I completely forgot about tables in this style!
The almost checkerboard squares inlaid, really takes me back. I think my Dad had a rectangle one of these. I had to give it a try, partly because of the memories and partly because this is a genuinely cool table. Ross had a great idea to paint it checkerboard, and that sealed the deal for me. I bought it, threw it in the car (it fit, that's always a plus!) and started brainstorming. I have a lot of ideas. The one I'm leaning towards is all matte black, with the squares alternating matte black and ivory. then distressed and rubbed with a walnut stain, and sealed for durability. I'm excited that the wood texture will show through the paint too, that will give it a lot of character. What are your ideas? We'll see where this week takes us. We have a lot of work to do in the shop itself now that it's raining. The main workshop is getting it's own pallet floor solution like the storage area, as we've been getting hit with a few puddles! Well, thanks for stopping by and have a productive day!
The almost checkerboard squares inlaid, really takes me back. I think my Dad had a rectangle one of these. I had to give it a try, partly because of the memories and partly because this is a genuinely cool table. Ross had a great idea to paint it checkerboard, and that sealed the deal for me. I bought it, threw it in the car (it fit, that's always a plus!) and started brainstorming. I have a lot of ideas. The one I'm leaning towards is all matte black, with the squares alternating matte black and ivory. then distressed and rubbed with a walnut stain, and sealed for durability. I'm excited that the wood texture will show through the paint too, that will give it a lot of character. What are your ideas? We'll see where this week takes us. We have a lot of work to do in the shop itself now that it's raining. The main workshop is getting it's own pallet floor solution like the storage area, as we've been getting hit with a few puddles! Well, thanks for stopping by and have a productive day!
Sunday, November 14, 2010
The Kill
Hello again! Hope everyone had a great weekend. Quick side note, I've always said "Hello again" without thinking twice about it, but recently we had a night with Netflix and the movie that arrived was "Hello again" with Shelly Long.
I hate to say it, but it wasn't the greatest movie in the world, but somehow it stuck with me, and I can't stop thinking about or quoting it! Eighties movies are so fun to watch though, I think it's something you just HAVE to see. Anyway, moving on!
We just got in a few pieces of furniture and I've been racking my brain to remember what it is CALLED. I've seen them all over and I used to know, but I'm drawing a blank! Maybe you can help:
I love the style, the raised back perfect for a lamp, leaving room for book and knick knacks underneath. I'm toying with a few different ideas as to how to paint it, any suggestions?
Now I usually don't talk about all the vintage things we put in the shop, simply because there can be SO many that it would hog the whole blog. This one though, I had to show. This plate is actually titled "The Kill". Check it out:
This has to be the most interesting plate I think I've ever seen... well, have a great day!
Saturday, October 23, 2010
Before & After - Coffee Table
Remember this post? Well Ross and I worked on Kevin's old coffee table and finished it up yesterday. We sanded it, primed it, painted it, then worked a Cherry stain into it. After a lot of experimentation to get the look we wanted, we lovingly distressed the piece. I think it came out great! White with a subtle red - purple tint. That's the cherry stain and I am really happy with it. The way the wings fold up on this table still amaze me, it's SO easy. Just pull 'em up, and they stay! Putting them back down is as easy as pulling the hinge. That's it! The designer was a genius to install the wings like this! Anyway, enough rambling, here she is and she's looking for a great home:
After!
Friday, October 22, 2010
Before & After - Side Table Wash
Remember this post? Well I finished up the tables, and I love how they came out. Here's the before & after shots:
I like how they came out and I learned a LOT doing this wash. It was my first time, and I can't wait to do it again. It was fun AND educational. I used the tutorial from Barb at Design Sponge. Next time I'd like to try one withOUT the brush strokes. Well, I'm a sucker for brushstrokes because I think they look really cool, especially cross hatch like I did here, but I'd like to try other ways too. I definitely recommend this process to anyone looking for a furniture face lift! These tables are up for sale in the shop.
Have a great weekend!
After:
I like how they came out and I learned a LOT doing this wash. It was my first time, and I can't wait to do it again. It was fun AND educational. I used the tutorial from Barb at Design Sponge. Next time I'd like to try one withOUT the brush strokes. Well, I'm a sucker for brushstrokes because I think they look really cool, especially cross hatch like I did here, but I'd like to try other ways too. I definitely recommend this process to anyone looking for a furniture face lift! These tables are up for sale in the shop.
Have a great weekend!
Saturday, October 16, 2010
Before & After - Royal Empress Chairs
Just finished a set of chairs! Here they are before:
And After:
I decided to do the third chair differently, as a set of 2 is probably better than a set of 3, rather than 4. The fourth chair is missing. The third of this set has arms, and will make a nice chair by itself. I chose this color paint to compliment the pinks and reds in the print, and highlight the greens and blues. In different lights the chair seems to be a different color, very pretty! Ross actually "made" this color from two other colors we had leftover. I'm sad that I used it all up! Oh well, we can always go get it matched.
These are for sale in the shop, with free shipping and delivery, of course! Have a great weekend!
Friday, October 15, 2010
Time for a Wash.....
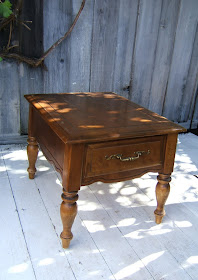
I have a set of end tables that I've been decided what to do with. Finally, I decided I need to learn this wash technique that I saw on Design Sponge. Here is 1 of the 2 tables I plan to wash today:
Here is what I'm going for:
I'm excited to do it, the full Tutorial from Barb on Design Sponge is available here.
Wish me luck and have a great day!
Wednesday, October 13, 2010
Coffee Table
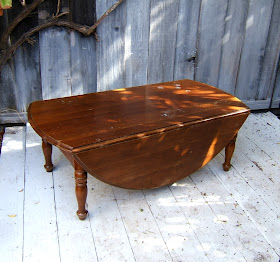
All is well with the Design Sponge post, they corrected it - I'm a "he" again! Hehe. In other news, Kevins coffee table and desk came out GREAT (pictures to come soon) and he loved them. He immediately replaced his old coffee table with the newly refinished one, and sent us home with the old! He didn't want it, so we are re-doing that today. Here it is:
The first coat is on and it already looks really great. Don't get me wrong, I loved the wood of the table, but it had some stains that made it a great candidate for paint. I'm partial to paint though, so I always say that! Have a wonderful week!
Aren't those drop leaves awesome? I was really surprised to see how easily they go up too. Normally with drop leaves you have to mess with little switches or pins, not these. Simply pull the side up and it stays.To put it down you just pull gently on the hinge supporting it. So easy! I really love the style of the legs, it was the inspiration for how we would re-do this one. Ross and I decided on French Provincial shabby chic style, like this:
The first coat is on and it already looks really great. Don't get me wrong, I loved the wood of the table, but it had some stains that made it a great candidate for paint. I'm partial to paint though, so I always say that! Have a wonderful week!
Friday, October 8, 2010
Design*Sponge, baby!
I'm so happy and honored to have made it to the front page of Design*Sponge! I LOVE reading design sponge and have always turned to them for advice, tutorials and ideas. They post a lot and have "65,000 daily readers on the main site, over 89,000 readers reading via RSS, and 103,000 Twitter followers" (from their About page). Well here is the link to the article: Design Sponge, and here is the review:
Have a great weekend everyone!
Did you notice, though, that they think I'm a she? Haha... it's a little funny, and not unusual, because with an androgynous name like Jesse and the faceless-ness of the internet, it happens all the time. Either way, I'm ecstatic to be featured on design sponge, I know they have thousands of before and after submissions coming in all the time. Here's a big thank you to design sponge!I’m not sure if this is a permanent installation or just a creatively styled photo shoot, but there’s something wonderfully surreal about this outdoor desk set up. Jesse runs a little furniture shop in Santa Cruz called 9 Red, and when she saw this pine desk, her creative gears immediately started cranking. She painted the desk ivory and then added lovely silver fleur-de-lis patterns in varying sizes. The results are quite beautiful, especially when paired with the plain wood chair and the wire basket. The desk combines French country, rustic vintage and simple modernism, which I’m absolutely loving. Click here to see more of her creations and be sure to check our her shop site, as well. Amazing work, Jesse!
Have a great weekend everyone!
Thursday, October 7, 2010
Sewing Table & Hexagon Parasol
Two new additions to the shop today, are the long awaited sewing table and a spur of the moment parasol. I've been trying to finish up the last of my parasol stock, but only so I can get more!
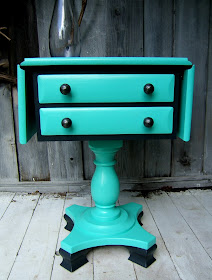
The sewing table was a sweet find. It was in great shape, just needed a face-lift. After stripping it and examining it, Ross decided to take off with Grey and Teal for this one. We had some leftover from our kitchen project, and the two go together beautifully! I'll let the pictures do the talking:
Available here, this is #11 of the 12 parasols I have made. One more to go! They take a little while though so I have to take breaks. Cutting each piece then gluing each one, man! Oh well, it's fun. Have a wonderful day, it looks so much like fall out today!
The sewing table was a sweet find. It was in great shape, just needed a face-lift. After stripping it and examining it, Ross decided to take off with Grey and Teal for this one. We had some leftover from our kitchen project, and the two go together beautifully! I'll let the pictures do the talking:
What do you think? It's available here, with free shipping or local delivery. $50 off for pick-ups. Up next is another parasol, this one I did in the style of a wall mural I did a few years back, that got a lot of compliments. Thought I'd give it a try!
Available here, this is #11 of the 12 parasols I have made. One more to go! They take a little while though so I have to take breaks. Cutting each piece then gluing each one, man! Oh well, it's fun. Have a wonderful day, it looks so much like fall out today!
Wednesday, October 6, 2010
Parasols
Hello again! I just finished up two new parasols last night, and they are ready in the shop:
My favorite is the red one! I got the idea from a magazine that had a few pictures from some fine china shops in Canada. One of the plate sets had these cute red flowers going up the side with a very fine red branch. Pretty much like I have it here!
Have a great day!
My favorite is the red one! I got the idea from a magazine that had a few pictures from some fine china shops in Canada. One of the plate sets had these cute red flowers going up the side with a very fine red branch. Pretty much like I have it here!
Have a great day!
Monday, October 4, 2010
Fleur de Lis Desk - Before & After
Before:
After!
I was surprised with how this desk came out, I am really happy with it. Thank you Sarah for your help! This is available in the shop or through email.
After!
I was surprised with how this desk came out, I am really happy with it. Thank you Sarah for your help! This is available in the shop or through email.


