Pages

Saturday, March 31, 2012

Pinterst Picks: Rainy Day

So I'm supposed to be mopping the kitchen right now, but that is so boring and the computer was staring at me from across the room - as usual.  And I thought, "lemme just hop on pinterest real quick.." which turned into a quick post session.  And why not, it's a rainy day!  Which inspired the theme of my search, and I found some great stuff! So here they are, in no particular order - and notice how this time around, I've learned to embed! They say you learn something every day, so I guess I've met my quota... :)
Look who's on first, a rainy day mobil!
Source
Precious lil thang. Sadly, the original pin didn't include the exact link, but I felt like going the extra mile today and finding the original post. Anything to avoid that mop for my readers! Here she is. Oh, and by the way, links to the pin are under each photo, so click that pic, if you think it's "sick". Oh man, I'm full of it today! HA! P.S. "sick" is supposedly some slang term that actually means "good" or "cool", but you all probably knew that already because you're hipper than I. Or is it me, hipper than me?

Next up - a chandelier that threw me right back into my childhood, hanging out at Grandmas.  She had one of these teardrop chandeliers and I adored it. I still do actually.
Source
Delightful, huh? Agreed. Moving on, I don't have all day here! (Ok, maybe I do) Let's move onto rainy day wall art.  Look at these cute wall decals, I can think of several places in my house that these would be more than welcome...
Source
Nice.. and look at this 3-D rainy day wall art...what's cookin, good lookin!
Source
I think that's my favorite, I'm a sucker for 3-D wall art. Can't get enough. Especially this two direction theme here.  Raining into puddles, evaporating into clouds. That's how it's done! Here's one more wall treatment:
Source
That's a rainy day theme you could do.... say.. on a rainy day. Jeez, where'd they get those towels? Send a link if you please.... OK - I think that's enough for one day, this house isn't gonna clean itself.

Eh one more:
Source

That was worth it! Can you believe that? The color attracted me to that post, first and foremost,but then on closer inspection I saw the crazy gutter work here.  This place plays music once it starts raining!  That is probably a love it or hate it situation, but either way it's impressive. I wonder if the wall takes requests...

Alright, well if the weather is better in your neck of the woods then I wish you the best! For those of us in the rain, set up that crock pot and redecorate your house.  Enjoy it, woot!

-Jesse

Wednesday, March 28, 2012

Party Time: DIY Decor

Spring has sprung, officially.  This week has been cold and rainy here, and I can't help but think forward to all the summer parties and bbq's ahead!  I love a good party, we all do - but more so, I love to decorate for a good party!  Though after the food and beverages have been bought, there isn't always a lot of room left in the budget for the decorations, am I right?  Don't let that stop you though - you can still make your party sparkle with a few affordable supplies, a few internet searches, and a few good movies to pass the time.  While I won't bombard you with all the great ideas I've come across in one long post, I plan to post pretty regularly in a section I call: Party Time! Today's Party Time will be using one of my favorite (and cheap!) materials, paper!

Let's start with the increasingly popular tissue paper pom pom:
These are great!  They don't take you that long, they aren't that difficult, and they make a really great impression at a party.  Plus, tissue paper is so affordable and comes in so many colors!  You could hang just a few here and there, or go all out and have a swarm of them.  If you have multiple areas, try hanging odd numbers of them over each table or area.  I think odd numbers are fantastic.  Here is the tutorial on Martha Stewart's site.

Up next we have Paper Bunting:
I had seen these before and never knew it was called bunting.  "...They have a different word for everything." -Steve Martin!  Soon as I found that out, it opened up a whole new world of techniques to me.  The first few (rough) ones I had done, I used paper and a stapler - but tape, jeez! Why did I not think of that? Faster, easier, more attractive.  You could easily whip up a great set of bunting for your next bash, also at an extremely low cost.  Again, paper & string come in so many great colors that this theme is up to you.  I'm really into the Ombre thing lately (oh, you noticed?) so my next party will definitely have a fade! I found two great tutorials for bunting:
and

Last but not least for today, an old-y but a good-y, is the classic paper lantern.  Remember these from elementary school? I have used these time & time again for party decorations. Take a look:
 
These are such a good standby, and surprisingly few people know how to make them - so you're sure to impress.  Luckily, I found some wonderful tutorials on the interweb for ya.  In the above shot, a paper lantern is used around a glass vase to transform it into a table lantern - this one's new to me so I'm really excited to have found it.  What a clever little candle holder!   In the second we have the hanging lantern, but with a rounded edge, framing the divider of a room.  Using patterned paper is fun here too, or stringing the lanterns up like a garland.  I can't find a good example of that unfortunately, so I will just have to do a whole tutorial on that soon (oh darn!).  Here are the tutorials I've come across:
Design Sponge: DIY Wednesdays
and
Lucky Dylan Weddings

Don't forget these colorful mobiles I posted about before, the sewing machine technique is also extremely helpful & can be used with a wide variety of shapes.

What are you favorite party decoration ideas?  Send them in to me here so I can share them in a future segment of Party Time.  I set up a Party Time Pinterest board as well, click here.  Special thanks to these lovely blogs who have posted tutorials of their work, head over to their blogs and spread the love.  It's party time!

Monday, March 26, 2012

School of Restoration: Ombre Accent Chair

Hi everyone! I posted another tutorial on The Divine Minimalist, click here to hop over there and read it, or read ahead:

Welcome to the next class in the School of Restoration! Today we are going to work on painting a chair in a color fade, or "Ombre" as you've probably seen it.  I looked it up, because I'll be first to admit that I had no idea what this word meant.  Ombre; "Shaded or graduated in tone".  Yep! That about sums it up, and I adore it.   I've been seeing this new style all over the place, and I'm really happy about it.  When thinking of an idea for today's class, this post came through on Design Sponge featuring Anthropologie's gorgeous ombre bench.  If you click over to their site, hang onto your seat - yes - that is a $1500 price tag!  Now call me crazy, but I'm pretty sure we can do this for less than $1500.  I couldn't wait to try it, and I added a third color too.  Here's a look at what we're aiming for:
Isn't that fun? I think so, and it really was fun to make.  So grab any chair lying around and let's get to work!

Materials:
  • A sweet chair
  • Steel Wool (paint removal grade) or sandpaper
  • Drop cloth 
  • Gloves
  • Mask & Goggles
  • Spray paint primer
  • 3 colors of spray paint - I chose Gloss White, Blue, and Navy Blue.
  • Spray clear coat - gloss
  • Optional: Sawhorse, Electric Sander & Pads, Spray Paint Trigger

Friday, March 23, 2012

Pinterest Picks: Succulent Furniture

We might as well admit it.  Those of us who use Pinterest are familiar with those times that you just get completely lost and blown away by the things you see there, that you just never thought of. I know I do anyway!  If you don't have Pinterest yet, I can invite you. People say, what is Pinterest, I don't get it? And honestly the best analogy I can think of, is, you know how we used to cut out things from magazines that we liked?  I had so many ideas cut out from magazines that I had to keep them in binders - all with the intentions of "saving" an idea that I would one day, hopefully, tackle.  Well Pinterest is just that. Saving ideas but one step further, categorizing them into easily accessible "boards" and sharing them with each other - without hogging shelfspace.  So I thought, what better way to add to our little addiction than to have a Pinterest Picks section now and then? And here we are.

I really should have named this post "Plant Furniture" or "Planters you can also use as a table" but I didn't.  The succulent table has had me so captivated, that it won for title of this post. I can't wait to try one of these, or it's siblings, when I finally get to make my mid-century modern patio a reality. Check out my Pinterest Picks, if you please:
 Can you believe that table? That's the one that started all this, that's the culprit, right there! I'm in love with that table. I can't decide if I would rather put succulents or herbs in there, or what the hey, lettuce and strawberries?  The person who made this was nice enough to do an entire tutorial on it and it's all over Pinterest. For good reason! Click here to hop over to Pinterest and check it out.  Re-pin that, it's fantastic!
This here is another take on that table.  But if you look closely the edges are open. That's a nice touch! Click here to dash over and re-pin that beauty.  Click again once in pinterest to be automatically redirected to it's source site. That's what I LOVE about Pinterest, it's like visual bookmarks. Honestly, have you ever heard anyone say they don't love it?
Here's a clever one - a coffee table! In my opinion all the outdoor furniture needs a strip of plants in the middle. It's a way for the table to say, hey - I love the outdoors, it's where I belong!  Wait a minute, did you notice that bench? That's no ordinary bench it's a vintage metal slider!  I would love to find one of those, they're gorgeous! Here's the pin' link.
Just in case tables weren't enough for you, fear not - the succulent treatment knows no bounds.  Look at that dresser! Normally a piece like that outside would make me sad, but once you throw a plant in it I'm all for it. Click here for it's pin.
Aaaw, here's a personal favorite. The Cinder Block planter wall. I have very serious plans to do this one in the next year or so of my life (ya like that time frame? I don't like pressure).  I think it looks really modern, it's fairly simple, and would be excellent for seasonal herbs and leafy greens - while saving space! Link!
Yes, this isn't a table or piece of furniture but I still thought it was delightful.  When something is easy but really makes an impact, you have to love it. Succulent Brick Planter Tea Lights, summer bbq anyone?  Line 'em up and you dont' have to cut a hole in your table! See? I made it relate to furniture somehow...

Hope you enjoyed my Pinterest picks, it's perfect for a Friday because pinning is the perfect thing to do when you just don't wanna work.  Do you have some clever planter meets furniture ideas? Do tell! Have a great weekend!

Thursday, March 22, 2012

DIY: Modern Vases

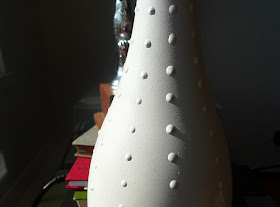
More and more I see solid colored ceramic textured vases and I love 'em.  I have quite a few myself, but the bigger ones come packing a heavier price tag.  I was looking up ideas to mock this look using recycled materials when I stumbled upon a fantastic tutorial from Redbook Magazine.  It's so simple, and can be done in no time at all! Party coming up needs vases? Just save those wine bottles my friend.  Here's the finished product:
 
Aren't these great? I keep a pretty colorful house, and let me be the first to say that a bright pop of white in the accessories department really adds a lot to a room.  These are just my style and my budget.  Head over to Redbook Magazine for the full tutorial - it's as easy as clean, puff paint, and spray. 

Along the same lines - here are a few other projects I scrounged up from the interweb.  Cans with puff paint, plastic pots with puff paint. They look great after. Clay pots would look great too! Here are two from the blog, Changing My Destiny:
If you do go with something plastic, be sure to grab a spray paint that says it will adhere to plastic.  This way it won't flake. If your color doesn't come in such a paint, just grab plastic primer. Then you can paint your color on after!
The herb can tutorial can be found here, and the pot tutorial here. Both from the same great blog! Looks like there are a lot of fun projects there.

Start collecting those fun shaped bottles, this is the perfect Saturday  morning project - and you'll be done by lunch!  Thanks for reading and have a great one!

Tuesday, March 20, 2012

Triple Layer Cut Canvas

A short while back, I showed you my new found love project - cut canvas.  Well now I love them even more.  After that post, my sister and I were talking about them, and she mentioned she'd love some for a wall in her house. I started telling her about some variation ideas I had for them and she was all for it.  Her birthday was right around the corner so I thought, perfect! So, with the good feedback, I set off and tried a little experiment in layering.  Let me show you first before I ramble on about 'em.  Warning: I made a huge mistake in not taking progress pics (again!) - but luckily my mom is a photography queen and finding pics from the birthday party was a piece of cake.  (Ha! Get it? Cake?! So cheesy.)  First up, is the finished product in it's handmade frame on a dark grey wall:
 Next against a lighter wall:
 Here is my one good progress picture, I kind of like the all white on red thing going here:
 I love how this project came out and plan to do so many more! My thumbs on the other hand, are begging me not to! I'm not going to lie, the results are worth it, but using an exacto knife for this many cuts, three times... is really a workout on the digits.  You have to push a big harder too to get through the canvas. It was SO worth it though. Here's the canvas at the party, look at my beautiful gift wrapping behind it.  Yep - plastic trash bag, what choice did I have? It was raining!
 Now the hard part will be deciding which wall to put it on in their house.  Here it is on her beautiful blue wall ( I LOVE that color, don't you?)
 and on the darker green wall:
Which wall do you think is best? Cast your vote in the comments section!  I'm so happy she liked it, and that it turned out like it did in my head.  I'm glad I got to try out the idea! I have a few plans & changes for the next one, I learned a lot this round.

If you are planning on trying your hand at this, let me pass along a few tips and tricks that I figured out:
  • Draw and plan out your design on the backside.  This will help keep things lined up in the finished product.  Since you won't have all 3 stacked as you work, it takes a lot of planning to make sure everything lines up.  
  • Stack & hold up to the light.  I can't tell you how many times I stacked them up between cuts and held them up to a bright bulb.  This let me see where things were actually lining up.
  • Paint the back of your canvas in mod podge to help keep it stiff during cutting and in the long run.
  • Hairspray? I didn't use it, but I wondered if it might also help it stay stiff?
  • No islands or peninsulas! When you're cutting, be sure your design doesn't leave any "islands" - because obviously there is nothing left to hold them up.  Peninsulas would be long hanging strands, or peninsulas, of canvas that aren't connected to another side.  These are risky because they will likely curl as it gets older.
  • Book press after painting. 
  • Stretch your thumbs!
I'll do a whole tutorial on these soon, because I just realized that the above list could go on and on! So I promise I'll do a tutorial!

So what do you think? Have a great week!

Friday, March 16, 2012

Spotlight: Wild Wallpaper

I never imagined myself to be that person, peeling old wallpaper and applying new. The whole process seems so intimidating that I'd rather just grab a roller and a can of paint and just cover everything up.  Then everything changed one day, when a post came rolling into my inbox from the blog SFgirlbybay, featuring Catalina Estrada's new wallpaper designs. They are, to say the least, amazing. Check these bold and beautiful designs out:


I love these designs! What can I say really, they speak for themselves.  I love how playful and fun they are, and the colors are gorgeous. Plus flowers and birds get me every time. I could see myself sitting at a desk, staring at the details instead of working. Sounds like my kind of productivity! These prints are serious works of art, I can only imagine how much work went into this.  The scale alone is impressive, these are huge! You could also work this into a wide range of styles, since they are so wild I think that keeps it non specific.

I'm not entirely convinced that I can commit to wallpaper however, because I like to be able to change the design of a room on a whim.  Yet there must be a way I can still bring these into a room. I'm considering using the wall paper on extra large canvases or boards.  That way I could hang the design, and move it as desired.  That's just me though, I think I'm just scared of the process that is wallpapering, which is so not a word!  Check out more of Catalina's designs on her site, and check out the original post that I read on this wall paper here: on SFgirlbybay.  Have a great weekend!

Wednesday, March 14, 2012

Spotlight: Kerri's Desk

Recently a new friend on Etsy, Kerri, had written me with some questions about refinishing furniture. I'm always willing to help, and she liked the Teal & Cozumel Table in my shop.  I gave her as much info as I could think helpful, and she took to her desk. Here's a before shot:
She stripped it down, made repairs, and did a really wonderful and thorough job.  Here's after picture:
 What beautiful and bold color! Way to go Kerri - you did a fantastic make over here.  Head over to her blog, Domestic Goddess to read more about the entire process.  Thanks for sharing Kerri!

Monday, March 12, 2012

Spotlight: Hanging Glass Globe Display

I love the emergence of these glass globes I see everywhere! They are adorable, and can be used in SO many different ways.  Affordable too! One of my most favorite sites in the whole world, Design Sponge, featured a really great DIY project recently that uses a cluster of these glass bubbles.  Take a look at the end result:
Pin It 
Beautiful! Click here to hop over to design sponge and read their detailed tutorial on how to create this beautiful display.  Wouldn't it look great if you added some recessed lighting in that board as well? Shiny tiny bubbles... now we're talkin'.

Or maybe a hanging display of... terrariums!  Hanging glass ball terrariums!  Wow - these things had me at hello. I LOVE terrariums - I've wanted to make one out of those huge wine jugs you see at the liquor store,  but I've never gotten around to needing several gallons of wine all at once. Plus, how would I manage to make a terrarium after that?  Maybe I should throw a party!  In the meantime, these glass ball terrariums are perfect.  They are big enough to hold a few cute plants, and small enough to not dominate the room. They make great  accents that would go nicely in any (or every) room. I've pulled up a few examples, in case you haven't seen them around.  Here's one from Butter Home:
Here's two I found on etsy stalker, from Still Lily:
If plants aren't your thing, here's another cute idea: sand and rocks. I also thought of candles, but then a friend of mine said he used candles in them, and they broke one by one, sadly crashing to the ground. Yikes! They're affordable but not that affordable.  So, I guess no candles...
These are from Mr. Sparrow, and have a less manicured look, which is also very nice.
I can't wait to get my hands on some of these. I'd love to have a set hanging around the house - I LOVE plants. These seem to be readily available online, and in a lot of local stores.  Get creative and get our your green thumb.  If you don't have a green thumb, this is the perfect way to start! Terrariums are pretty easy, and if you get "air plants" they pretty much take care of themselves.  Worse case scenario, ditch the plants for a mini beach hanging in your house.  Have a great Monday - is that an oxymoron?  :) Send some pictures if you try this at home!

Saturday, March 10, 2012

Indio & Mid Centry Modern

Recently we took a trip down to Indio, California.  Every time I told someone where we were going they'd say "India?!?" in total shock.  While India sounds really fun, it's hardly a 4 day weekend kind of trip! Indio is just outside of Palm Springs, and most people will probably know it for it's crazy music festival in April, called Coachella.  We went to escape the cold weather of Northern California, get some sunshine, swimming and bbq in. We had a blast!

One of my favorite things about visiting the Indio/Palm Springs area is all the amazing architecture you can find. It's a mid century modern paradise, and totally reignited my love for the period.  I think we're pretty much set that in our next house (more on THAT later!) we will go with a mega mid century modern theme - and you know I'll document the whole thing for you to watch!

So I combined my refound love with my newfound love (pinterest) and came up with a lovely board of ideas, that I'm sure will be three times as big when I'm through.  If you're on pinterest already, click here to head to the board and check it out, and you can follow me there too!  For those not yet on pinterest, here's a snapshot:

And for a little extra eye candy from Palm Springs, take a look at this gorgeous hotel we passed by:
I'm in love! I think it's Holiday Inn owned (surprising!) and it's called The Saguro hotel in Palm Springs.  Here's a link if you want to check more amazing photos.  That first photo was our first view of the place, and they've done something I always wondered why other cinder block hotels didn't do. Paint those patios in different colors and shades! So much better than a massive grey building. What I love most about this hotel is the clean modern lines without having to go entirely minimalist and colorless. Very bright, very fun, and still very simple! Color will definitely be included in our MCM decor in the next house. If I lived in Palm Springs I'd probably take it to this level, no joke here people!  Hope everyone is having a great weekend, enjoy!