Materials:
- A sturdy stool, or other interesting furniture
- Electric Sander
- Medium & Fine Sanding pads
- Sanding Sponge
- Tape
- Masking paper (newspaper works too, but these rolls are handy dandy)
- Spray paints: Primer, 3 colors, Clear Seal (I'm using high gloss baby!)
- Dropcloth (old sheets work too, and they are almost free at the goodwill)
- Cute stuff to put on top of it after.
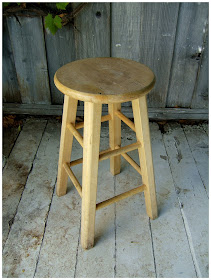
Get your stool, or chair, or whatever it is you're going to be color blocking. Here's my little darling wonder:
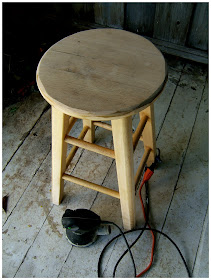
Yawn... bring a book! This stool wasn't even asking for the spotlight. Oh well, let's change that. Gather up your stuff:
Look at all that stuff, fun stuff! So, I've said it before, I'll say it again - invest the $30 bucks into a sander. Doesn't have to be an expensive one, but it's just so much easier than sanding by hand. Sure, that sounds lazy, but if we have the tools we should use them, right? Alright, it's a little lazy, oh well...at least I'm honest.Ok - start sanding, and since we are going to be painting this, there's no need to remove the original coat all the way. Just get it smooth and scratched up so our paint has something to hang onto.
Ok I'm ready. Notice my edges up there? I did a lil something special....
Beveled, faceted, chiseled... whatever you call it, I'm obsessed with it. You could say it's my signature, I do it all the time! I first talked about it in the Chiseled Chair tutorial. I wanted something angular to add interest to the chair. To get this look, just run your sander on high away from the chair, then when it's nice and fast, just press the sander into a curved edge and hold. Lift up, admire your work, and repeat 50 times or so.
Next up, add a coat of primer:
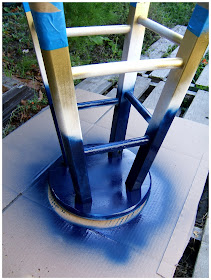
You'll notice I don't have a drop cloth here, and you probably thought I messed up. But no, I meant to do that. Whenever I paint with white on this white deck surface I have, I let the overspray add more coats to my surface. Don't wanna waste it, right? Once you are happy with a good primer coat, let's do the feet. Flip your stool over, grab your gold spray paint (or whatever color) and start spraying thin coats:
Remember the rule of thumb with spray paint, is many thin coats are better than a thick globby one. Also, recoat within one hour or after 24 hours. That's surprisingly important. Keep in mind how far up you want this first color to go, and spray a good 2-3 inches past that point. Doesn't need to be perfect, just make sure you get past it.
Before we can begin the other colors, we need to protect our golden footsies here. I chose to keep about 6" of my feet gold. Measure up, and tape off. Remember to add the tape ABOVE the 6", so you don't accidentally make it smaller than you meant. That's our cat on the right there, Rubin, he always likes to lend a helping
Press your tape nice & firm, then use your masking paper to cover the feet:
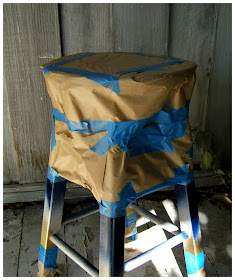
I wrapped the paper around the leg, taped it to the previous tape zone, and then crumpled up the remainder & taped. Imagine you are gift wrapping something irregular, like a bottle. Man, I can't stand wrapping bottles! What's the point anyway, everyone knows it's a bottle... anyway... off topic :)
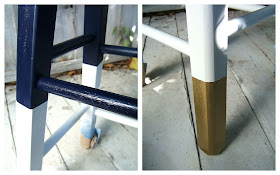
There's my stool, all taped up! Here you may think, "all right, I get it, paint the next color, bla bla bla" No. Don't do that yet. Here's a super important and helpful tip for getting clean lines. Tape isn't always a perfect seal, so we are going to paint over our taped area in gold (or whatever color you chose). Why? This way, if there ARE any leaks, it will leak a matching color. See how clever? This really helps!
That's my little before and after collage, just spray over the tape line. NOW you can start up in the next color. I chose to do the top of my stool first. You can do this in any order, it more comes down to what you think will be easier to tape off. I thought taping off the top would be easier down the line than taping off all those legs & spindles. Here I am, painting away with my blue:
I like to do it upside down first, so I dont have to mess up the top by flipping it later. Flip & repeat:
Sanding between coats is a great way to get rid of weird little spray
paint bumps, and other unexpected textures. This also helps a lot in the adhesion department. Here's where the electric sander is a no-go, it will just take the paint right off. We just want a gentle sanding... steel wool works too.
Once you are happy with your coats, let it dry a full 24 hours, and then let's start taping downwards. I chose to let the blue stay all the way down to the lowest spindle there:
That also made it so I didn't have to measure, since the lower peg there hits all 4 legs. I just taped right under it! Now the fun begins, play with your paper, and just start wrapping & taping: That part isn't so hard, it's after that that's annoying. I just laid paper wherever I could, to cover all my blue, but keeping a clean line where the top color (blue for me) will meet your middle color (white!):
Done! Remember to spray your newly taped areas with the same color before moving on. Then, move on:
Layer by layer, nice and thin until you are happy. Use your sanding sponge for any weird issues, it's better to catch them now while everything is taped up. Don't forget to flip the stool to paint the underside! Once you're happy and it's dry, it's Christmas morning time - unwrap that beauty!
Carefully remove the tape, I like to pull it completely backwards, like peeling a banana I guess.
Clean lines! Yes, mission accomplished. If you have any areas that need a touch up, I suggest spraying some of your paint into a dish or a little ziploc bag, and using a paint brush to quickly dabble those areas. Unless you have matching paint that isn't in a spray can, then by all means that's easier! Make sure it's no longer tacky or sticky, then begin your clear coat spray.
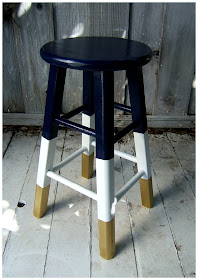
See the angles in the stool seat? Man, I love those! I don't' know why I chose this color combo, like I said, I've been feeling the gold lately. Having the white in the middle adds some fun contrast too. Here's my finished stool pretending to be a plant stand:
There you have it! You just color blocked a stool, or whatever you chose to do. What did you think? Wonderful? Terrible? I'm sure yours came out great. If you did do this, share the pictures with me so I can share with the rest! Email me here. Here's another side by side, I just love before & afters:
Thanks for tuning in for another class in the School of Restoration, I hope you enjoyed it & I hope I wrote it easy to understand! Feel free to pin it up on Pinterest so you can get to it later too, I know how the to-do lists tend to pile up!
If you missed any of the other classes you can check them out by clicking here. Have a fantastic day, a fun Friday, and a wonderful weekend ahead. Tell me, what projects do you have on the horizon?










Hubba Hubba! What a great color combo. Thank you for the inspiration.
ReplyDeleteWOW! This stool looks amazing! I love that you used three colours, and the colours you chose look fantastic!
ReplyDeleteVisiting from Primitive & Proper
thanks! :D :D
Deletei love this! my favorite color combo, too- navy and gold! :) the gold feet totally complete it.
ReplyDeletethank you! Yea I wasn't sure what colors I'd use for the top, but I KNEW I had to do gold feet - no discussion! Haha.
DeleteI too have these stools, great redo!
ReplyDeleteGorgeous job and great tutorial too!! Well done!
ReplyDeleteThanks so much! Glad you liked it :D
DeleteFabulous look! I love this!!!
ReplyDeleteThanks so much Anne!
DeleteLooks great! I did a bench like this, but wish I had found your tutorial first! Getting the lines straight on the middle section was quite a task. Party at my place if you feel like linking up! jedandivy.blogspot.com
ReplyDeleteOh dear, I think I'm late to the partaaay, I'll try to go find it. Hehe. Thanks for the comment! Yea, that painting OVER the tape thing helps so much. It's so heartbreaking to pull tape off thinking "hooray.... clean lines" only to see it's leaked all over the place. No matter how great the tape, I always take this extra precaution now!
DeleteFeaturing this today! http://jedandivy.blogspot.com/2012/11/aloha-friday-link-party-13.html
DeleteLooks great, thanks for the tutorial!
ReplyDeletecasadesoria.blogspot.com
Thank you for finally linking this up to my party! i absolutely love this piece :)
ReplyDelete