Tidying up the details of the downstairs bathroom, finally! Last weekend we worked on the new wood plank ceiling, and I used a nail gun for the first time. It was a life changing experience, why did I not get one sooner?? More on that soon... let's play catch up - I'd been saying I'd show you a quick run down on the light fixture, and here it is.
Heads up, if you are planning on doing a similar, simple light fixture makeover, here is what you'll need:
- Old light fixture, cleaned up.
- Spray Paint. Two colors in my case.
I told you it was simple...
As you know - we had a fluorescent light fixture in the bathroom, that I just couldn't understand WHY it was there. If you missed it, here's a peek:
Pretty bad, and the light it gave off was the worst. If you ever want to install the most unflattering light in the world, I recommend a bare bulb fluorescent shop light. It's pretty bad. In my brain I knew I wanted something unique, so off to the thrift stores I went, and found this:
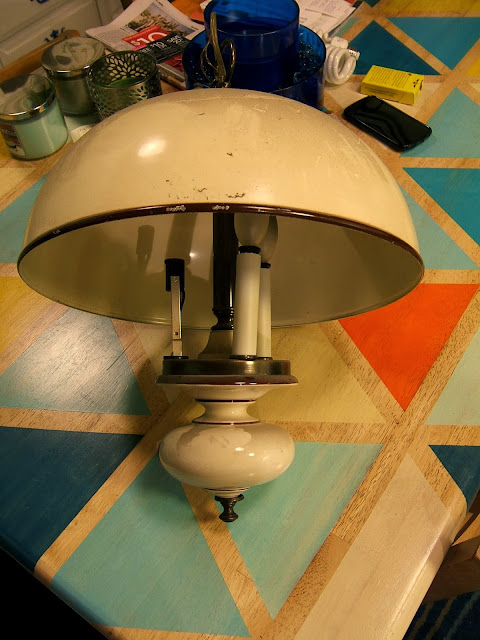
I have to admit - I didn't pick it up at first. I walked by it, then walked around thinking & kept coming back. I could see some potential, but let's face it, it's also pretty scary... but it was solid metal & porcelain, around $15, and I knew I could at least TRY spray paint. If it didn't work out, no big loss, right? I got impatient when I got home that night & started dismantling:
There were no big surprises or roadblocks, so the next morning it was all systems go. If you are going to redo a light, it's important to NOT lose any parts, and as you dismantle, take note of where everything went. Do this either with tons of photos, or draw out a chart. You may think you'll remember where every washer went, but you won't. I always think I will, and I don't. So here's my parts, nice & clean:Then we have the big bell:
After a lot of brainstorming, I voted on a light that would be grey exterior, yellow interior. First up, many light coats of yellow on the interior:
That totally doesn't look yellow, but it is. Very yellow. Took about 4 thin coats, and luckily no drips. That's why you want to do THIN coats.
I decided to reassemble the "guts" portion of the light, figuring that solid yellow would make for a seamless & clean look. Though I did keep out the very last brass fastener, to remain brass. (For the bottom).
So here I have it assembled, tape to protect the wires, and tape inside the sockets to protect our connections.
I decided to lay it on it's side & tackle the underside first:
After doing as much as I could from these angles, I hung the "guts" from my sawhorse and spray painted my last few coats from above. I didn't take a photo, oopsy. You get the idea!
Note: See how at the end (far right) there is no finishing piece of hardware? That's the one I kept out.
While that dried, I went back to my bell (which was now dry) and added a few pieces of tape to the inside top (to cover the hole from within) and then painted the bell grey. I apologize for the lack of pictures, I could have sworn I took some. These are the consequences of balancing too many projects!
I was starting to really work against the light here, as shown in my impatient cell phone night photo:
Normal people allow their things to dry for 24 hours, but I needed to see it together, so I took the chance. I let it hang here for a few days, for what it's worth...Simple makeover! Two different colors of spray paint, and an afternoon of patience.
Trying it on in the bathroom, here it is in the horrible fluorescent light:
Had to do a test run...
This was unexpected, I love the pattern the bell makes on the ceiling, reminds me of a bio-hazard symbol:
So that's that! Simple. I really like the fixture now, even though it is in no way what I had in mind! But it's satisfying my yellow craving for this bathroom, and it's definitely one of a kind. What do you even call this style lamp?
Now, in these photos it's a plug in light, but the plan is to hard-wire it in so this puppy is operated on the light switch. Maybe even a dimmer switch... fancy....
OK - back to work! Have a good one.
-Jesse
Leftover things to do in the bathroom:
- Whitewashed Wood Ceiling
- Door!
Tear the place apart and patch up the damagePaint the back wall dark grey, other walls light greyGet a huge mirror & build the frame.Build Copper Pipe Towel RackBuild distressed wood mock mantle under mirrorHerringbone Peel & Stick Floor, except, no longer Herringbone.New light fixture, something fun & yellow!Paint or replace sink & stand.Tie it all together with accessories, and ferns! FERNS!


Almost done! Love it!! Love, Mom
ReplyDeleteMuchas Gracias Madre!
Deletewoozels! I gotta say your mom was right! 2 things left on your list. impressive! and it's looking sooo nice. great job. can't wait to see the finished room.
ReplyDeleteThank you so much! We are so so so close to being done!
DeleteWow! You make it sound so easy. Haha! Great design idea for your bathroom lighting. And I do agree that that fluorescent bulb was just really unflattering. Good thinking that you were able to switch it up to a gorgeous light. Now your bathroom looks so chic and classy. Great job!
ReplyDeleteShirly Patillo