

Wednesday, April 25, 2012
Redoux Visit
Hi everyone! Today I've been asked to post the ombre chair tutorial over at a friends blog, Redoux. If you haven't heard of her blog yet, head over and check it out. Karen has a lot of great furniture make overs, and always some really interesting posts. I'm happy to be guest posting on her blog today, thanks again Karen!
Thursday, April 19, 2012
Featured on: The Sentinel & The Penny Rose
I'm so excited! Recently, Christa Martin of the blog The Penny Rose, and contributor to our local newspaper, contacted me after she saw the Ombre chair post on Design*Sponge. She asked if I would be interested in doing an interview not only for her blog, but for the paper. I was so flattered, and still am! She wrote a nice article about me and my work, and I can't thank her enough. Here are some screen shots:

 Fun! This is the first time I've had my furniture in the paper. Hop over to the Santa Cruz Sentinel to read the full article here, and for the full interview head over to The Penny Rose, Christa Martin's blog. A big thank you to everyone who has been sharing my work, be it on Facebook, pinterest, etc. I really appreciate it, have a wonderful day!

Post a Comment
Wednesday, April 18, 2012
Hanging Perfect Pictures
Happy Wednesday! Even though it's the dead center of the work week, Wednesday is at least the height of it.. it's all a downhill slide into the weekend from here folks! Today's post is short n' sweet. For years I've struggled with lining pictures up exactly where I want them on walls (Doesn't that sound like a cheesy infomercial? Ha!). I've never been able to line up picture frames with each other perfectly, so I usually opt for the random arrangement. Until now! I stumbled across this little gem of a tip today, and had to share it.


Post a Comment
Monday, April 16, 2012
Spotlight: DIY Vintage Mason Jars
Today's spotlight is a tutorial you could totally tackle in an afternoon. I was rummaging through the posts over at The Divine Minimalist, and came across a DIY post that I can't believe I missed it when they posted. I absolutely love these mason jars:


Post a Comment
Friday, April 13, 2012
Pinterest Picks
It's Friday! It feels like I have been waiting for this day all week, I'm sure everyone has. Spring is officially here & in gear in California, the flowers are blooming left and right, the garden party invitations are showing up, it's time to go outside! I love bringing flowers to people's homes, and I love having fresh flowers in our house as much as possible - but I don't have a ton of vases here people! I mean, this is a little house..
Today's pinterest picks showcase some really great ways to turn your empty beer & wine bottles into some great vases & similar. What could be better, flowers AND recycling?! I don't know if someone has coined this phrase yet, but here goes: direct recycling - ha! By this I mean, where you can get another good use out of something without having to send it off to the recycling plant, to be melted and recast, expending all that extra energy. And I'm not talking egg carton arts & crafts here folks, these creations are CUTE!
Alright enough chit chat, first up - the greatest gift budweiser has ever given us, the beautiful cobalt blue bottles of "bud light platinum":

I know you've seen 'em! They are certainly an eye catcher. These bottles are good enough to recycle AS IS! No paint necessary with a color like that. For a little more disguise, you could cut the bottles like in this next pin:

Nice...! I have yet to use a bottle cutter, but a friend of mine that is making some votive candle holders from bottles told me that it's pretty easy. If you don't want to get into the sharp world of cutting bottles, how about we just wrap those puppies up in colorful string:

There we go! Quaint. Just think, it can be an activity. You could drink the beer, and wrap your empties, all at the same time.... OK maybe not. I'm sure 2 or 3 bottles in, that the vases would take on an entirely different look! Up next is my personal favorite, the pin that started my search for the rest of these, and most likely the one I'll do soon: Behold... the six-pack vase:

Woot! This is perfect! OK I know pictured is a 4 pack, but I'm more likely to have a 6-pack around. Just think, it has it's own carrying case... it has flowers.. it has everything! I imagine myself walking into a party, a six pack of flowers in one hand, a six pack of beverages in the other. These are ready to disperse around the house too! Plus, I can use up the last bit o spray paint left in all those cans.
Ok, we've favored beer this far, let's not forget the ever-versatile wine bottle. I was in a restaurant recently where they used clear wine bottles full of ice, water, and lemons as a carafe on each table. I thought, that's so simple, it's brilliant! Imagine getting ice into those things though...yikes.... First in the wine bottle spotlight, you guessed it - vases:

Look at those angled cuts! How in the world did they do that. Mine would probably come out with a flat cut. Or not cut at all, but I still love these. It only gets better in the vase department, wine JUG vases:

I have had a secret crush on wine jug vases for years, and I'm finally admitting it. Here, publicly. I just can never bring myself to buy that huge thing! One of these days I'm going to have to muster up the courage, because I can't wait any longer. I love 'em! I did a post a while back on glamming these up a bit, but they honestly look great as-is. Check out this lamp:

Um, two please! Now that's awesome. I always see those bottle lamp kits in the hardware store, but imagined them on wine bottles. Which seemed small to me. I never thought about the wine JUG! Maybe wrap that cord up like in this DIY post earlier this week. One day my house is gonna be full of these things. Vases, lamps, whatever. I'll have to throw some mega party first though, because that is seriously a lot of wine!
Dang, this has been quite the post... If you've made it this far, hang in there with me - one more! Last up is this handy-dandy summary of uses for bottles, & brings a whole new set of ideas for giving a second life to these glass darlings.

I mainly noticed this one for those colorful yarn bottles there. Why yes, of course I thought of ombre! Haha, someday that fad may fade, but that day is definitely not today. While I won't get all link crazy on you, all of the ideas above can be found through an easy google search. Those cobalt blue (skyy vodka?) bottle torches there were a design sponge tutorial, and I just happen to have that link handy, here. Look at number 1 there, a bar?! Really!? I wonder how long that took to stash that many bottles. It is pretty with the light though!
Well there you have it, a use for all those bottles you keep sending out the door. Turns out recycling can be pretty darn cute. Have a wonderful weekend, keep these ideas in mind when you're cleaning up!
Today's pinterest picks showcase some really great ways to turn your empty beer & wine bottles into some great vases & similar. What could be better, flowers AND recycling?! I don't know if someone has coined this phrase yet, but here goes: direct recycling - ha! By this I mean, where you can get another good use out of something without having to send it off to the recycling plant, to be melted and recast, expending all that extra energy. And I'm not talking egg carton arts & crafts here folks, these creations are CUTE!
Alright enough chit chat, first up - the greatest gift budweiser has ever given us, the beautiful cobalt blue bottles of "bud light platinum":
I know you've seen 'em! They are certainly an eye catcher. These bottles are good enough to recycle AS IS! No paint necessary with a color like that. For a little more disguise, you could cut the bottles like in this next pin:
Nice...! I have yet to use a bottle cutter, but a friend of mine that is making some votive candle holders from bottles told me that it's pretty easy. If you don't want to get into the sharp world of cutting bottles, how about we just wrap those puppies up in colorful string:
There we go! Quaint. Just think, it can be an activity. You could drink the beer, and wrap your empties, all at the same time.... OK maybe not. I'm sure 2 or 3 bottles in, that the vases would take on an entirely different look! Up next is my personal favorite, the pin that started my search for the rest of these, and most likely the one I'll do soon: Behold... the six-pack vase:
Woot! This is perfect! OK I know pictured is a 4 pack, but I'm more likely to have a 6-pack around. Just think, it has it's own carrying case... it has flowers.. it has everything! I imagine myself walking into a party, a six pack of flowers in one hand, a six pack of beverages in the other. These are ready to disperse around the house too! Plus, I can use up the last bit o spray paint left in all those cans.
Ok, we've favored beer this far, let's not forget the ever-versatile wine bottle. I was in a restaurant recently where they used clear wine bottles full of ice, water, and lemons as a carafe on each table. I thought, that's so simple, it's brilliant! Imagine getting ice into those things though...yikes.... First in the wine bottle spotlight, you guessed it - vases:
Look at those angled cuts! How in the world did they do that. Mine would probably come out with a flat cut. Or not cut at all, but I still love these. It only gets better in the vase department, wine JUG vases:
I have had a secret crush on wine jug vases for years, and I'm finally admitting it. Here, publicly. I just can never bring myself to buy that huge thing! One of these days I'm going to have to muster up the courage, because I can't wait any longer. I love 'em! I did a post a while back on glamming these up a bit, but they honestly look great as-is. Check out this lamp:
Um, two please! Now that's awesome. I always see those bottle lamp kits in the hardware store, but imagined them on wine bottles. Which seemed small to me. I never thought about the wine JUG! Maybe wrap that cord up like in this DIY post earlier this week. One day my house is gonna be full of these things. Vases, lamps, whatever. I'll have to throw some mega party first though, because that is seriously a lot of wine!
Dang, this has been quite the post... If you've made it this far, hang in there with me - one more! Last up is this handy-dandy summary of uses for bottles, & brings a whole new set of ideas for giving a second life to these glass darlings.
I mainly noticed this one for those colorful yarn bottles there. Why yes, of course I thought of ombre! Haha, someday that fad may fade, but that day is definitely not today. While I won't get all link crazy on you, all of the ideas above can be found through an easy google search. Those cobalt blue (skyy vodka?) bottle torches there were a design sponge tutorial, and I just happen to have that link handy, here. Look at number 1 there, a bar?! Really!? I wonder how long that took to stash that many bottles. It is pretty with the light though!
Well there you have it, a use for all those bottles you keep sending out the door. Turns out recycling can be pretty darn cute. Have a wonderful weekend, keep these ideas in mind when you're cleaning up!
Post a Comment
Thursday, April 12, 2012
Party Time: DIY Surprise Lantern
Another Party Time post here, if you missed the first one, you can find it here. I came across such a great tutorial for a surprise lantern, I knew I had to share it ASAP. I was actually browsing different uses for paper rice lanterns, when this beauty caught my eye:

 YEP! That's confetti! How fun! When I was growing up, there was this graduation party we were throwing, and I was racking my brain for a way to have confetti "bombs" around. Of course I had yet to discover paper lanterns, maybe things would have been different! This is such a great idea, and it comes from the wonderful party planner over at Oh Happy Day.
 This is something that you could easily tackle, and add a lot of fun & a huge mess to a party. What's a party without a huge mess, right? They are reusable too! Head over to the tutorial to see the clever "plug" design. The only thing I can think to add to the tutorial, is to make sure you hang it from a fairly sturdy hook, so only the plug pulls and not the entire ball. The house I live in is pretty old, and I swear the walls are made out of brittle chalk. It's a real challenge to keep a hook in the ceiling!
When I first saw them I assumed they were being used as a light, which would be a really cool variation on these. Minus the confetti of course, that's probably a crazy fire hazard! But a rice lamp with a great fringe on the outside and a light on the inside would look fantastic. Even a white ball, with white fringe, and a colored light bulb would give almost a fur look. The rice paper ball certainly has a lot of uses!
Alright party people, let's get to work on these - it's Party Time!

At first I thought, "oh that's neat, some tissue paper fringe" but that quickly became "hey wait a minute!"


When I first saw them I assumed they were being used as a light, which would be a really cool variation on these. Minus the confetti of course, that's probably a crazy fire hazard! But a rice lamp with a great fringe on the outside and a light on the inside would look fantastic. Even a white ball, with white fringe, and a colored light bulb would give almost a fur look. The rice paper ball certainly has a lot of uses!
Alright party people, let's get to work on these - it's Party Time!
Post a Comment
Tuesday, April 10, 2012
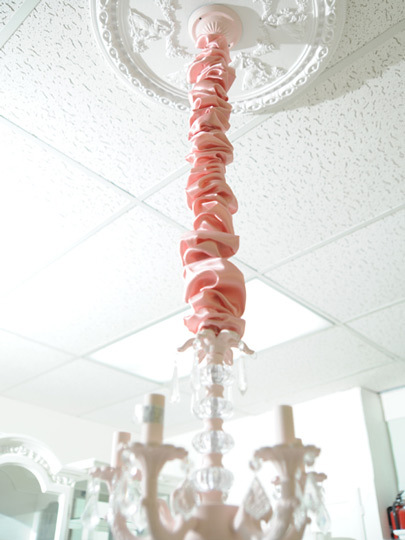
DIY: Braided Extrension Cords
Extension cords, lamp cords, speaker wires....ugh! Cords are the #1 eyesore and prove to be the most difficult to conceal. But you know what? What if we just stop trying to hide them, and just make them attractive? There are a lot of great ideas out there to get this job done. Especially for situations where you can't hide the cord at ALL because it's holding a lamp from the ceiling. In the past, chains have always done a decent job of blending cords in, as have home-made fabric covers like this one from A Cup of Glee:
 In my home, I often cluster hanging lamps together in groups of 3. Which has tripled my cord problem! Thus far, simply braiding the cords has been my method of tackling them. I like how it comes out, especially the simple white hemma cord sets from ikea:
 But my new favorite, and the DIY for today, is this awesome yarn wrapped & braided extension cord tutorial from Design*Sponge (of-course!):

 Sooo awesome! This turns ugly cords into large, attractive - centerpieces almost. Definitely a focal point and conversation starter, and depending on your colors can be a great accent in a room. The tutorial on design sponge is for an extension cord, and you'll notice there are female ends at both sides. I asked why, and she said she needed a splitter at the wall, where it plugs in. Genius! This way when you need power in the room, just pull out this beautiful cord. It would also look great coiled up under a shelf when not in use. In my opinion, the color combo above, pink, red & orange, would go great in any room!
 Surprisingly few materials are needed on this one, the biggest one being time! Head over to design sponge for the full tutorial, I think you'll be pleasantly surprised, inspired, and hopefully think about your cordage in a whole new light. I can't wait to try this one myself. Enjoy!


Post a Comment
Wednesday, April 4, 2012
Featured on: Design*Sponge
I'm so excited! Kate over at Design Sponge saw my ombre chair and wanted to feature the full tutorial I did for The Divine Minimalist. It's part of Design Sponge's DIY Wednesday, and I couldn't be more happy. So far the people who have tried the fade job says it really IS fun - I'm glad I'm not the only one that enjoyed it! If you are looking for a rewarding project, try this out. Head over to Design Sponge to see the full post. Have a great one!


Post a Comment
Subscribe to:
Posts (Atom)