Google+ Nine Red: October 2013

Thursday, October 24, 2013

Bringing in the Barn Quilt

You may have noticed that I have a serious love of triangles, OK in reality.. I love all things geometric (Like our old coffee table, which is up for grabs btw).  Luckily Ralph does too, or at least seems to tolerate my little obsession. So when I saw these barn quilts I got all kinds of ideas. First of all, have you ever heard of a barn quilt? Well, I hadn't - but apparently people with barns (lucky!) sometimes like to paint a nice, huge quilt square on the side.  Look at this beauty:
Source: 2Modern
Source: 2Modern
I, not having a barn & not living near any (that I know of) have NEVER seen this, but I think it's amazing. What a fun idea! I love that pattern, but I need a little help here. Does anyone know the specific name for that pattern? I know it's used in quilts all the time.  I love how it's triangular, but the triangles together resemble what I can only describe as a sort of moravian star, which I pulled from the only other non-quilt related time I've seen this pattern. In origami, we have these moravian stars:
**Update! Special thanks to Paul who informed me that this is Aunt Eliza's Star, now we know!**
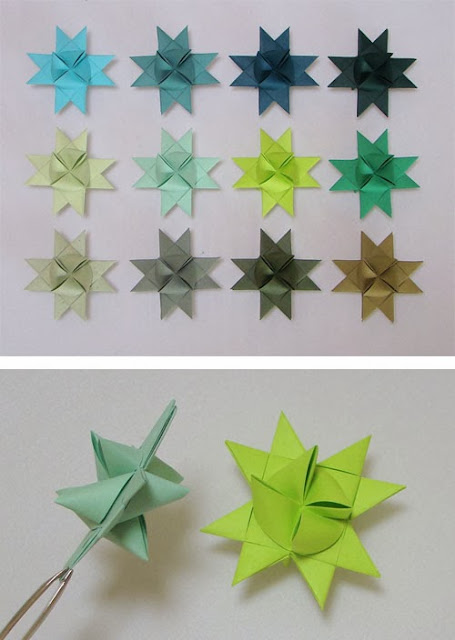
Source: Origami Resource Center
Which are pretty darn close to their non 3-D buddy on the barn there.  So anyway, I immediately thought, I've GOT to do a giant wall installation of this pattern, how cool would that be?! I've been mega in love with triangle pattern walls like this one:
Source: Sketch42
Which is actually a wall paper.  In fact, I've  been wondering for years now how to easily pull off painting a triangle pattern like this without tape.  Tape leaves gaps, which I think also looks wonderful, but if you're trying to pull off the close triangle pattern? Yikes... I can only guess that something like stencils would come in handy.

After googling an assortment of words to see if anyone has done similar with quilt patterns on their walls, the closest I came to was this next one:
Source: Design Milk
Gorgeous, right? And guess what, they are wall decals! Well that solves the taping issue...I've seen many fabric inspired wall patterns, such as these beautiful hounds-tooth patterned walls, which are totally stencils:
Source: Etsy
That stencil makes a bit more sense as a stencil, because there is plenty of room for "bridges" in the stencil, which are the parts that hold the design together.  Here's another really pretty hounds-tooth wall:
Source: East Coast Creative
I like the idea of looking to classic fabric patterns for inspiration on wall treatments.  Still, can't find my star pattern (Aunt Eliza's Star, so happy to know now!) replicated inside a house (yet!) so I may have to pioneer this one on my own. Here's the closest I could find:
Source: Centennial Farmhouse
Those are pretty neat too, but I'm craving large scale.  So I really want to figure this out! What do you guys think? I'd love to paint a triangle pattern on the walls without tape gaps, here are my ideas for trying to tackle this design dilemma:

  • Draw the triangle pattern & freehand the paint. Problem? Wiggly freehand lines...may be a neat effect though.
  • Draw the pattern and tape each triangle one by one. Could take forever? Definitely will get the clean lines.
  • Find a triangle stencil, though I imagine it would have gaps... could be ok?
  • Wall Decals, would have to buy lots!
  • Giant Triangle Stamp?  I don't even know where to start there.. foam?
Anyway, I'm clearly obsessed with getting this thing done someday. I'm diggin' the Aunt Eliza's Star pattern and think it's high time her star joined the ranks of fabric inspired wall treatments.  I can see it now, giant barn quilts as headboards...How about you, can you see this in your house? Even a subtle design of two similar colors would add some fun detail to a wall.  Like grey & white.  Or, is the look ridiculous & I should drink less coffee & just move on......?  My caffeinated heart says go for it...

Hey tomorrow is Friday, finally! I like that.

-Jesse

Is the way people spell "grey" (or "gray") a preference like the tomato/tomato debate?


Post a Comment

Tuesday, October 22, 2013

Rain Chain Round Up

Remember our crazy floods last year? Yea, the rains can get pretty heavy here.  And most the house didn't have rain gutters, so we've been adding some ourselves. And, we finished! But... just the gutters. Now we have to do the downspouts, and I've always wanted a rain chain. The problem though, is which one? Do we buy one or make one? Well due to the shape of our roof, it looks like in total we'll need about 5 downspouts anyway...  so we'll get to have an assortment.  I figured it's a great time for anyone considering a rain chain to get the ball rolling too. Rain is right around the corner (hopefully anyway, it's dry out here!). Today, I've rounded up some of my favorite ideas, a here we go!

My initial thoughts go towards DIY projects, just to see how easy or hard they may be, and how the cost compares.  I've seen people use just plain old chains, like this:
Source: This Old House
But I wonder about the weight against the gutter.  Usually the chains are lightweight and hang from the downspout, so for a chain like this we'd have to rig a bracket in there. Still, I bet they rust beautifully! I guess you could use lighter weight chain too....

Here's another DIY chain that uses simple metal rings:
Source: Blue Living Project & Michelle Kaufmann
There's a great video on that site too (click the source link below the photo).  I watched it, and they talk about connecting simple metal ring clasps or shower curtain rings. I instantly thought, "OK - shower curtain rings are like $8 for 12, no way is this affordable!" But alas, an amazon search revealed THESE, a pack of 100 for about $8.  You could easily double up at those prices, to create the same look as above. Plus they have larger 2 inch sizes! Mix & Match, riiiiight?

Then there's this beauty, which I spied forever ago on Design*Sponge... I love it:
Source: Design*Sponge
So colorful & fun! Though, I admit, I DO wonder about how well it will age, but maybe that will make it even cuter. Terra Cotta + that lightweight chain make this rain chain very inexpensive.

Here's one I found on Pinterest, that sadly, as Pins often go, doesn't have a link to the original tutorial, but it looks pretty straight forward:
Source
You can see they probably drilled holes in the bottoms of the buckets, ran the chain through each and most likely attached the buckets handle to the chain with an S-hook.  Pretty cute, and galvanized steel holds up to weather really well. So they'll  be shiny for YEARS...

Then there is also the buying it option. I love copper, I love how it turns green, and this one here is only $55 on Amazon so... one of our five may just get it:
Source: Amazon
Tulips! One thing to keep in mind, no matter which rain chain you choose, is where the water will go once it hits the ground.  A popular solution is to have the chain lead into a decorative pot or bowl, full of pebbles or decorative stones. It adds great sound to your yard, too.  Be sure there is a hole in the bottom of the pot to let the water out.

For added drainage & less erosion, dig a deep hole under the pot and fill it with gravel.  This will act as a French drain, dispersing the water back into the ground.  Or, if you're worried about water near the house, you could run a PVC pipe from the bottom of your pot, slightly underground, to an area far away from your home.

The possibilities are endless, any rain chain adds such a nice detail to your home, without very much effort. Which would you choose?  I'm leaning towards copper tulips & metal rings....

Have a great one!

-Jesse


Post a Comment

Tuesday, October 15, 2013

Spotlight: DIY Waterproof Painted Bottles

A long time ago I posted a spotlight article featuring DIY Vintage Mason Jars using just a little paint & glue. The finished look was really great, but the only drawback was you absolutely could NOT get them wet. Fine for dry decor, but that leaves fresh flowers completely out of the loop.  And if I'm going to be able to justify stockpiling cute bottles, they better have double use, right?  Well, I came across today's featured article & knew it deserved an immediate shout out.  Check out these beauties:
Source
Problem solved! These are waterproof, and while I haven't tried them myself - the comments on the original post seem to suggest that all is well.  If you're like me you probably have the urge to save every cute bottle or jar you come across, and now you have even more justification for your hoarding...
Source
Check out the full tutorial on My Design Folder, and let us all know if you try it.  It looks so easy I'm almost skeptical... this would be a great use for one of my favorite bottles, (remember these?) from a cold brewed coffee called "Chameleon" I think... the shape is adorbies.  I admit, sometimes I buy the product because of the bottle shape.. (ever seen the Rain Vodka bottle? Look out!).

Anyway, I'm back to making state patterns for the string art peeps.  I only have 47 left! Oh man...

Have a great day!
     -Jesse

Linkies: FacebookPinterestInstagramTwitterSubscribe & of course, Email me.

Post a Comment

Thursday, October 10, 2013

String Art Pattern Downloads

Happy Thursday!  I have some exciting news for the DIY'ers out there.. those who follow on my facebook page have seen that I've been working on some string art patterns.  I'm really excited to be doing these finally, it's been requested for so long! I've figured out a good system, and have tested it out over & over before putting them up for sale on etsy, instant download style.   I've loved making string art, and have been extremely fortunate to be able to make so many for many of you. However, I knew there was another crowd out there, the DIY crowd that sees something they love, & wants to make it themselves. More power to you, & here's a pattern to help you out!

Here are some sneak peaks, for obvious reasons I can't show the entire pattern, but a snippet will help you see how easy the patterns make it.  This is only the beginning...
Download the Rocket Pattern Here
I spent a lot of time hand drawing each pattern, testing it, then scanning into the computer where I clean, edit, modify and prepare it for you to use. This takes a TON of the guesswork out, (believe me, the original drawing looks nothing like this!) so all you have to do is print it, tape it down, and begin. Here's the most requested, Otis the Owl:
Download Otis the Owl Pattern Here
So cute! I've written up very detailed directions too, that of course come with the purchase of  a pattern. I will still have finished string art up for sale for those that want me to make them one, but this is a great alternative for the DIY crowd.  Head to my etsy shop and click "patterns" on the right to see what's new & available.

ALL patterns are available via instant download. That means is as soon as payment is processed, etsy "unlocks" the patterns for you to download, whether it be 3 p.m. or 3 a.m., you get your printable PDF's right away!

So far I've done the Rocket, the fighter jet, Otis the Owl & the State of California. States are a really popular one, and my goal is to make patterns for all 50... yikes! After that, maybe countries, etc. Whatever you guys ask for really. I am doing them in no particular order UNLESS you message me, comment, etc saying which ones you guys want done first. I'll bump them to the front of the line! Email me: 9redinfo@gmail.com

In other string related news, here are some of the various custom projects I've been finishing up.  This was a request for a family crest:

I finally got to use the string that has a variety of colors in it, here it is on the sea snail pattern:
Here's a HUGE map of the United States, that took me a really long time.  The person who requested this is actually using it in their SHOP as a backdrop the paint line they carry. They were so great to work with, they sent me the barn wood boards, already joined, and let me go to town.  They wanted a star over their home state, and well - here it is:
This next set was requested to be a gift to family expecting a newborn, who's name starts with a W:

A fellow etsy shop owner & friend, Allison, from Zipper8, asked if I could do a string art version of her logo, and here it is:
She sells all kinds of amazing handmade lights, her most popular being the artichoke book page lamp - which is the theme of her logo.  Check out her shop, here
This is just a handful of the many custom orders I've been working on.  Thank you all so much for the orders, you're keeping me very busy! I have some new designs coming up, and about a million new ideas, that I get to when I have a free moment. If... I have a free moment, haha. 

I also bought StringArtSupplies.com so you can get to the shop easier, it's just a forward but hey - it works.

Can you believe how chilly it's getting? It is here anyway... we set up the fireplace yesterday, and while I was a little sad that winter is coming, I was also kind of excited for cozy nights & amazing sweat pants.  How do you feel about the changing of the seasons? 

Hope something great happens to you today, 

-Jesse

Linkies: FacebookPinterestInstagramTwitterSubscribe & of course, Email me.

Post a Comment

Tuesday, October 8, 2013

Spotlight: Painting a Back Splash

This last weekend we installed rain gutters.  Came out great, there were no ups, no downs, it was pretty straight forward & unexciting.  Therefore I have nothing terribly interesting to share about that, haha.  So I decided to choose a topic that's way more fun. The Kitchen!  As we move right along with the projects in there, I started really considering tiling our back-splash.  However, the long term plan is to pretty much flip the kitchen and blast a hole in this wall behind the stove to open up a bar space to the living room:
DIY Painting Cabinets
See - behind that wall is the living room, and if it were open with a glass floating cabinet... it would really join these rooms together. Often times we totally get stuck hanging out in the kitchen, and I'd love to bridge the gap someday.  So what do you do to get a non-permanent back-splash in the mean time? You paint it!

One of my favorite blogs, Sawdust & Embryos, have shared some amazing painted back-splashes, they are so inspiring.  It's been on my to-do list forever, and once our friends Danielle & Patrick painted theirs I was able to see the results in person. And? I LOVE it. All systems go...

While I have no ideas what colors to go with yet (bright & crazy? Or keep it neutral...?) I can at least start gathering my supplies, and convincing Ralph that this needs to be on top of the to-do list.  To learn how to paint your own back-splash (or anywhere else you want a tile look) head over to Sawdust & Embryos for a fantastic tutorial. Definitely something you can do.

Here's a sneak peak:
How To: Paint your Back Splash
Can you believe that is PAINTED? Looks so awesome..professional & clean. The colors totally speak to our kitchen too, notice that? What a perfect example. I'm leaning towards this same thin, long tile, and I think I'll have to contain my excitement for bright colors and stick to neutrals. Maybe a few teals here and there.. We have plenty of fun accessories to soothe my color cravings... heh.

What do you think, will you try to paint a back-splash in your home? Special thanks to Beth & Nick of Sawdust & Embryos for the great tutorial! Wish us luck...

Oh by the way- anyone nearby want a hutch?

-Jesse

Linkies: FacebookPinterestInstagramTwitterSubscribe & of course, Email me.

Post a Comment

Thursday, October 3, 2013

River Rock Fireplace

While the kitchen has been hogging up all my brain time, string art & the rest of my life have put the progress at a standstill.  The weather has suddenly decided that yes, fall is actually here, and it's getting chilly! So other projects have taken precedence, like gutter cleaning, wall building (ugh!), and heater buying (totally caved...).  So today I want to share a quick update we gave our fireplace recently. This is a really easy, non-permanent update you can do in a weekend, and I haven't really seen it anywhere else.  Perfect for renters!
When we white-washed the fireplace I mentioned this idea, and finally one Sunday afternoon we just went for it. When I say it's easy, I mean.. really easy. The hardest part is rinsing the rocks. Which, was easy. Rocks, being naturally non-flammable, should hold up to the heat that the stove gives off.  The bricks around the stove are never really HOT in the winter, so I'm not worried.  The rocks don't go UNDER.... just around.

Here's how easily you can throw this together, you need:

  • Rocks. Your choice of style. We chose Mexican river pebbles.
  • Wood, for the border. We used 1" x 4" 
  • Stain & Poly (or use the Vinegar & Tea recipe)
  • Miter saw, or miter box, to cut 45 degree angles.
We started with our stove sitting in this brick area, which, if you look closely, is pretty beat up...
The front right corner there. Seems the last owner chopped wood (and missed..) non stop on that area, and has totally broken up the bricks. Replacement at this time wasn't in the forecast, so covering it was the next best thing.  First, a border had to be placed, since we didn't want stones all over the carpet.
Whoah, blurry photo! Ah well, you know how it goes.  All we did here was measure the area, mark that on one side of the wood, and cut at 45 degrees inward (meaning, the measurement will be on the LONG side), and set it in place.  The fit was perfect, and didn't need any securing.  If yours does, I suggest a little super strength double sided tape. That should hold it still.

Meanwhile, we washed our rocks by putting a few hand fulls in a bucket full of water, and placing them on towels in the sun after.  That took forever, but was necessary.  Look at our clever way of bringing them in, it's like a little hammock!
So that's it really, you just start spreading your rocks around.  Super complicated, huh? I know...
A large part of me wanted to stray from the original plan to stain the border, and keep it natural. But being on the floor, I figured it's better to have some protection on it. (side note, anyone know how to fix that ever growing crack in the ceiling? It's like, the drywall tape or something...)  Here's the stain:
Much better! I did the Tea & Vinegar stain technique from the antique crate post, I just love that trick. Then I coated in a semi-gloss Minwax Polycrylic, one of my favorites.
I cleaned the glass, but the inside was pretty dirty, and now in plain view. So for the summer I just adhered a little wrapping paper in there, which, of course, will NOT be there once we start using this bad boy. (duh!) You probably noticed the back isn't filled in with stones. Yep - we didn't listen to the guy at the store when he recommended an amount for this size area, and we had to go back. Boo....
But you get the idea. Isn't that neat? I've always loved rocks, especially river rocks.  Just another way to bring the outdoors in, and add a little texture in here.  It actually feels really good to walk across these, like a little massage.. ahh....
All done!  Just for fun here's what we started with, less than a year ago, before the whitewash:
Yea, so nothing terribly tricky, or tutorial worthy... pretty much just cut a frame, popped it in & filled it up. When winter comes (right around the friggin corner!) I am thinking of putting one round concrete stepping stone near the door (on the right side) so I can split kindling. Something the last owner did NOT think of. 

That's about it... 

What do you think? Before you say it - someone already asked "how on earth will you clean that?!" and someone else suggested using the vacuum with the brush attachment. Problem solved! Perfect too, because I had NOT even thought about cleaning.  Thanks guys! 

Enjoy your day, get something pumpkin-ey, because it's October, so everything is pumpkin.  Shouldn't be hard. Seriously, yesterday I saw pumpkin bagels... who knew?

-Jesse


Post a Comment

Tuesday, October 1, 2013

Flashback to October 2012

Happy October! Sometimes on the first of the month, like the first of the year, I get the urge to look back and see what was going on around here a year ago.  Luckily having a blog makes that extremely easy (click of a button!) - which is how I spent my morning caffeine session today.  Here's what I found, a year ago we were still house shopping, and apparently just putting offers on our current place.  Here's the post, but just look at this living room during the sale:
Wow... I remember thinking, how in the world will we arrange furniture in here?! Just for fun, here it is now, use the door to line things up in your brain:
Yea.. little different..

So we were still living in Santa Cruz, I still had my major workshop set up in the back, and furniture was churning out nicely... I had the Chevron night stands, which quickly found a home:
I wanted to keep those but had NO room.. plus, getting prepped for a move? I shed things like crazy.. I did get to keep this stool from the Color Block Stool Tutorial:
And some of my favorite how-to's of the time were this Origami Star Lantern, that I still haven't made, but really really want to:
Photo Credits: How About Orange & Passengers on a little spaceship
And my flat marble light fixtures.. I can't believe this was only a year ago! I'll have to do another tutorial on these, I've experimented a lot more with the process. For now, here's the original tutorial.
Or this great under-bed storage project, that I completely forgot about! I need to do this one for sure...
Photo Source
And I was grossing you all out with this pretty nasty & somewhat cruel cockroach jewelry, that actually exists...
Sources: Mapping the MarvelousBlack Chandelier
I still think that looks like Jonny Depp... haha.. you can watch the video & read more from a year ago, here.

And of course, my super cheesy pumpkin:
I hope you get the joke!

That's just a glimpse of what was going on last October.. what about you? Do you ever take a look back at a year ago to see how much has changed?  I'm always surprised to realize things that feel like a super long time ago, were only a year ago..  Kind of slows things down a little bit to remember how much has actually been crammed into just one year.

Happy October! I want chili.  Cincinnati Chili...

-Jesse


Linkies: FacebookPinterestInstagramTwitterSubscribe & of course, Email me.

Post a Comment

Related Posts Plugin for WordPress, Blogger...

Shareaholic