Hello again! Hopefully everyone had a great weekend. We were down in Indio, California, and it was around 92 degrees midday, it was fantastic. Today, my next tutorial in the "School of Restoration" series on
The Divine Minimalist was posted. Head over to their blog to check it out, or read ahead here. Enjoy!
Today's tutorial will involve mixing paint with
wood stain on a tabletop, which is a favorite look of mine. I love that
juxtaposition! We'll be sanding, taping, painting and staining - so get
you're gloves on! For my table, I chose a round table that everyone
has or has had in their house at one time, you'll see what I mean in the
"before" shot. Take a look at our finished product though:
That's
the final result of this tutorial, and I think the pattern made a huge
difference in the look of this dime-a-dozen table. Seriously dime a
dozen folks, head to your local thrift store because I'm sure you'll
find 12 for 10 cents. Just kidding, but these tables really are
plentiful. Here's a peak:
Now,
I had already taken the legs off - forgive me, I got really excited.
You can of course choose any table you want, but let me just say - the
great news about these widely available tables is that they are solid
wood, the legs come off, and boy do they ever sand well! So let's get to
work.
Materials:
- A Table
- Electric Sander with medium to fine sanding pads. (or sandpaper and a sanding block if you don't have a sander)
- Sanding Sponge, fine grit
- Masking Tape or Frog Tape
- Masking paper (or any spare paper)
- Paint Brushes
- Optional: Extra paint gallon cans (free stilts!)
- Plastic sandwich bags (for inbetween coats)
- 2 colors of paint (stripes and legs)
- Wood Stain
- An old T-shirt
- Minwax polycrylic, satin
- A weekend
To
start, let's strip this table down. My weapon of choice, is the
electric sander. I highly suggest the investment (check your area to
see if you have a used tools shop, you can save a ton o' cash...). I
started with a coarse grit, and the varnish flew right off, I was so
impressed.
Here's
a halfway sanded shot, see the difference from the varnished to the
wood? I just wanted to remove that top layer. After the course paper, I
went over it with a fine grit to get rid of any rough edges and bumps I
may have left behind. Here's the opportunity to remove any stains or
marks that the table inherited along the way. Just blend over the area
gently and watch it vanish.
Here
we are, all finished! I took my fine sand paper and went over the table
sides and legs lightly, just to rough them up enough to give the paint
something to hold onto. Since we are painting the sides and legs, I
wasn't too worried about completely removing the varnish.
I
like to do the table top last, to avoid having to put a freshly painted
tabletop upside down. So let's flip it at this point. Mask off a rough
square around the sides of the underside we are about to paint, as
shown below.
Even
though eyes will rarely see the underside of the table, I figure it's
just as easy to go ahead and keep a clean look. Now, paint the sides of
the table top base. Regarding primer, for this look - it's up to you. I
opted out (yet again) because I knew ahead of time I would be
distressing the legs. Also, by not priming, there will not be a white
undercoat showing through when we distress. This is all personal
preference, and if you like primer, go for it! It never hurts.
If you don't go with distress then primer is a great idea, as you want all the adhesion you can get.
Yes
folks, I busted out the paint sprayer for this one. You definitely do
NOT need to go out of your way and get one of these for this project,
but if you own one already - why not get your money's worth out of it?
Which is exactly what I did. A paint brush, or a can of spray paint do
the job just fine too.
Paint
your legs and your frame layer by layer until you are happy with the
finish, letting it dry between coats. If you're using a brush, tightly
wrap it up in a sandwich baggy between coats so you don't have to wash
it each time. If you would like less distress (or if you are going
without distressing) then sanding with a fine grade sandpaper between
coats will help your top coat stay put.
Set these legs aside in a warm dry place for the next few, and flip that table back over. It's time to tape!
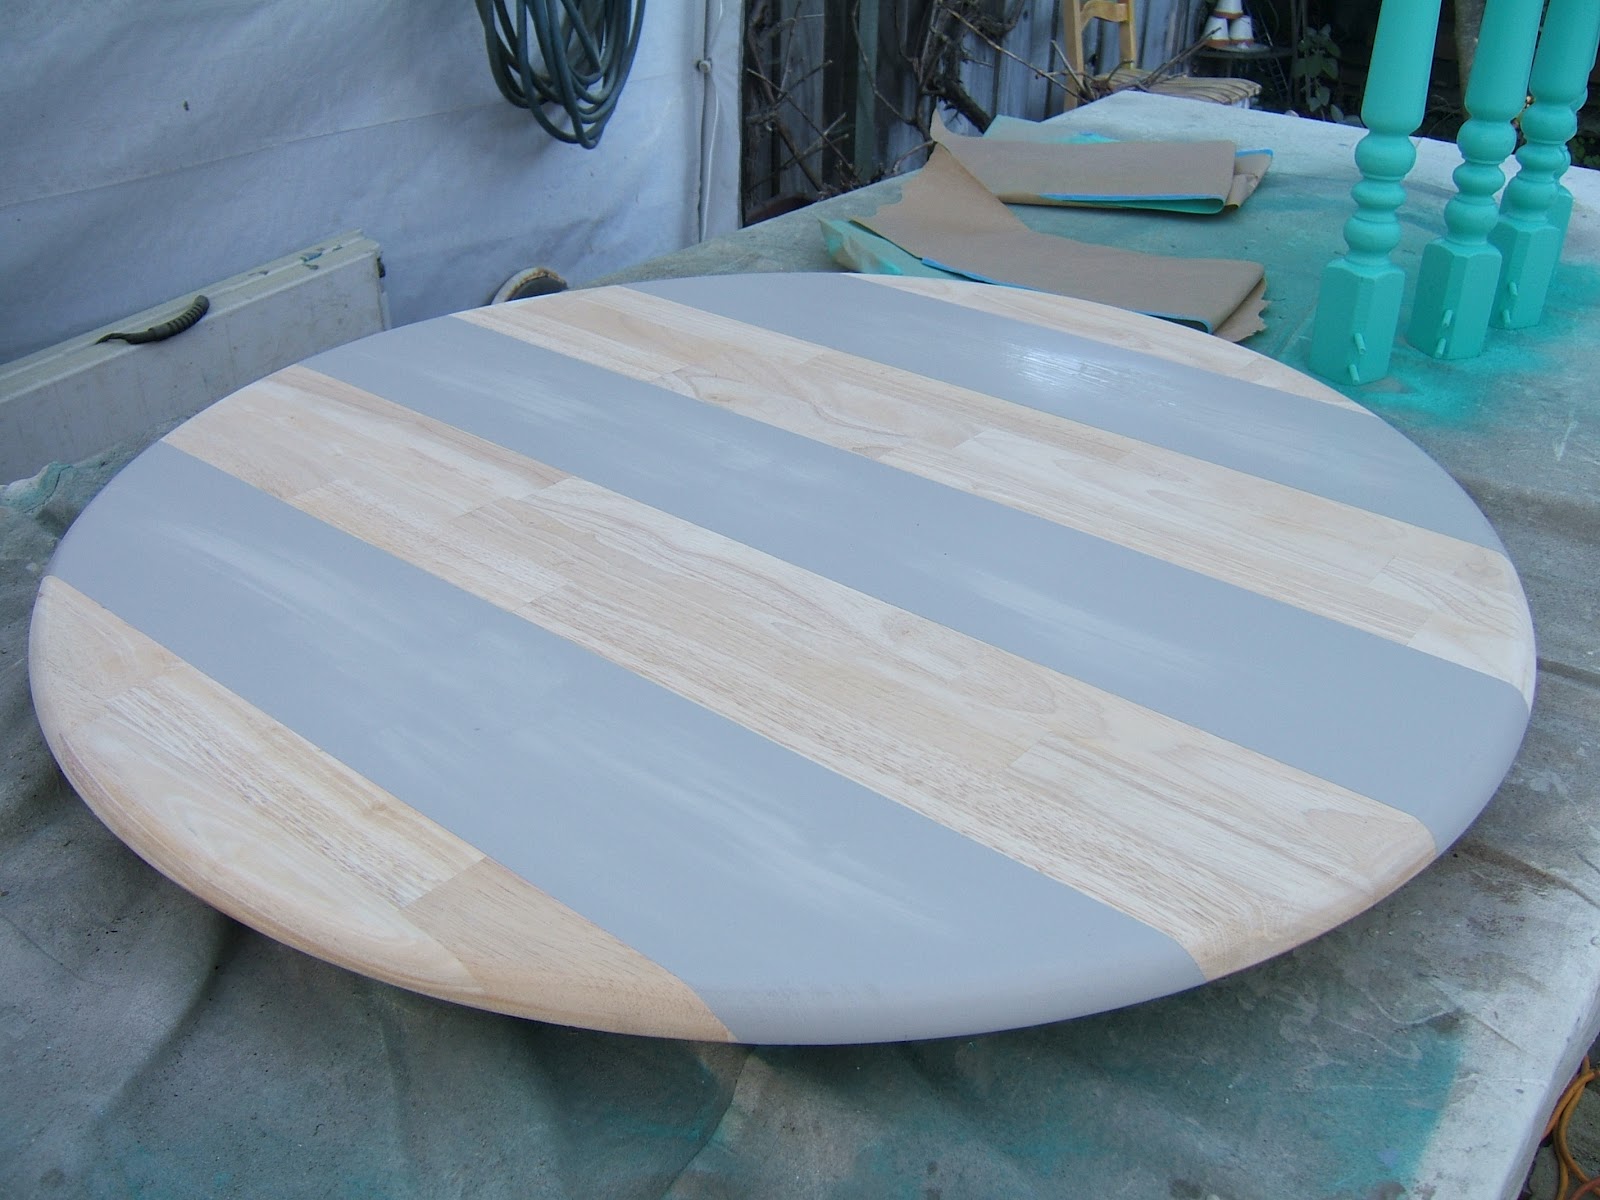
Measure
out your stripes. You could draw the line with a pencil if your table
doesn't have lines like this one. Just be sure to leave the pencil line
within the area you will paint, so it gets covered. For this
table, I chose a width of 3 planks for my stripes. I taped outside the 3
planks, then marked with a light X which stripes to paint. You'd be
amazed how easy it is to paint the wrong area!
I'll
be using some Glidden Interior paint I had leftover from another
project I did. I love this grey (sp?). This color is called "Wood
Smoke." On another note, I used blue tape because I was pretty sure
leakage wouldn't be a problem on this thirsty wood. Frog tape however,
is amazing, for keeping leaks out. The sides are coated with a chemical
that react to the paint, and expand, forming a mini barrier to keep
paint from crossing the line. It's great when doing intricate designs.
Since this is a more rustic style, perfection is the least of our
concerns.
Here we go! Paint, paint, and paint again. See? I don't always cheat and use that gun. I did this one
by hand! Also
note in the picture above, that my brush is not soaking wet with paint.
I like to keep it fairly dry when dealing with taped edges, it's less
likely to seep under the tape.
Done. Let it dry inbetween coats, and since this is the table
top I'm going to encourage a light sanding between coats. By
hand,
not by that ferocious electric sander. Tabletops face a crazy amount
of wear and tear, and the more you can do to prolong this coat, the less
refinishing you will do down the line. I did 3 thin coats here. When
you're satisfied with yours, carefully pull back the tape to reveal your
stripes! If you find the paint is pulling up at all with the tape,
stop, and score the edges of the tape with a razorblade or a box
cutter. Easy does it though, we aren't carving this beauty!
Fortunately
I did not have that problem, as the paint stuck like a dream to this
wood. Have I mentioned how great this type of table is to paint? It's
like it was just begging me to do it! I gave the entire table a light
sanding by hand, and a little rougher on the edges. Take a look:
Fancy.
Get your plastic gloves and wood stain, because up next we give our
table some much needed contrast. I'll be using Minwax Wood Finish,
Jacobean.
Hold the phone - A friend made it clear to me that I should point something out here, I prefer to use Minwax Wood Finish. Just
the finish. Any brand is fine of course, just as long as it's not a, 12
in 1 type thing - stains, seals, delivers, slices, dices..etc. I think
that those stains are great for some purposes, but I've found that they
are so over-engineered to make the job quicker, that you find yourself
rushing to get a smooth look before the whole thing dries. A nice, oil
based wood finish like I have here will give you plenty of time to work
with it, and blend any areas that look blotchy.
Do this outside though, stuff is stinky! Hello Jacobean...
I
use an old T-shirt, and I chop the sleeves off. Gloves on, ball up a
sleeve and dip a little into the can. Now start rubbing it on, with the
grain, in the bare wood stripes. Really glop it on. Let it sit for a
few (read your stain instructions), and use the bulk of the Tshirt to
buff it off. If you get it on the painted stripe, just wipe it off
fairly quick. For a more distressed look, you can bang up the table a
bit before staining, as we learned in the last
tutorial.
Once
those wood stripes are done, rub some stain on the painted stripes.
Then buff off right after. No need to let this sit on the paint too
long, we are just trying to give the table a uniform age and hue.
Don't
forge the legs! They are bright as can be. I ran my sanding sponge
over the legs one or two times. Rather than a back and forth motion, I
just push hard and drag the sponge down one or two times. I find this to
be a little more natural looking, but it's up to you! Here's a tip,
when my sanding sponge has lots it's rough edge, and I don't want to run
to get another, I use sandpaper wrapped around the sponge to give it a
few more go's. The idea is to have a flexible but firm sanding tool, to
grab those curves!
After
you've distressed to your liking, take your jacobean T-shirt and run
some stain over these legs. This brings out the distressing, and makes
the legs match the hue of the table. I don't hesitate with the buffing
either, this is a wipe on wipe off routine! I find it easiest to put
both my hands inside the T-shirt, grab the leg, and just start spining
it. Works like a charm. Here they are, aged a bit:
If
you want them older, keep on going. Do this same technique for the
sides of the table frame, on the underside of the table. It
really
helped me to put my table top, right side up, on top of a few 1 gallon
paint cans. I know, I messed up and didn't take a photo. Forgiveness
please! With the table up on the cans, I could keep my table top safe,
while staining the sides. It works, and it's free!
Alrighty!
Once she's dry, reassemble your table and take a look. Don't forget to
seal! I used Minwax Polycrylic in Satin, because it's nice and natural
looking while super strong. Read the directions on your specific stain
to know how long to wait before sealing. This is surprisingly important!
Now set that table up and snap some photos.
A little staging never hurt anyone....
You
did it! Now show your friends, show us, show the world. Surprisingly
easy to tackle, with some really eye catching results. Thanks for
tuning in for another tutorial in the School of Restoration here on The
Divine Minimalist! If you decide to take on this weekend wonder, send us
your photos - it's always great to see the work people do. If you
missed our first tutorial you can find it
here, and if you are wondering who I am, that's
here too. Class dismissed!
Post a Comment


Just found this through Pinterest...this is gorgeous! You did a great job. I am heading to the local thrift store tomorrow in hopes of finding a table to do something similar. Thanks for the tutorial!!
ReplyDeleteThank you! I'm sure you'll find the perfect table, this is a rewarding project too. Have fun!
ReplyDeleteThis is what kind of kitchen table I have so I'm doing it! What color are the legs?! I'm obsessed! Check out some of my work here, www.facebook.com/PearlyBirdDesigns
ReplyDeleteYour work is beautiful!!
I don't actually have the name, I'm sorry! BUT, it's very very close to aqua. So, anything in that realm will work.
DeleteLove it! I'm doing it to my table this weekend! What kind of paint do you use? Is it high gloss? Thanks!
ReplyDeleteThanks! I'm glad you are going to try it! Send pictures. The grey was a normal interior satin, and the legs were gloss because it was leftover from a kitchen project. Let me know if you have any more questions! You can reach me personally here: 9redinfo @ gmail.com
Deletewell.. i think this could be much better if you just little bit focused on its color combination. otherwise idea of making strips on the top is really cool..
ReplyDeleteI think the color combination is fabulous! Focusing a little bit on your grammar would be a good idea!
DeleteI love the color combo too! Great job!
ReplyDeleteThank you so much!
Deletei just bought a similar table with 4 chairs on craigs list today and plan to start the restoration process this weekend. i'm really excited! this will be my first furniture restoration. one question, the table and chairs are already painted light grey and blue, how do i work around this and still end with the dark wood stain look?
ReplyDeleteHi Brandi! Sorry for the late reply! How exciting, you'll be hooked after this! So - I'd say, if you are going to paint the legs and the chairs anyway, all you'll have to do is give them a decent sanding to rough them up, so that you're layer of paint will hold. However, for the top - to get the wood grain to show you'll need to strip it or sand it. An electric sander will be easier than hand, or if you feel it's very thick paint you can use a stripper (I like CitriStrip, environmentally friendly and smells like starburst!). Once you get the top down to the bare wood you can pick up with your stripes. I would say that sanding the whole top would be easier & less tedious than sanding down just some stripes, if that makes sense. If you have any more questions feel free to email me directly! I'll respond faster, I promise :D 9redinfo @ gmail .com
DeleteThanks for sharing this great idea. I am going to begin painting my table this weekend. Any advice for making it an outside table?
ReplyDeleteI'm so sorry to reply so late! I could have sworn I replied! To make it outdoor I'd just clear coat it in a heavy duty seal. Minwax Polycrylic would work, several coats, or if you want to get really crazy, use any marine varnish. That stuff is made for use on sailboats!
DeleteI'm doing this to my table today! Only our table has a leaf in it, we are making it so when the leaf is out the stripes are strait like yours in the picture, but when we add the leaf in it will turn to chevron stripes. (i of course had to ask my husband for help on that part--he's much better at the measuring and i want to get it exact) can't wait till its done! thanks for posting the tutorial! i love it!
ReplyDeleteOh my goodness that sounds AWESOME! Sorry for the late reply - send pics! 9redinfo@gmail.com
DeleteI love this table, and just bought one of my own to re-store! One question: How did you make sure not to go inbetween the lines? I find the average coloring book to be of questionable difficulty. I can't imagine doing this without going in the lines. Any tips on how to make this work?
ReplyDeleteYay! Hmm.. What if you put a tape X in the stripes you ARENT supposed to paint in.. that might help without making a permanent mark?
ReplyDeleteUr work are really cool
ReplyDeleteI wud love to work with you I also do interior decoration
ReplyDeleteI love this! The table I have is the old 70's style with the fake wood top. I wonder if I could still paint it all white when try it and sand it in a few spots for a weather look? Love love yours
ReplyDeleteabsolutely loved this post,loves it so much I'm working on it myself. decided to paint my coffee table like this, I'm on the sanding process (manual, uhg). really, you blog, your house it's amazing, so cozy and everchanging. you never get bored! I love doing stuff around the house and moving things around, upcycling things, so I really relate to your wonderfull blog!!! saludos desde argentina!!!
ReplyDeleteDang, this is actually a really cool table that I wouldn't mind having in my home.
ReplyDeleteWhat a creative mind you have..!!
ReplyDeleteInformative tutorials..!!Kids Car Beds
This comment has been removed by the author.
ReplyDelete