Recently I told you guys I had been trying to wrap up one of my many
many side projects, and I finally did. These lights have been in the works for a while, there was a LOT of trial and error, which led to a ton of learning. When I make these again I will do a better tutorial, but for now at least I can give you the basic idea. Take a look at how they come out:
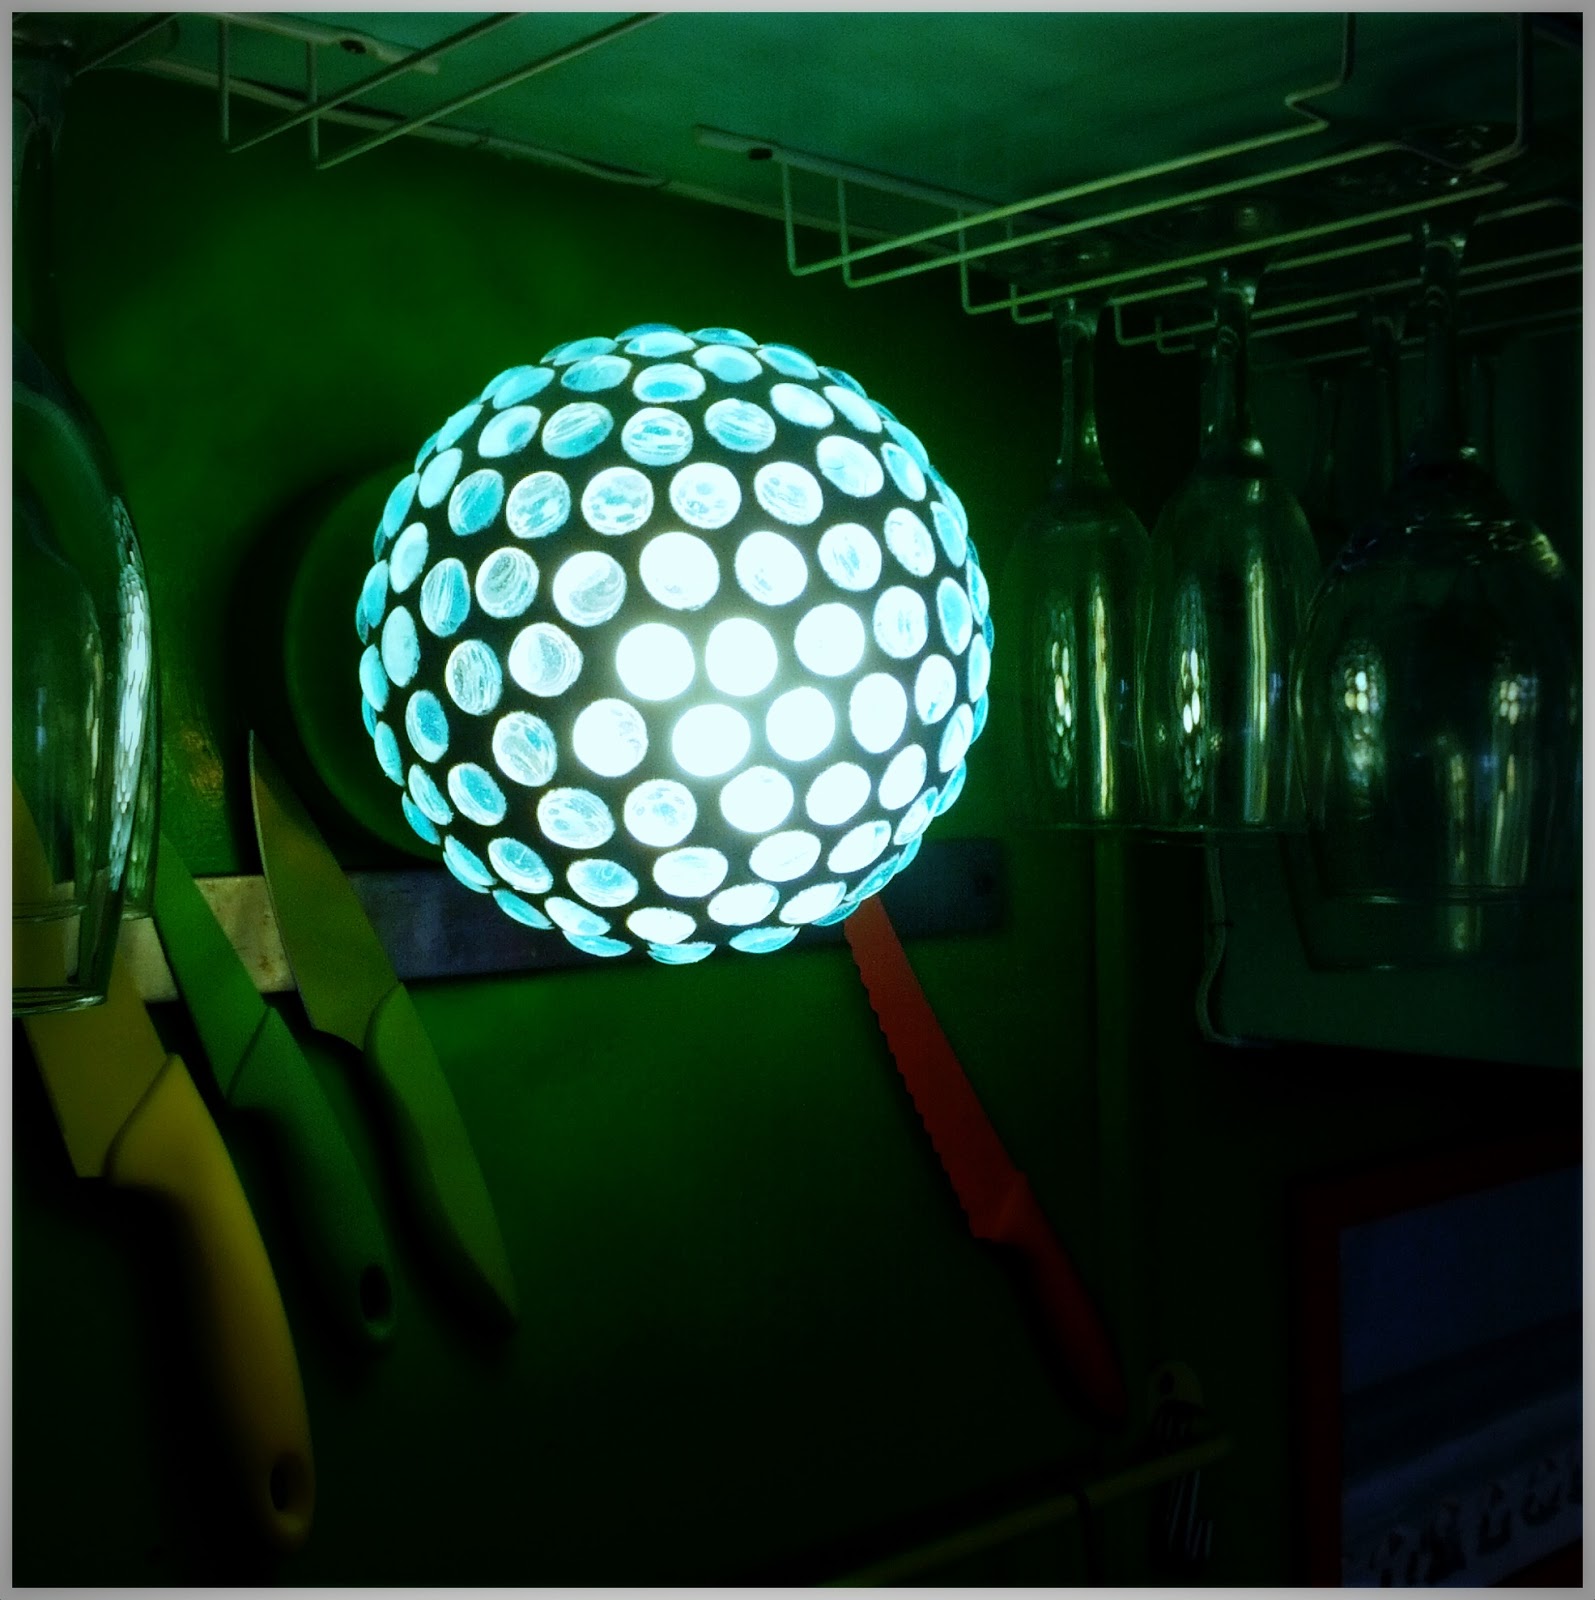
I'm so excited about these! These are actual glass light fixtures, the standard ones that we've all had gracing our homes at one time or another. Aren't they pretty? They let out a good amount of light, too. I was worried that they would be too dark, but with a standard compact fluorescent in there it's perfect for a hallway or porch light. Like I said, Ralph took a lot of pictures during the hardest part, which was the grouting...
I owe it to the project to give a little back story here, so go refill your coffee and let me tell you a tale. Now, when I say this was in the works for a
while....I mean literally 4-5 years. You could go as far as saying 8 years when the first idea floated through. It all started when I was in San Francisco for Halloween one year, and walking down one of the side streets I saw a porch light that looked like it was covered in little marbles. I couldn't get close enough to see what it actually was, but it was my first guess and I was sticking to it. It was beautiful - just glass and marbles, radiating a soft blue, almost textured light all around it.
The idea stuck, and floated from project list to project list, and a few attempts were made. They were fails, we couldn't figure out a good glue... until fast forward another few years when we were sealing the inside of a glass aquarium with window caulking and -boom- 2 and 2 were finally slammed together, and the project could at last be completed.
Sure enough, silicone caulking worked like a dream! The marble light came to life and radiated in our kitchen for almost two years, we all loved it. I thought it was a done deal, it looked great, and then the last idea hit - grout! Would it hold? Would it work? Would it make it too dark? Figuring we owed it to the project to try, Ralph and I made three prototypes and got to grouting. Success. It held, It worked, and it wasn't dark at all.
And it was messy! If you're going to try this, do it outdoors. I once tried grouting with black grout indoors and it was horrible, I can't even relive that story! Heed my warning. So since I don't have pictures up to this point, essentially what I did was use silicone caulking from any hardware store, to glue flat marbles onto glass light fixtures. The marbles need to be clear, the opaque ones don't let any light through. Don't worry, the caulking dries clear. Actually, be sure to double check and get the kind that dries clear, there are SO many types.
Here we have the three lights, pre-grout. Two of them are flat and frosted, rescued from a free pile at someones garage sale. Gotta recycle, right? The all blue one is a clear glass, and is competing for my favorite.
This is pretty much how it looks, smear that grout in there. I used a poly grout in white, I thought the contrast would look good. I was using a grout spreader for a bit, but it was so much easier with just our hands. This thing gets heavy!
Wipe it off with an old towel that you never want to see again, because you won't.
Here they are with most the grout off of them. Grout is neat, if you haven't worked with it before, you should. It's a lot of fun. So every hour or so I'd take a clean cloth and keep buffing, just to get that haze off the marbles. I couldn't resist holding them up to the sun though! Here is the light with blue marbles:
And the light with large greens & baby blues... this shape fixture is perfect for a ceiling.
These are the large clear marbles, on a frosted glass fixture. I love that the grout turns silhouette on us.
Here are a couple night shots of them in then kitchen. Yes, that's a lime green wall! We have a very bright & colorful Santa Cruz kitchen... Wait a minute! The magic of archiving brings us
this post, which shows the kitchen colors. Man, what messy pictures! Sorry...hehe
I love it!
So there you have it, the long awaited marble light fixture. What do you think? It's sort of 70's to me in a way, sort of modern. I'm not sure. But it's a lot better than the fixture we had before, which was almost offensively bright. Do you think you'll tackle this project? If you do, don't let it linger around for 8 years like me, that's a lot of time you could have been enjoying it! Just jump right in, definitely a weekend project. If you don't want to tackle it, get in touch with me. I have a few extras here, but I'd love a reason to do this again. Enjoy your Wednesday! It's got to be better than mine, I'm getting my teeth cleaned today. Hooray....
Post a Comment


Love these Jess!! Especially the one in your kitchen. And looks great in the day light when it is off. You will have to be sure to take this one with you to the new house. ;)
ReplyDeleteVery creative! Persistence paid off with beautiful results. Thank you for sharing!
ReplyDeleteHello There,
ReplyDeletethis is really very nice blog and looking very nice. this blog is very helpfull for shopping .. we want come back on this blog...
Love it! I am working with the flat marbles and stained glass, and your beautiful works are inspiring. I am picking up some poly grout today.
ReplyDeleteLove it! I am working with the flat marbles and stained glass, and your beautiful works are inspiring. I am picking up some poly grout today.
ReplyDelete