Hey everyone! Hey it's Friday, finally - this has been a long week! I'm so happy to share this tutorial today, Ralph and I bought a TV recently for our bedroom and started dreaming up what kind of dresser we wanted in there. It's not a huge room, so I imagined finding a long, low, old school dresser that we could do something fun to. The
very next day I was browsing craigslist and actually found it. FOR $25! After making sure I read that right, I rushed over & snagged it, and we got to work right away. Check out this before & after:
This project took ONE day. Start to finish, with a lot of breaks and a lot of
Radiolab. We combined a few different techniques that I've talked about on the blog, and I love how it came out! We really wanted something in a bright color (
red!) but still sort of subtle. We both love patterns so that was a pretty easy choice for the top, and ever since we did the
Triangle Tabletop we've both been digging the wood grain showing through the paint look.
So, you want to make something similar? I show you how! Read on.......
Here's what you'll need:
- A sweet dresser, go for solid wood - at the very least, the top should be. or at least a wood veneer.
- Electric Sander and medium grit paper
- Vinegar
- Rags
- Paint - get Primer & paint in one if you can, and get flat (chalk paint baby!)
- Craft paints - acrylic, these are like .88 cents so stock up!
- Plaster of Paris
- Tubs to mix paint - use something you dislike, they are probably gone after this.
- Oil based stain - we used Jacobean
- Wax - we used Watco Satin Wax in Natural.
- Tape
- Long Straight Edge
- Hexagon, or good geometry
- A good podcast or pandora station, heh..
Alright, just a tip - before I start a project that is going to consume all my time and energy, I take 15 minutes to pop a meal in the crockpot. My favorite resource for crockpot meals is
Slow Cooker from Scratch, but sometimes I just wing it and throw everything but the sink in there. Moving on...
Get your dresser outside and give it a thorough inspection. Repair any weirdness, then get ready to clean your life away.
One of my favorite things about this dresser is these crazy crazy details:
Sexy! Heh.. these are so seventies I love it. So seventies in fact, that they are
plastic fronts on wood drawers. I know, classy right? Hey - this didn't stop me one bit because we are using chalk paint, and that stuff sticks to anything.
Let's clean it, ok? I like to use a solution of warm water and vinegar. I do like, 2 cups.. but it really isn't a science. Vinegar also helps with any mysterious odors, in our case, 85 year old woman's home. Which is amazingly nostalgic...... but, not being an 85 year old woman myself, I think we can ditch it.
Just dunk your rag, squeeze, and clean - I don't have to tell you how. Pretty simple stuff. Now the real fun (
yea right)..... sanding!
I like to wear a mask, because I just imagine all these tiny particles sticking to my lungs.... and that's just sick. Who knows what varnish they used way back when... so safety first - cover your nose n stuff.
Our dresser here had a veneer, oh
joy... so I went pretty
easy on the sanding. Just enough to get rid of the sheen, and get
uniform wood grain. Easy does it...then we had this:
Hardest part is done! In my opinion anyway. Now take off all the hardware of your drawers, and let's begin the painting.
So for the paint, we went with Martha Stewart's "Barn Red" - which is mixed by Glidden now, and at Home Depot. We turned it into Chalk Paint using
this recipe, which for a quick reminder was 5 tablespoons plaster of Paris, smoothed into 2-3 tablespoons of water, then mixed with 2 cups of paint.
Notice something? Yea... freaked us out too. This paint looks PINK.. I wondered if they accidentally mixed the wrong color. I mean, our bedroom is just starting to take shape, and we would have been OK with this deep pink, but really wanted red. Look at this:
Not what we had in mind. We were thinking deep red, subtle..dark....but so far it looked like life was handing us deep pink. Meh?
But at the last minute, that magical paint dried to the red it was supposed to. Tricky paint! I gotta say, I did not expect it to change so drastically, but I am not complaining. We did 2 coats on the whole thing, and 3 coats on the trim.
Tip: We did NOT use the paint that had primer in it, and a lot of the wood grain showed through our paint. I like that look
anyway, so I didn't care - but - if you're going for solid, then
spring for the primer in the paint.
Now we can work on the top while the dresser dries all the way. Get your tape, straight edge, and hexagon. I used a mirror from the
Disco ball sun tunnel project. I
could have gotten all geometric and figured this out with math, but it was Sunday and that sounded horrible. So I just used an existing hexy as a guide and went with it.
Using the straight edge to sort of extend the sides of the hexagon, we naturally got a pattern that incorporated little triangles. This will go great in our room, which will someday be sort of.. Moroccan - Indian - combo pack.
Keep taping........
Be sure to press your edges really hard!
Done-skees. Now's the fun part! Like I mentioned before, these little craft paints are super cheap and available in every color you can think of. Every. Color.
Those are all in the hues of colors we're leaning to for the room. Warm, but still bright and fun. We started filling in our hexagons at random, using the "finger paint" method like in the
triangle tabletop. Essentially, using our fingers to rub in paint into the grain, then a paper-towel or rag to wipe off the excess.
You can get really creative and wild here, grab a color at random, close your eyes, and pick a shape.
I don't know if you've noticed, but the sun has been changing in the background during this whole project.... see how it's night? Told you it was one day! Almost done...
Here's the perfect chance to take a break for din-din, and let these paints dry. They'll dry fast because of how thin they've been spread. See that wood grain peeking through? Fabulous.
Such rich colors! Start peeling your tape, and remember to peel the pieces you put on
last, first.. and always pull as close to the opposite direction as possible so it doesn't take some paint with it.
I was so... so... tempted to just stop here. I loved it
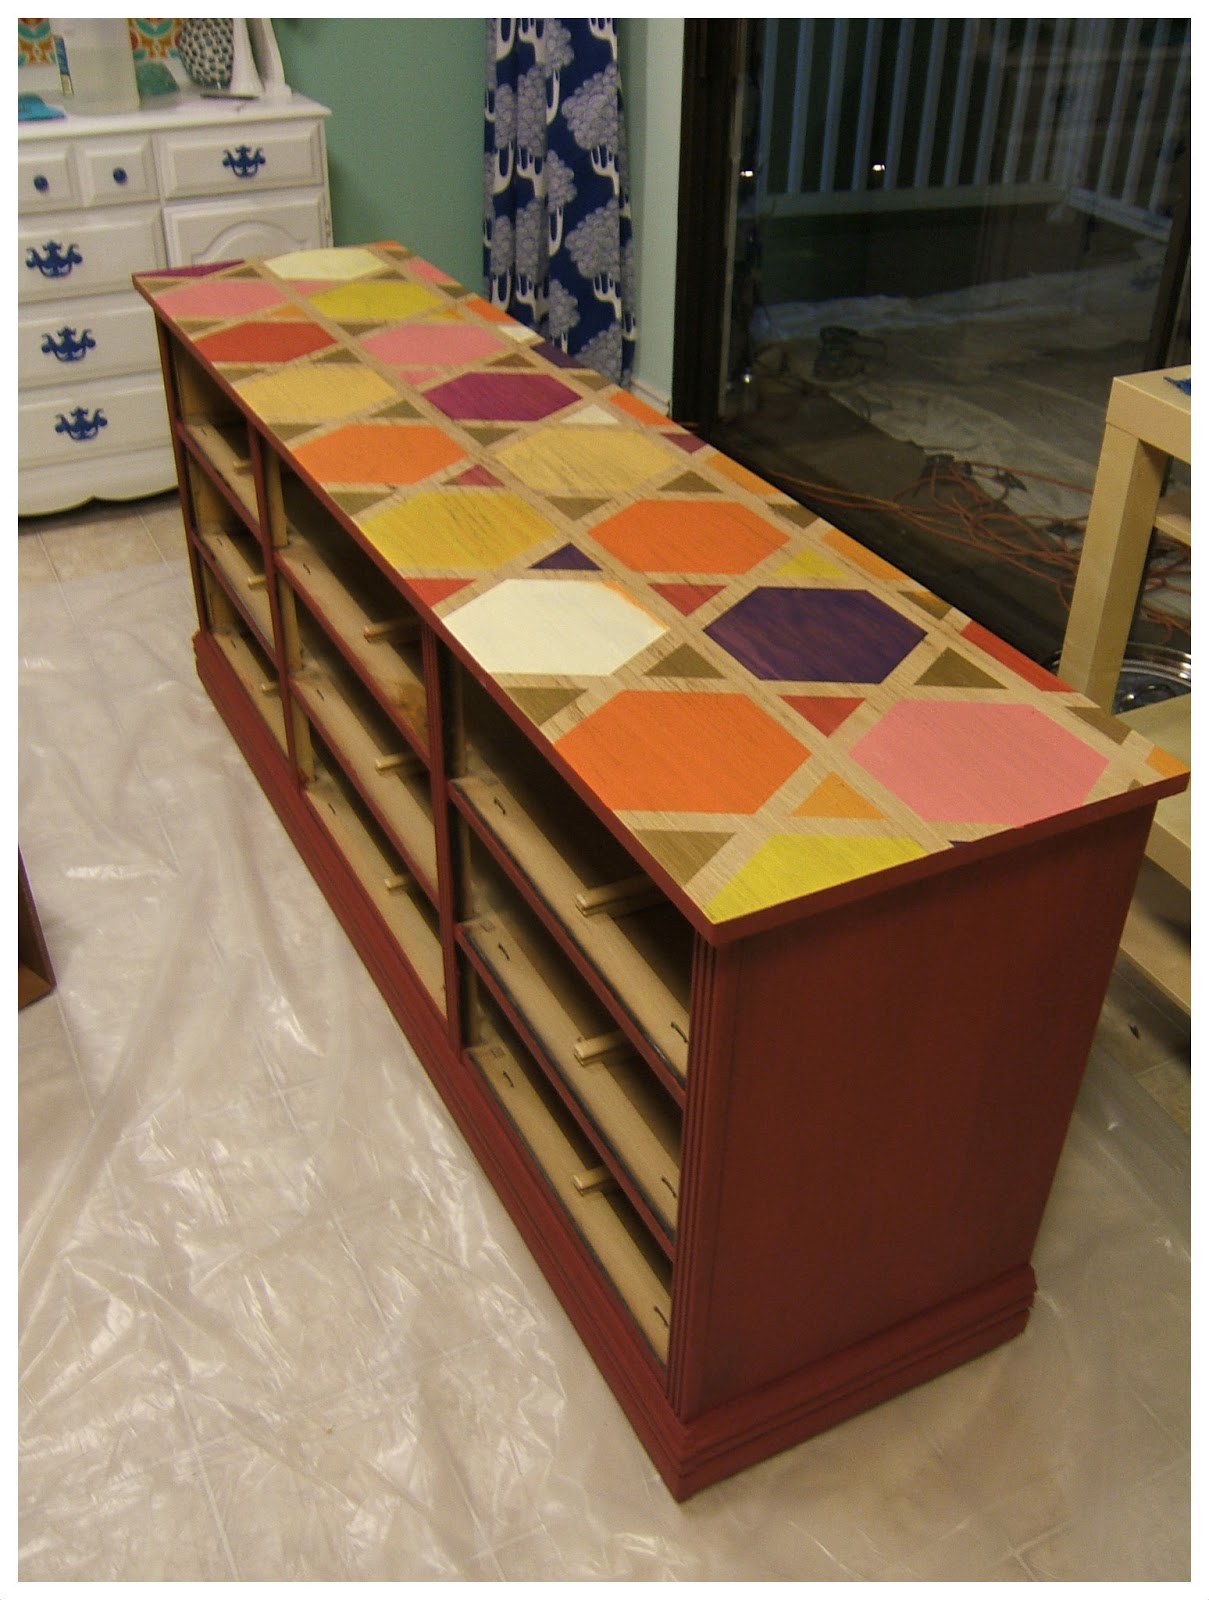
as-is. But knowing how we wanted it more subtle and warm, we just decided to continue with the original plan, and wash the top in a stain. Here's where we use the Minwax Oil-based stain, in Jacobean:
Oh how I love this stuff! Since it's oil based, it gives you time to work without drying so quickly. Here's a before shot:
Using a rag, I just dipped it in the can, spread the stain on in the direction of the grain, while Ralph came behind me and buffed off the excess from the paint immediately - with a clean rag. The result? Wonderfulness:
So glad we decided to do it!
Still with me? We are wrapping it up here... let that soak in & dry... perfect time to do some clean up work. We're almost done I swear!
That's Charcoal in the background, she's not overweight, she's just been pregnant for 7 years. When will those kittens show up!
Actually, while this dried we took a moment to hot sauce our hardware. Ralph heard about this and we thought we'd give it a shot:
You are supposed to let it sit overnight, but I don't have that type of patience, so we just scrubbed and cleaned. They didn't get too much shinier, but it helped a bit. We'll probably replace it someday anyway, have you ever done this trick?
Grab your wax and a clean cloth, it's time!
I love this wax. It's liquid, so that makes it VERY easy to apply. Just dab some on your rag, rub it in, then buff it off after a few minutes. The "natural" color is great because it doesn't add any tints or pigment to the paint, which is what we were going for. I just love the wood grain not only inbetween the shapes, but coming
through them as well.. gah!
There we go. Hardware back on, lookin' pretty and ready to move.
It's not terrible hardware, and can be replaced... but for now we needed
something to open those drawers up.
Here are some photos of our new dresser, in it's new home...
Start to finish, about $38. Not.. too.. bad! Here are some close-ups to enjoy:
Love that deep dark red.. this is exactly how I imagined it. A red dresser, with a lot of dark crevices and details that would tone it down a bit.
Did I mention we used gold? Yea... and I love it. I'll be using that a lot in future projects. Look at this cute blended triangle:
So, what do you think? Something you'll do in your home? If you do, be sure to share pictures with me, I love to see all the amazing work you guys do!
Thanks for tuning in and reading my tutorial, it was a day's worth of work and worth every minute. Plus, we got to make it together, and that's quality time. Aaaw!
Have a fantastic weekend everyone, and if you're looking for more DIY projects, you can always browse my ever-growing
Project Gallery, or click on these full tutorials below:
Post a Comment


Love this awesome dresser!! Excellent ideas too!! Luv Diane/Mom :)
ReplyDeleteLove it!!!!
ReplyDeleteMy wife and I acquired a whole bedroom suit almost exactly like this and have been looking for ideas to redo it. We both love the 70's look but not the garish brown. Thank you for the inspiration & instruction on a project for us!
ReplyDelete