Google+ Nine Red: Current Projects
Showing posts with label Current Projects. Show all posts

Wednesday, September 20, 2017

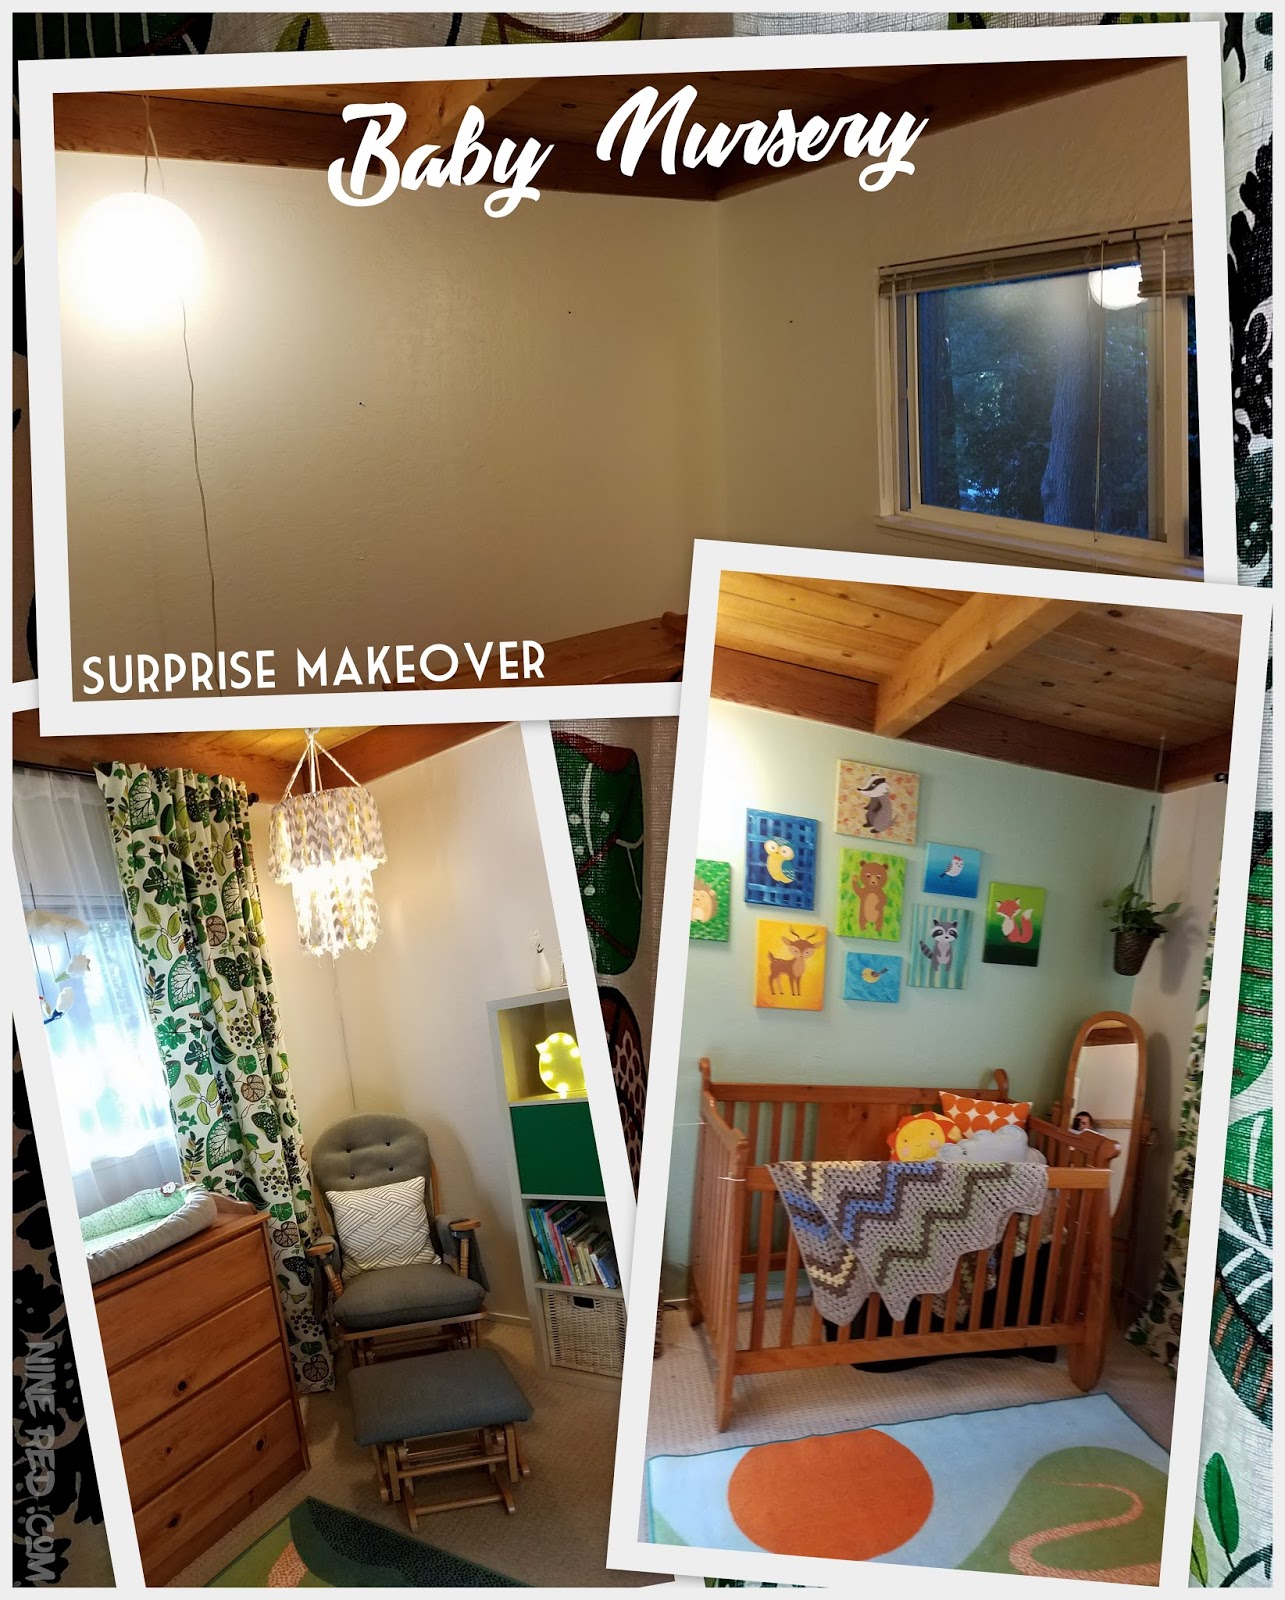
Baby Nursery Reveal! After & Before...

Hey everyone! Well, I'm dusting off my keyboard and putting my blogging sweatpants back on, finally! I'm back & I'm really excited to show you one of the latest projects we've been working on, I've had to keep ALL clues of it totally quiet since it was to be a SURPRISE nursery makeover for our good friends, Sarah & Shaun. This is their first baby, and my friend Danielle and I decided our gift would be a nursery make-over!  Don't worry, we did tons of detective work beforehand to be absolutely SURE they didn't already have something planned, and with the help of Shaun being our inside guy, we were able to successfully pull it off.  We did this room, top to bottom, in ONE DAY you guys... That was the craziest day I've had in a long time, and let me just say, I slept VERY well that night.  So originally we were going to do kind of a bohemian safari feel for the nursery... but luckily before we bought too much, Shaun told us that they were starting to pick out sheets & accessories that were more woodland, so we swapped gears...If you want to see what other ideas we had in mind, check out the Pinterest page devoted to this room.

OK enough intro, let me show you the room!  This will be a picture heavy post, you've been warned. I know this is out of order, but I'll show the finished project first:

Do you love those animals?! I do! Danielle and I made those, well sort of - we used these wall decals from Amazon, but didn't want them just floating on the wall...  So we painted up some canvases I had lyin' around, I'll have a whole post about it later. Having these done before hand was a huge help!
Curtains are IKEA (sadly I can't find a link, they might be gone!), as is the plant hanger - and the amazing blanket was made by Ralph's Grandma Lorraine, so sweet!  And what a great match....

Sarah's mom refinished that rocker in all new fabric - what a pro! It came out amazing and matched the room perfectly. We made the chandelier above it from ripped strips of fabric.  I like that it gives a nice soft light, and is literally soft... It was so easy, I'll post a full how-to on that as well.
This bookshelf was Ikea also, it's the Kallax Unit with some simple accessories.  The doors are part of the available accessories, that magically they don't have AGAIN!  Well, they do, just not in green.  Come to think of it, we did this nursery in July or so.... which is right when Ikea goes through it's big annual change... it's making sense now... I SHOULD have built this beforehand, it definitely ate a good hour of the day.

This rug was from there too, it's NEW and called Lattjo..Ikea really pulled through for us:

Now that I've learned I can't get those curtains anymore, I'm kicking for myself for not buying myself a pair! Haha.... Ikea loves to do that to us, don't they? I love the green leaves! Here's a close up:

This cabinet was built in already. Really useful for all the baby supplies they are going to be stashing. All we really did to incorporate it into the room was paint the wall around it, and add a curtain in matching colors. It sits on an inexpensive tension rod, so we were able to have that completely made before the big day & just popped it in.  I had wanted to install all new cabinet hardware, but there are 19 handles on that beast, and this is a rental so....we chose to spread the budget around other ways.

Clearly, photographing small spaces is rough (for me at least!), so for a better idea, take a look at this video - side note, I had JUST gotten out of that chair that is rocking itself....no ghosts up in here:


And the before shots, just did a little four corner action....

 Danielle caught me bloggin'.....


Sarah & Shaun had collected a lot of baby furniture already, and with that ceiling being wood as well, it came together really nicely!  Especially for their woodland theme... plus, not having to paint a ceiling & trim was a MAJOR time saver. There were grand dreams of painting furniture at one time, but when you learn you have ONE day to do it, projects hit the chopping block REAL fast.  Before I forget, the paint names we used are:

  • Behr: Healing Aloe (S400-3) - paint & primer in one, eggshell.
  • Behr: Moth Grey (N200-1U) - paint & primer in one, eggshell.

I started writing down codes for our paint that we buy. You know why? The labels ALWAYS fade off that can, and news flash - Behr likes to change color names. For the same color! But the code is supposed to be the same so, learn from me. 

The paint is still a little wet in these photos, but it gives you an idea of the color:

 Yea.... the shiny & the streaky... it was half wet here, it definitely looked better shortly after!

Quick side note - so if you've noticed there's only tape around the light fixture, you're right - we didn't use ANY tape! Just had the help of this Shurline edger tool that you can get online or in most hardware stores.  Just be sure not to overload it with paint, you can get drips that way.  If it's your first time, play around on some test areas to get the hang of it.

Accessory wise we were pretty proud of ourselves. We scoured thrift shops, discount stores, and clearance racks for things that would work well in the room, or that we could easily make-over. Danielle was super excited to get them stocked up on baby books, she found tons at the thrift shop & scoured through them to find the like-new ones:
Bambi of course was in there... I wasn't sure if we were going to dissect the Bambi book to use as some sort of wall artwork - but once we were in the room we realized we had less space than we thought, and of course wanted to give THEM room to customize the place & grow into it. With a project this fun it was REALLY hard not to go overboard.

With the thrift shopping we really were just looking for foundation items, things to give us the headstart so we could tailor/redo/repair to go with our look. But as luck would have it, a gold lamp & a ceramic animal were found on our FIRST visit.... score!
The shade was destroyed, but I recognized the lamps label to be that of Target, so I knew any standard drum from them would fit, and it did:
This cute little baby bird light caught my eye right away, and it luckily worked!  It was lime green with a gold trim, and it took me a good 2 or 3 days to realize it MIGHT actually be an Easter Peep? (Worst candy ever)..... Whatever, cute night light if you ask me. 
Baskets are always useful, token white vase, naturally... 
So I know I've mentioned IKEA a lot and I SWEAR I'm not sponsored by them or anything (I mean, I wouldn't say no.... call me Ikea! hehe....) but they had SO many cute stuffed animals for kids! Some of these are even puppets... so if you find yourself needing a haul of plus woodland baby animals, plan that visit.
Ok one last, funny thing, from our shopping trip.. so I'm going around the thrift shop, and I don't know if I was hungry or what, but we went to the frames area... You know, to see if A) we score on some perfect wall art or B) we at least get some cheap frames to do our own thing with... and this raccoon just stared into my soul...
Danielle humored me for a minute, then distracted me, but I kept going back... "Are you sure?" I'd ask, and she finally had to break it down for me, telling me it's very different than the rest of the room's style - which it was.  So I agreed, then naturally rushed back to get it while I was being rung up.  Well I did everything in my power to make it cuter, painted the frame black, tried to get the picture OUT of it that was glued in, just to clean it up a bit.... but that raccoon didn't want to budge.  I stuck to my guns, brought it with us as a "just in-case" there's a lonely corner... 

Meanwhile, Danielle was planning to re-purpose a picture frame they already had, that had 5 or 6 photo spots in it.  When we got there and she wanted to put it together, the frame was GONE. Turns out, they got rid of it LITERALLY the day before we did this - so guess who came to the rescue? You know it - raccoon frame! Ah..... I just love when that happens....
The rest of it all came together naturally, luckily they already had a few light cord sets with paper ball lanterns on them, which are simple & give a really warm light to the room. We had taken inventory and measured the room MONTHS beforehand, and I'm so happy that it wall worked out in the end, and that we were actually ABLE to pull it off in. one. day.  Great work Danielle!

As for their reactions? Speechless! Shaun already knew we were doing it but hadn't seen a THING...Sarah knew nothing, though later said she suspected SOMETHING but nothing like this... they walked in the door, there were tears... hugs... and then soaking it all in.  Lots of oo's & aa's... We should have gotten a video but we were too in the moment! They loved it, which was a huge relief for Danielle & I!

Congratulations Sarah & Shaun on your first baby, Miss Georgia Rae, who's due to arrive literally any day now.  Thanks for letting us invade your space & let loose with our creative sides, it was fun!

And thank YOU dear reader for reading to the bottom of this post! You my friend, are something special.

Back with a few tutorial posts soon for some of the projects you see around this nursery.

Cheers!

Linkies: FacebookPinterestInstagramTwitterSubscribe & of course, Email me.
Thank you for visiting Nine Red .com

*Full Disclosure: If you decide to purchase items from links on this page, Amazon will send a small commission to support this blog at no additional costs to you. This helps cover the costs of keeping this thing up & running. Thank you for your support!

Post a Comment

Wednesday, November 13, 2013

Downstairs Bathroom Update

Yes - I've been bad about posting, things have been crazy! We opened up a can of worms when we said "Oh, let's just paint that downstairs bathroom real quick".  I showed you some of the pictures in last week's post, and as all projects seem to go, a simple paint job unleashed a long list of to-do's.  Suddenly new towel racks, flooring, mirrors, light fixtures & even a special ceiling treatment were in order.  And guess what? Ralph's mom is visiting this weekend and I would LOVE to be finished by then. Our downstairs looks like it's been turned upside down. But in the end, going the extra distance for the details we know we want will be worth it, because you know how it goes - once you move on to another project, it's likely going to be a loooong time before you backtrack to add the details to a chapter you already closed.

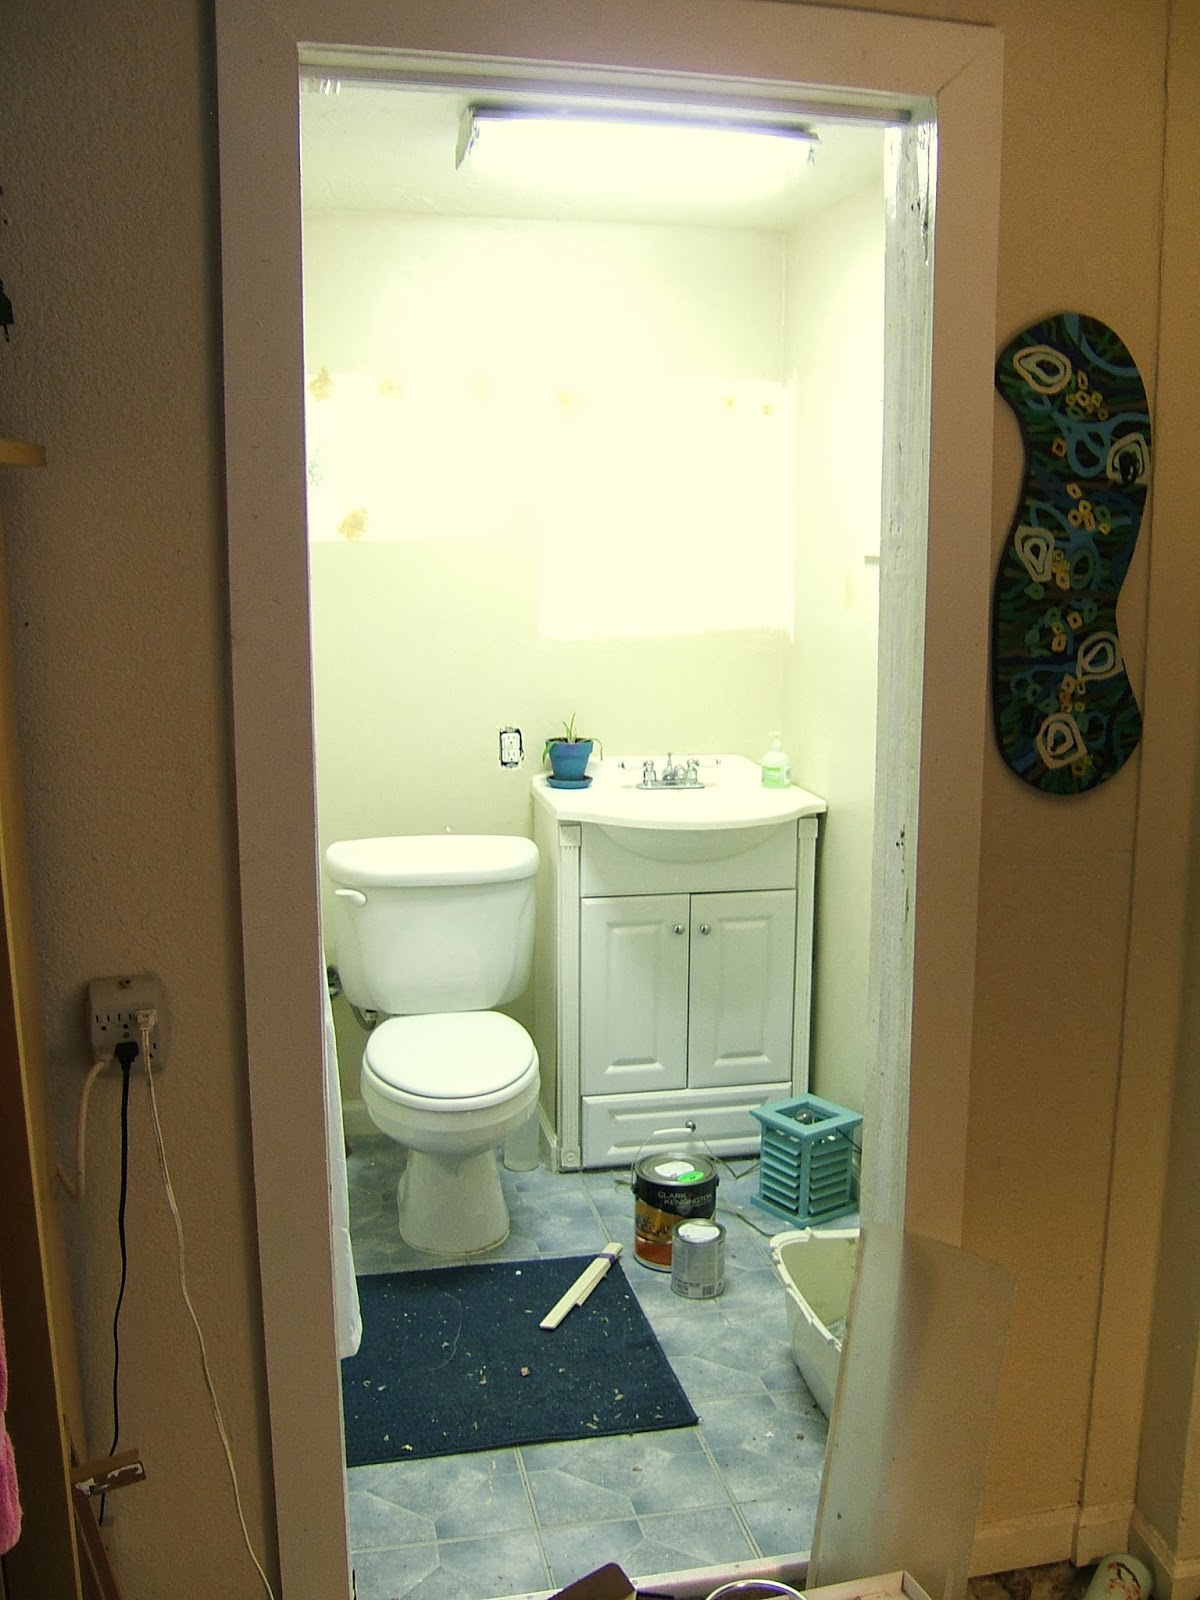
So here's a little peak at the changes so far, and as soon as we're done I'll have tons of tutorials for this room.  We started with:
 Ugh.... then we started in with some dramatic dark grey paint. I know the room is tiny, but the plan is (and hopefully arriving today!) to have a large wood framed mirror & matching mantle across the back wall there.
Now, it's kind of hard to see the grey, (gray?) because of the nasty fluorescent light....
It's darker in person, and less shiny... and less blue. Say goodbye to this light:
.......and say hello to this one:
It might be hard to see the potential in this light, but I know something is in there. I snagged it at a thrift shop. We've been toying around with ideas, and I think the inside will be a summer squash yellow & the outside a light grey. Very clean & simple, two tone, and hanging centered on the back wall of the bathroom.  It might look good, and it might go horribly wrong... (I'm not completely convinced yet myself!).  But at $15 it's worth a try.  There was part of me that wanted the inside to be like a disco ball, but .... meh?

We needed a towel rack, and it - just like everything else - went and got all elaborate on me.  It started simple, "buy a towel rack. Oh, paint it copper... oh wait, we should paint some pipe copper, oh wait - we should make it OUT of copper.  Oooh, it should be really big!" Yea, so that's what happened:
I didn't even go look at what "normal" towel racks cost, because I'm sure it would make me rethink this plan. This puppy weighs in at about $25, but once I saw the finished product, I was fine with that.
Definitely have a tutorial on that, it was simple. No soldering either!
***Update, tutorial posted!***

And sidenote: for some reason we decided tackling the downstairs closet at the same time as the bathroom was some sort of genius idea, so we have not one but TWO projects to wrap up. Right Now.

This closet had no shelves. no bars, nothing. So we started adding rails:
Then plain old plywood shelves:
And a few more:
And even with all the measurements, we of course found out that the walls are not perfectly straight, and some shelves fit & some don't.  Yay! So we have to come back and make a few repairs, but all in all - I'm thrilled to have some very simple shelving in this closet, and I have to keep reminding myself that it's just storage.  Functional, simple storage. I can't help but want to make it cute, but there's just no time right now.

So that's where we are right now. It's Wednesday, Ralph's mom comes Friday, and I'd like to get these things done:
Here's a glimpse of the Pin-board too, in case you missed it:


Wish me luck! What about you, taking on any crazy projects this time of year? Is Thanksgiving really around the corner?

-Jesse
Linkies: FacebookPinterestInstagramTwitterSubscribe & of course, Email me.

Post a Comment

Tuesday, November 5, 2013

Warming up the Nest

Alright, last week was wild! We've had a ton of work going on around the house, getting ready for the inevitable winter. So we sprang for it, hiring a few people to do a few jobs we admitted we couldn't do ourselves. Gotta know when to call it, right? Mainly the retaining wall & a forced air heater.

The retaining wall in our driveway has been on the ever-growing to-do list since day 1, but as we began to dig at it... we realized it was a job for a professional. This puppy was going to be about 5 feet tall, and hold up a huge hill... not something you want to mess up!  So we sprang for it, and this guy is doing an amazing job in 1/100th of the time we could have done a so-so job.
This is at the top of our driveway, which is already up a steep hill.  They're only half done, and still need to add the stairs so we can get in this side of the house. But wow...
It's been fun to watch (and learn) as they dig & build this wall, and I'm happy we chose a pro. That's a huge hill! I feel confident we could do much, much smaller ones around the yard.. mainly for creating level areas for planting.  I can't decide if we'll paint this wall white like we did with our other retaining walls... (from this post).

While all this digging & building was going on, we also had our heater installed. We have not had a normal, forced air heater in.... 10 years? 12 years? It's always been wall heaters, and let me tell you - this is amazing! It feels SO GOOD to not be typing to you right now with gloves on. Ha! My favorite, favorite part about the system.. is the Nest thermostat.  I knoooow, expensive thermostat, but you know what? They were going to charge us $150 for a traditional thermostat that are SO confusing to use.  The Nest? Easiest thing ever... and was only a little more.  Disclaimer, I am NOT being paid or compensated to talk about the Nest, I'm just seriously thrilled with this thing... 
It's sleek, it's easy to use (turn the dial!) and it programs ITSELF. Yep... using algorithms and motion sensors, it figures out when you are & aren't home, what temperatures you tend to set it to & when, and eventually just starts doing it all by itself.
Oh... and it's on our WiFi network.  My nerd side was thrilled when we realized we can access this thing from our phones, tablets, laptops... and from anywhere.  Coming home early? Tell the nest to get the house warmed up.  Ah... technology.. ! 

So while all this work was being done, we felt pretty restless and decided to start tackling our really gross downstairs.  I've talked about the issues downstairs before (see this post) - mainly, it acts like a basement, and gets moist & stale, bleh.  Plus, whoever built this place made some pretty interesting decisions. For starters, the bathroom:
I am not proud of this bathroom, and I'm only showing these pictures in hopes that once we are done, we'll have a beautiful AFTER picture.. For now? yikes.  Those squares on the wall were a crooked particle board mirror cabinet, and some ridiculous towel & spice rack combo that held absolutely nothing. Note the gorgeous fluorescent light fixture. You know how I love those.... *barf*
Do you love our dirty peel & stick floor? Do you love that there is no door? Exactly.  Hey, I have nothing against peel & stick floors, they've come a long way, but this one was done wrong, and there are gaps, etc. etc.  The door thing?  There used to be a dirty.. dirty...(don't want to even think why) plastic accordion door here that we should have torn out once we signed the papers on this place. Magically it lasted a year here, because Ralph & I pretty much pretended this part of the house didn't even exist.  But with our stairs missing on the side, we've been entering this room (technically our first floor, and future front door) so it's been brought back into the mix.

With that, I'm going to wrap this up so I can get down there and tape. This is a before & after work type project, so every minute counts.  We're heading down the dark grey, light grey, whites & woods road with this one. Keepin' it clean but still a little dramatic, and a pop of yellow! We want to give it a new look, for a low price, without having to change anything major (plumbing fixtures are stayin' put for now!). Check out my Pinterest board if you want to browse the inspiration, here's a snapshot:

To Do List:
We have a lot of work to do, but it's cold out so we're inside anyway.  Nice & toasty inside might I add, finally! What are your upcoming fall & winter projects?

Have a good one, 

-Jesse


Linkies: FacebookPinterestInstagramTwitterSubscribe & of course, Email me.

Post a Comment

Wednesday, June 12, 2013

Giraffe String Art Tablet

Hello everybody! And a big welcome to all our new subscribers just tuning in... I've been crazy busy lately with string art orders.  The best part? A lot of the people ordering have all kinds of fun ideas, so we've been working together to come up with some new (fun!) designs.  Check out this giraffe:
What do you think? I love him (or her?), I'm considering making one for our house.... hehe. I had trouble deciding what pose to do - straight on, side profile, etc - and settled with straight on.  The ears were too cute, and the tail is a nice touch.  So now that I've made one, I can make more for those who want one too: You can order them in my etsy shop by clicking here, or on the "My Etsy Shop" Tab above.

Here's another one I did this week, with the name "Jace" - I'm really diggin' this color combo that the person chose. The stain is "Weathered Oak" and came out so differently than I'd expected. In a really good way! It's kind of brown gray, and looks like it's description....weathered!  Plus the blues, white, and light green string they chose look great together.
Name tablets can also be ordered in the shop if you're interested, I tried to make ordering easier by putting up generic listings that say "3 letters name tablet" or "5 letters name tablet". This way, you just buy the ad with the number of letters you need, choose your strings, stains, nails & fonts - and BOOM! Done.  You can find those types of listings here.

On a side note, I also wanted to show some new fonts I have! Everyone seems to love the classic, but I think it would be fun to play around with some of these on a name board:
Market and Remachine are my favorite, and I'm making a few in those fonts right now. So I'll show them soon. 

Anyway, hope everyone is having a great week, and if you haven't already - don't forget to enter the Father's Day Ryobi giveaway! There's still $400 at stake here... Hop over to this post if you  missed it. 

Take the time to enjoy your day today..   :)

-Jesse


Linkies: FacebookPinterestInstagramTwitterSubscribe & of course, Email me.

Post a Comment

Wednesday, March 27, 2013

Radio Silence...

Oops! Sorry about the radio silence there, as luck would have it - Ralph and I managed to get 5 days off together, which means we went in overdrive on the home projects.  So much has changed, and we've done so much work, that today we are off to Monterey to relax.  We've been working 12 hour days on this house, and I can't wait to show you the results.  We fixed a major drainage issue in the yard, but that was so boring that I didn't bother with photos. Let's get to the good stuff!  Remember our porch dilemma? Here's a snapshot:
Yea... interesting little cave there. Behind that is a door, a brown oak door at that - I am pretty sure that this outhouse looking contraption is what helped us get the house over other people.  I'm sure people saw it, noticed the lack of curb appeal, and just left. I mean, where is the front door? We were going to chop it in half, make a cute patio, then on Sunday... we just.... kicked it down in a split second decision. Here's a sneak peak (warning - blurry phone pics!):
We painted the door red in a spur of the moment decision too, "Fire Cracker" by Behr.  All the names in the red category were really... interesting. My favorite was "Flirt a little" - who knew paint could flirt?  You can also see the wood 2x2's on top there that we set there to see how it looked...
There - we have a front of the house! I have a million more pictures, as we didn't stop there. We've been turning the frame into a little pergola... and repainted the whole thing (frame, not the house! I wish...).   We decided to just ditch the half banister and keep the whole thing open, and I like it. Of course a bench, some pots & planters will make an appearance later... baby steps.... (name that movie!)

More to come soon... just didn't want to leave you all in the dark! Have a great day - are you getting the itch to start working outside too? Spring is here!

     -Jesse

Let's keep in touch: Facebook, Pinterest, Instagram, Twitter, Subscribe & of course, Email me.

Post a Comment

Related Posts Plugin for WordPress, Blogger...

Shareaholic