Welcome to another session in the School of Restoration! As many of you know, I guest post over at
the Divine Minimalist. I just wrapped up a tutorial on one of
my favorite techniques. It's easy, fun, and gives any piece of wood
furniture a unique hand chiseled look. I debated calling it faceted,
(another love of mine!) but we'll do a whole piece on
that soon.
This chiseled look gives the effect of something being hand carved, and
it's especially distinct when you paint your piece first. The contrast
really highlights our edges and draws your eye to them. This is a
total weekend project, too. Take a look at our side by side:
Materials:
- Wooden Furniture (visible grain & knots are especially nice)
- Paint - I used "Cilantro", non-shiny finishes are best.
- Paint Brushes - I like synthetic.
- Drop Cloth / Old Sheets
- Orbital Sander + Pads: Coarse & Fine
- Protection: Gloves, Goggles & Mask. Safety first!
- Minwax Polycrylic - Satin
Got everything? Let's begin! So here we have an
interesting wooden chair. I chose a chair because I feel you can never
have too many, and they are abundant! I'm sure, like many things, it was
a fabulous and beloved chair at one time... but all I can think of is
that it's a leftover from the set of the original Muppet Movie. The
scene in the old church to be exact, where the band paints everything in wild psychedelic colors & patterns. Take a look:
Hey
I'm not gonna judge... just here to give a little facelift! First
things first, give it a proper inspection. Make sure your piece is
sturdy, and make any necessary repairs before continuing.
Next up, let's break out the orbital. Now, I've suggested in the past few tutorials that you pick one of these up. For this project it's pretty essential, because sanding by hand would be a nightmare! I
promise these things come in handy, and aren't too expensive. I'm using
a coarse sanding pad here for paint removal. Mask, goggle up, and get
started!
Luckily my paint came off pretty easy.
The most important parts to make sure have no paint left are the edges.
That's where we will be revealing the wood. So, if some paint remains
on the surfaces, that's ok. Just make sure it's scratched enough to hold
your paint.
Grab
your brushes & gloves, lay your cloth out & start painting. I
used a latex paint, in an eggshell finish, called "Cilantro". I love
it's light teal hue. This chair will be very "Modern Cabin", if that's a
style.
The naked wood takes the paint
really well. I'd suggest at least two coats, but you're the artist - it's up to you!
Here's where I chose to stop. The coats dried relatively quickly, and I was done in under 2 hours.
If your chair is like mine and has gaps you can't easily reach, an inexpensive foam brush is a huge help.
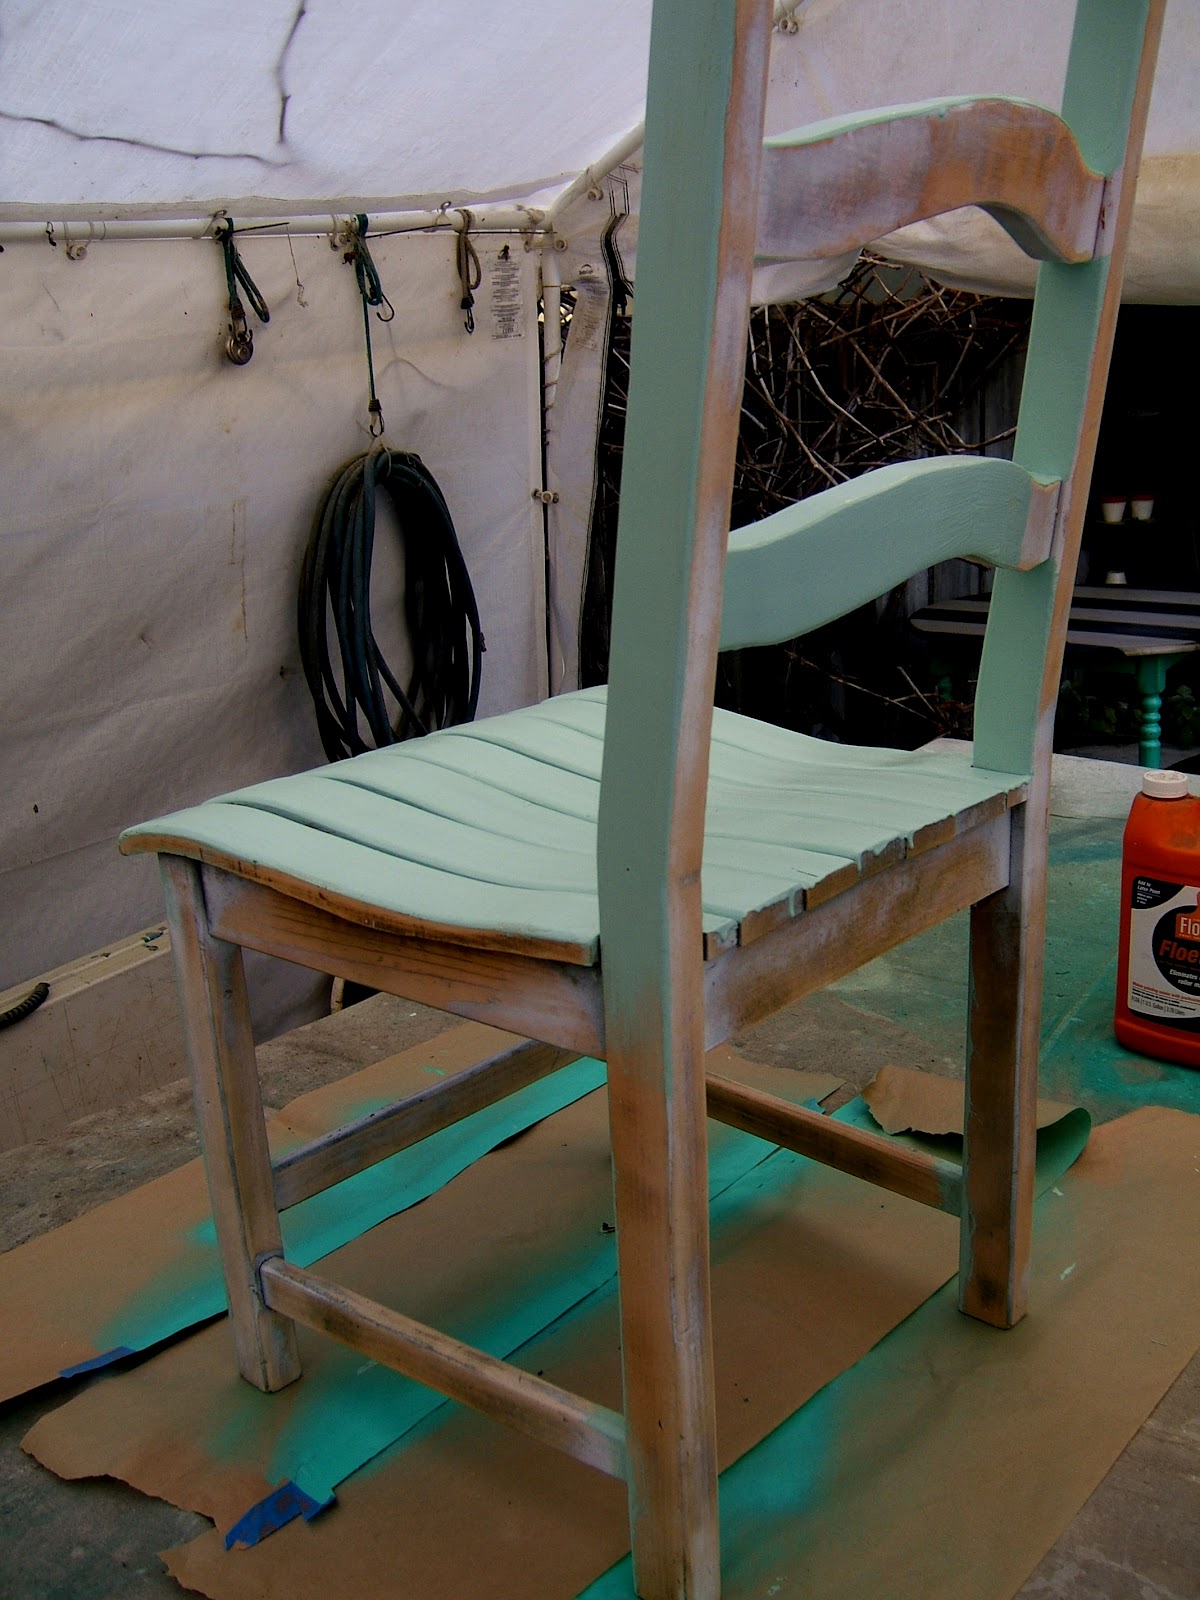
Once your piece is
completely
dry, we can start our chiseled edges. This is the extremely fun and
rewarding part, and I'm not exaggerating! I love it. Start planning out
where you want the edges chiseled & wood revealed, and get your
orbital set up with the
fine sanding pad. First, take a look below at the goal:
See
those edges? Fantastic. For this look, I always always keep the corner
for last. Get your mask & goggles on (you do NOT want paint dust in
your lungs), turn your orbital on, and let it ramp up to speed a little
bit. Then, starting with the edges (save the corner for last!) just
gently press the sander onto the corner. You don't want to be parallel
to either side, remember you're coming in at an angle to flatten that
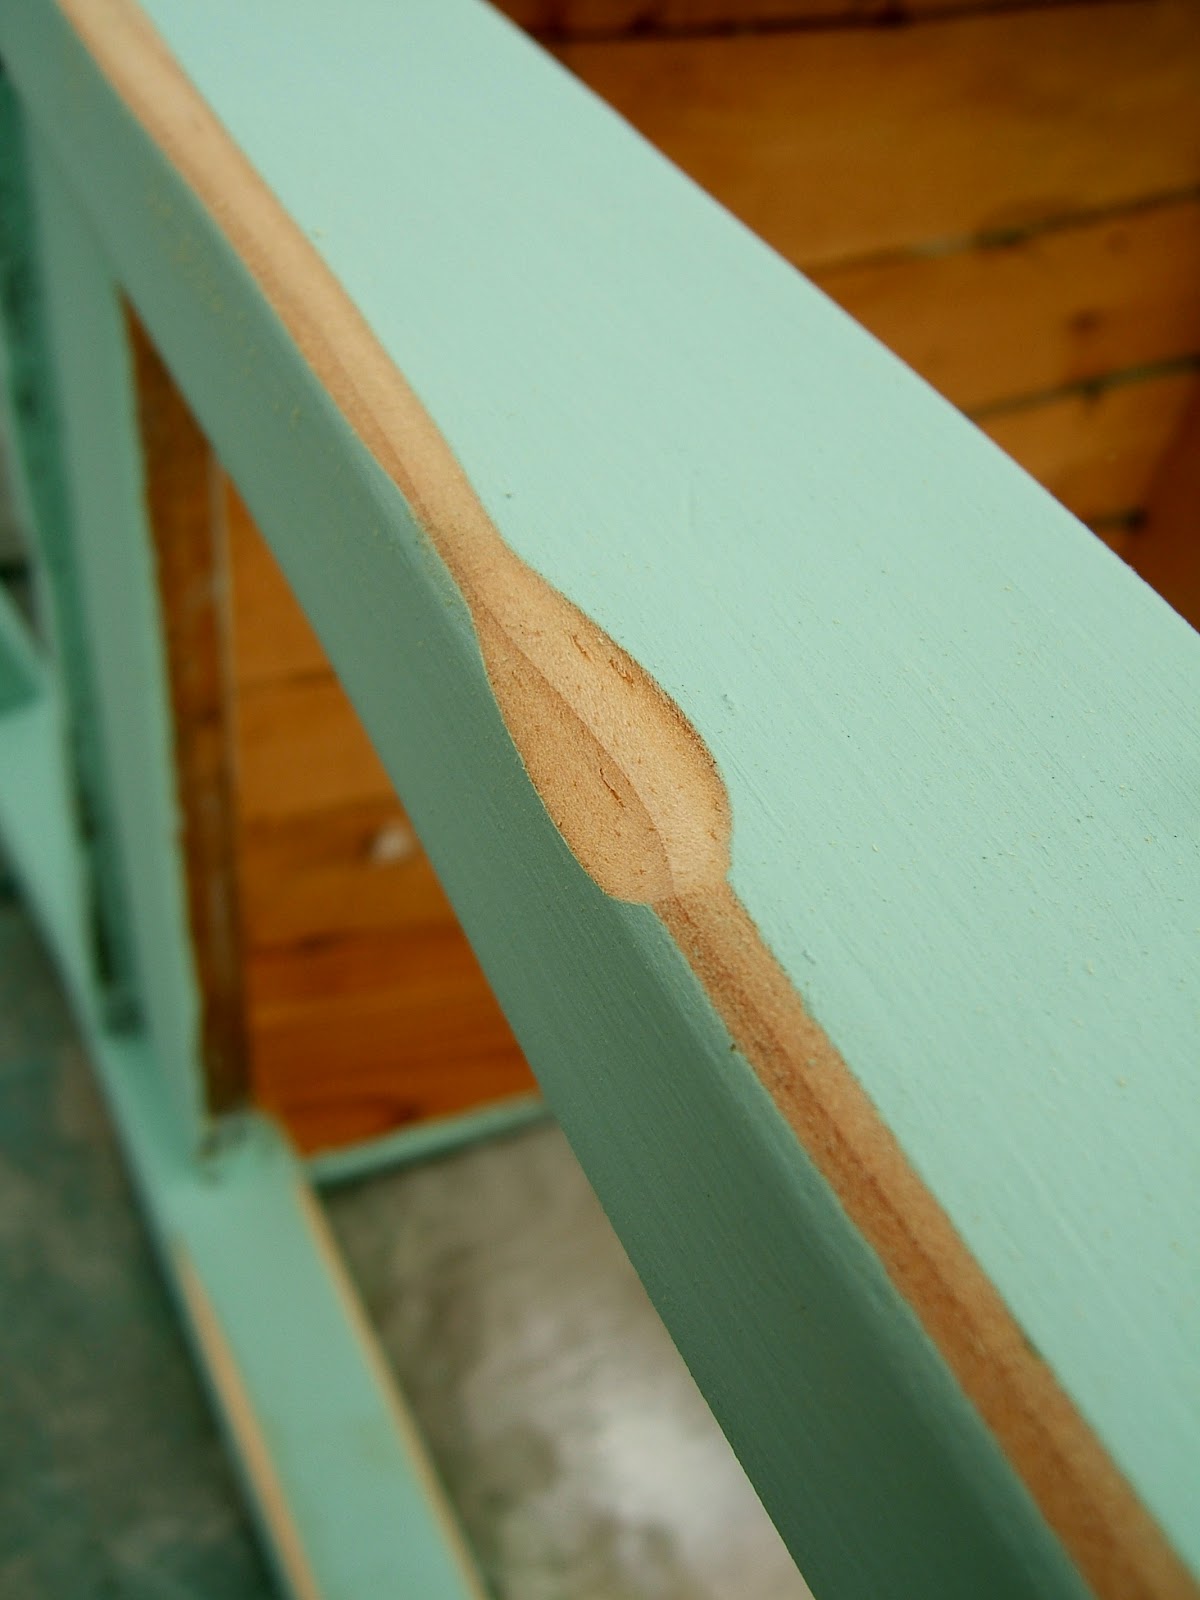
edge a bit. Here's a close up that will explain better:
Fun,
right? By now you will have an idea of how your wood, sander and hand
are interacting - and you can start to really play with it. I added a
few marks here and there, where it was sanded a bit more than the rest. I
just used the edge of the sander, and went over one spot until I was
happy. Take a look:
After
you've done the edges, you'll be left with so-so corners. They do look
nice, but if you want the truly chiseled or faceted look, the corner
will really be your pride and joy here. Just do as you've done so far,
but now right against the corner, and watch it rapidly form. Careful though, the corners sand down
much faster than the edges. You'll see what I mean.
So
that's pretty much the technique, easy right? Just have fun with it, do
as much or as little as you like. I think the contrast is really cool,
and makes for a unique effect.
Now
this reminds me of a chair you'd see on the wrap around porch of some
lake house. I could easily get carried away with this! I had to stop
myself.. I added a few deeper marks on the surface areas, as you can see
above if you look closely. Once you are happy with your outcome, give
it a good cleaning to make sure all the paint and wood dust is gone
before we seal.
Gently stir your seal. This is
important! I made the mistake once of not stirring, and my "satin" came
out "glossy". The company explained that if it settles that will
happen. So learn from me, and stir (not shake) that polycrylic. Use a
synthetic brush and start coating your seal on. One coat is enough for
basic protection, but if you think it will get heavy use, go with a
second. I actually did a third on just the seat for even more
protection. You're done! Here's mine:
I
especially love that top piece there. Turning a rounded edge into
multiple flat edges definitely gives this chair a hand chiseled look. So
how did you do? This is my favorite technique by far. Just think,
those who don't ask will assume you chiseled this chair piece by piece
from some old tree, and that's just fine. It just goes to show that the
furniture we already own can almost always be brought back to life
instead of tossing them aside.
Thanks for tuning in for yet another session of School of Restoration.
This is definitely one of the less complicated tutorials, but after last
months
re-upholstery I think we needed a fun one! If you decide to try this on something of yours, send in your pictures - we'd love to see & share them.
If you missed the last few tutorials, you can find them all
here. Tune in next month for another technique tutorial in the School of
Restoration, when I guest post again on The Divine Minimalist. The weather is getting
warmer, which means more fun and more projects. Take care, class
dismissed!
Post a Comment


I love the color of the chair. I guess I never really get the 'exposed wood' look. Why do you want bare pieces of the wood showing? Is it to make the chair look old/well worn? Personally I think the chair looks better when it was just painted. If you want the 'faceted' flat edges, why not do them before you paint?
ReplyDeleteThanks! Yes, I love the color too. As far as the look, I think with so many styles to choose from this is just another one in the bag, hehe.
ReplyDeleteYou're right, faceting first would give you that nice, solid color edged look. That would be really pretty too!
I think what personally attracts me to the style, is I like that, "cabin-ey" style but I'm also a huge fan of modern color. So I think it's a nice blend.
This looks so cool!! I would never think to use my chisel in this way. Almost to the end of my last Ginormous project, a huge kitchen, kids out of school next week, and I will finally, finally have time to write you that email about business I promised all those weeks ago.
ReplyDeleteGreat chair, love the update, and the color! I have so badly been meaning to buy an old piece from the thrift store and put my own touch on it, but have yet to do so!
ReplyDeleteNot doing anything for me either ...
ReplyDelete