Google+ Nine Red: January 2012

Monday, January 30, 2012

Before and After: Striped Round Table

Hello! I just finished up on this table, this was a really really fun one to do! It sanded nicely, it took the paint well, everything just seemed to go nicely the whole way.  I couldn't decide a design, and eventually settled on stripes since I haven't done them in so long. I chose thick, almost nautical stripes.  Here's the before:
 I feel like these tables are a dime a dozen. Literally, I see them everywhere! But, they are solid wood which is really great.  If you have a good base to start with, you're good to go. And so it went:


 This turquoise is actually the same color as the top half of my kitchen. It's really bright, and wonderful.
 A lil staging....
There it is! It's up for sale, and will soon be in a local shop as well. I'll let you know where as soon as it's confirmed.  Have a great one!

Post a Comment

School of Restoration: Teal & Persimmon side table

Good morning class and welcome to the School of Restoration! As many of you know, I guest blog over at The Divine Minimalist in a tutorial section they call School of Restoration.  Head on over to their blog and take a look around! So first up in what's to be a long line of tutorials, is the Teal & Persimmon Side Table.

Well hello there my sweet lil side table! Or sweet now... because before this simple yet satisfying make-over, this table would have quickly been put in the back of the basement.  Distressing is a popular and fun way to give furniture a fresh look, while giving the impression that your grandma made it this way decades ago  (and how thoughtful of her, it happens to match your home decor!). Today we'll walk through the steps for this two color distressed effect, and some of the tricks that I've picked up along the way.

Materials:
  • Electric Sander with medium to fine sanding pads.  (or sandpaper and a sanding block if you don't have a sander)
  • Medium Steel Wool
  • Sanding Sponge - fine to medium (optional)
  • White Candle (a dead tealight is perfect)
  • 2 colors of paint - one for the undercoat, one for the topcoat.
  • paintbrush
  • plastic sandwich bags
  • Watco Satin Wax (or your preferred seal)
  • Plastic gloves (I know, I don't like them either, but just do it!) 


Post a Comment

Friday, January 27, 2012

School of Restoration

Class is now in session! The great gals over at The Divine Minimalist have asked me to start writing monthly tutorials on furniture restoration and techniques.  We're gonna cover a lot of subjects, and take some crazy looking furniture and give it love again. Fun! Check it out, and their blog: The Divine Minimalist.

Post a Comment

The Dining Set, part 4

and the finale! Well, I put all the pieces in the same room today for a final photo shoot before they go to their new home on Tuesday.  It's been a long journey, but a fun one, and I really like how they came out. Here's the set:
 I wanted to take a picture from both sides, but my three million windows really drowned that last one out! Up next is a close up of the leg, chairs, and table top.

 So, you might notice that table top is a bit different than the first picture I had showed you in part 3.  Well, it is and I'm glad! The person I'm doing this for agreed, it needed a little more brown and warmth, so I distressed it and rubbed 2 coats of Jacobean all over it. Came out great! I love it. I'm waiting for it to fully dry before giving it a good seal to withstand the wear and tear of real life. Isn't that ironic, we distress furniture and then seal them so they won't become distressed? One really great thing about the distressed look though is that if it DOES get a scratch, it's pretty forgiving. I'm rambling, here's some shots of the table progress if you are interested:
 That's the first coat of Jacobean, below is also:
 Bring in a lil' leg to show some contrast:
 And the final coat:
I love that the table is expandable, but with this many seats (6) I think it will always be in it's widest form.  This was a really fun custom job, I was so happy to do it, and I hope she loves it when we deliver it on Tuesday!  Have a wonderful weekend everyone!


Post a Comment

Tuesday, January 24, 2012

Dining Set, part 3

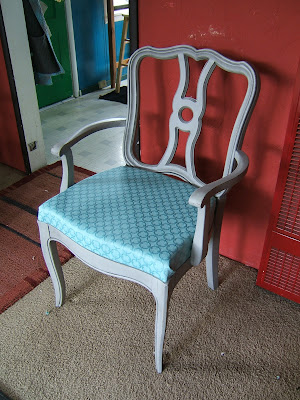
I'm just about done with the dining set! You've seen and read the progress so far, here, so let's cut the chatter and get down to business. Here's some final shots of the chairs and progress of the table.  First up, the chairs!


 I love that fabric! It's textured so it adds a lot of interest and changes the look in different lighting.
 Don't mind the bits of upholstery foam all over the house.... haha. I had just finished up!
 and in the shop, the table during it's sanding when I remember I had no photo yet:
 
There it is with the final stain coat on it. She chose "tugboat" by behr, which is a semi translucent stain/coating.  It still lets some of the wood show through while effectively delivering the color she wanted. We are thinking about distressing the edges to let the light wood show through just a teeeny bit. Not sure yet.  Once it's done drying completely I'll set the whole thing up for a fun photo shoot. Have a great Tuesday!

Post a Comment

Friday, January 13, 2012

Turquoise Half Table

During dry times on the dining set, I took a little break to spend some time on this half table that was brought in recently:
 Pretty great as is! I loved the legs.  But I hadn't done a good old fashioned color wash in a while, and I already knew where I wanted to go with this table. So I spray painted light blue, color washed in teal, and distressed that dark brown right back out. Here it is after:
 I like it! I sealed it in wax, for the soft finish.  Yes, that's a copy of design sponge on top... I love that book!

 A little close up of the leggies:

This table will probably head over to The Beach Shop on Soquel Ave in Santa Cruz.  Of course, it will also be available in my etsy shop.  Have a wonderful weekend!

Post a Comment

Thursday, January 12, 2012

Dining Set, part 2

Moving right along, the chairs needed a good cleaning and a priming.  Here they are:
 What a difference some primer can make!  Yes, maybe I'm over excited about it.  But to see some progress here was really helpful, haha.
 Since the style she wants is a distressed style, I wanted to do a nutmeg undercoat.  In this case I used spray paint.  I just love spray paint.
 So that's the final coat! She picked out the grey, and I distressed down to the nutmeg, and then coated the entire chair frame in an ebony stain. 
 Here's a close up of the distress, I love how it came out.
So now you're up to speed, I'll take more pictures as the progress moves along. There are 6 chairs, and the fabric that she chose for them is a really pretty almost teal blue...... you're gonna love it. Have a great day!


Post a Comment

Wednesday, January 11, 2012

Dining Set

In mid December, I had someone contact me about doing a custom dining set for them.  I was really excited about this - one, it was my first time doing an entire SET rather than bits and pieces.. and two, I was flattered someone wanted ME to do it.  We've amazingly been doing the whole process via phone & email, which is pretty impressive.  Between craiglist purchases and delivery coordination, to sharing paint codes so I could get the exact colors - it's been a fun adventure.  I'm almost done, and I thought now that I have a good line up of pictures, it would be a good time to start the sharing.  So over the next few days, I'll show the journey that has been, the dining set. Let's catch you up to speed, here are the chairs as they arrived:
 Oh my....
 Someone, somewhere, loved that print - and got a LOT of use out of them. These chairs were really.... something.  I was so curious to see what was causing the interesting  lumpy-saggy front thing they had going on. 
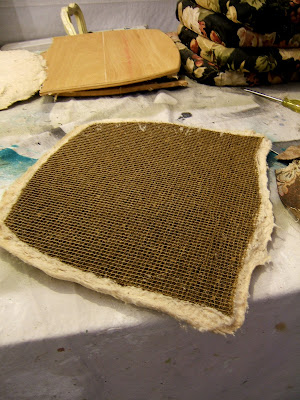
First things first, I took the seats off. I was SO happy and relieved to see that the base was wood, and not some crazy spring contraption that would have tripled the time on these.  But look at all these layers I found! At least 6, and whoever covered them (over and over again......) just wasn't really feeling the whole, remove some layers FIRST idea.  Notice the clever use of old comforters as a padding between layers, No wonder they had such a lumpy shape before! I found a brown and cream label that said "Davis Cabinet Company - makers of fine furniture - Nashville, Tennessee"  I'm going to say at least 1960's.
 
 Why hello there!  These chairs just aged themselves.. this is the original padding on the wood.  Mesh, straw, and pure unfiltered cotton. You can see all the little husks in it! But, this is a new day and age and we have super-cushy synthetic padding now, so these got a good salute - then the boot. Haha, how cheesy...

Here they are, all six, lined up and cleaned up, ready to be worked on. Keep an eye out tomorrow when I show you what happened next.

Post a Comment

Related Posts Plugin for WordPress, Blogger...

Shareaholic