Google+ Nine Red: Vintage
Showing posts with label Vintage. Show all posts

Friday, July 12, 2013

Spotlight: Home Tour of Robert & Michael

By the time you read this, I will be gone. (Beetlejuice quote alert! Anyone?...) Gone, to Lake Topaz, which I'm assuming has zero internet and cell time.  I guess I shouldn't blog lakeside anyway (oh but if I could...).  So, Happy Friday & today I'm sending you over to Apartment Therapy to see one of the most magnificent home tours I've seen in a long time. Robert & Michael's apartment.  I'm a HUGE fan of mid century modern, an unexpected love that was lingering just beneath the surface, until one day... bam.  So this place is super inspirational, "keep going... keep collecting", it says (yay!) Check out the sneak peeks but head over to Apartment Therapy to see the full slideshow, and to witness what an amazing jobs these boys have done, in their rental mind you... see what I'm sayin? You don't have to own that place to make it magnificent.


Oops! Looks like you dropped your jaw, that's ok so did I. And for damn good reason! This place embodies so many of the goals I have floating around in my head for our home.. I just love the mix of the Mid Century furniture (wood grains! crazy shapes!), with the retro handmade crafts (Macrame! Latch Hook Rugs!), modern touches (Flat screens! Stark white pottery!) and amazing ceramics (get a load of those lamps sister...).  This is the type of mix I'm scouting out. In the meantime I'll be referring to this amazing tour time & time again for inspiration. It really is what I was dreaming of. Ah.......

Ok since it's Friday I give you full permission to stop working and go on this house tour, it's roughly 20 pictures of amazing, and you won't regret it. Go ahead, boss won't mind.  I'm dying to know where they got that circular hanging room divider (above).. I wonder if they made it out of PVC slices. Maybe. Anyone? I should write them.

Have a fantastic weekend, hopefully you're up to no good, it's Summer after all! Make it memorable... 

-Jesse

Linkies: FacebookPinterestInstagramTwitterSubscribe & of course, Email me.

Post a Comment

Friday, June 28, 2013

DIY Antique Crate End Tables

In the spirit of the front deck projects, I'm going to show you a quickie today, to take those versatile (and cheap!) crates from any craft store, and make them look like they've been handed down from your great great whoever, who actually built them.  No one needs to know they were brand new yesterday.  Yep - we can age these a good 50-100 years in one day.
Ok maybe not 100 years, that would probably be falling apart by now, but I had to say it for effect peole.  Remember when I shared All Things Thrifty's Colorful Antique Crates? Yea, that totally inspired me...  Once we had our furniture for the Front Deck Redo, I was stuck in the dilemma of needing some smallish end tables.  The crates, turned on their sides, would be perfect. But they were too... new...
Forgive me, this is a mid project shot! (Go here to see the finished deck tour) That set of furniture came with some less-than-cute cushions (no offense if you like 'em! To each their own..) and see what I mean about the crates? Too new! Too clean! I was getting kind of obsessive, when I thought - Oh - I'll do that steel wool aging trick from the Floor Mirror Project a while ago. ah-ha!

So let's do that today. Go buy some crates, these were $9 each at our Beverly's, which - sadly - were reduced to $6 the very. next. week.   Oh well, whatevs - $9 is still way cheaper than if I were to make them.  And cheaper than patio tables, what is UP with outdoor furniture prices?!  Hey - while you're out shopping, get some of this stuff:
  • Crates - if you're store doesn't carry them I found some on Amazon, click here.
  • Tea or Coffee.
  • Steel Wool
  • Vinegar
  • Mason Jar
  • Paint brushes
  • Spray Bottle if you're too lazy to brush, like I was.
  • Small thing of a paint color you like, or leftovers that I'm sure you have lying around. 

Be sure to protect your work surface, I used this gorgeous blanket........lol
Line 'em up! Now the aging process that I'll walk you through right quick, consists of this:
  1. Applying an acidic base
  2. Fermenting Steel wool and vinegar
  3. Waiting 24 hours.
  4. Applying the fermented steel wool and vinegar. 
Weird I know, but it works like a dream.  So brew up some really strong tea.  Like 3 bags to one mug of BLACK tea.  I didn't feel like doing that and decided to use coffee that was already sitting in the pot. Just go with the flow...

I normally brush this concoction on, but with all these grooves and nooks I was not excited for this step, so I popped the coffee in a spray bottle.

Always have empty spray bottles around.  Eh, it's acidic, should work.....right?
When you spray or brush your coffee or tea on, it won't look like anything is happening. That's normal, this step is not very fascinating. Just make sure to be generous and get every spot wet with tea or coffee.

Meanwhile, drop a half of a steel wool piece into a jar, and fill with white vinegar until it submerges it. Cover it, it's stinky.

Now, you're done. Wait 24 hours.  Yes, 24. Don't cheat here. I would if I could, you know that! Go do something fun.

THE NEXT DAY....

Feeling pretty proud of my spray bottle shortcut, I put the steel wool and vinegar mix in the spray bottle. NOTE: You can dump the steel wool part, that's all done. Just need that gross grey vinegar.
Within seconds of applying the vinegar you'll see a magical and interesting transformation.  Just spray it everywhere.  That's it, you're done!
 Within a couple hours I had this:
Hooray! 50 years added.  Just let those dry.  Now, here's where I decided they needed a little color.. I put them next to the dark brown furniture and they pretty much disappeared.  Yea.. I didn't need them to blend in THAT much! So I whipped out some leftover paint. This color is Cozumel by Behr.
This one is extremely easy.  Took five minutes.  Take your crate, wet or dry, doesn't matter:
Whip up some paint and water. I did about 2/3 paint to 1/3 water. It wasn't exact. At all.  Then just dabble a little here and there and rub it in.
Imperfection is key here, and it's all a matter of personal choice.  If you want it really bright and bold, cover the whole thing.  Here's my stopping point:
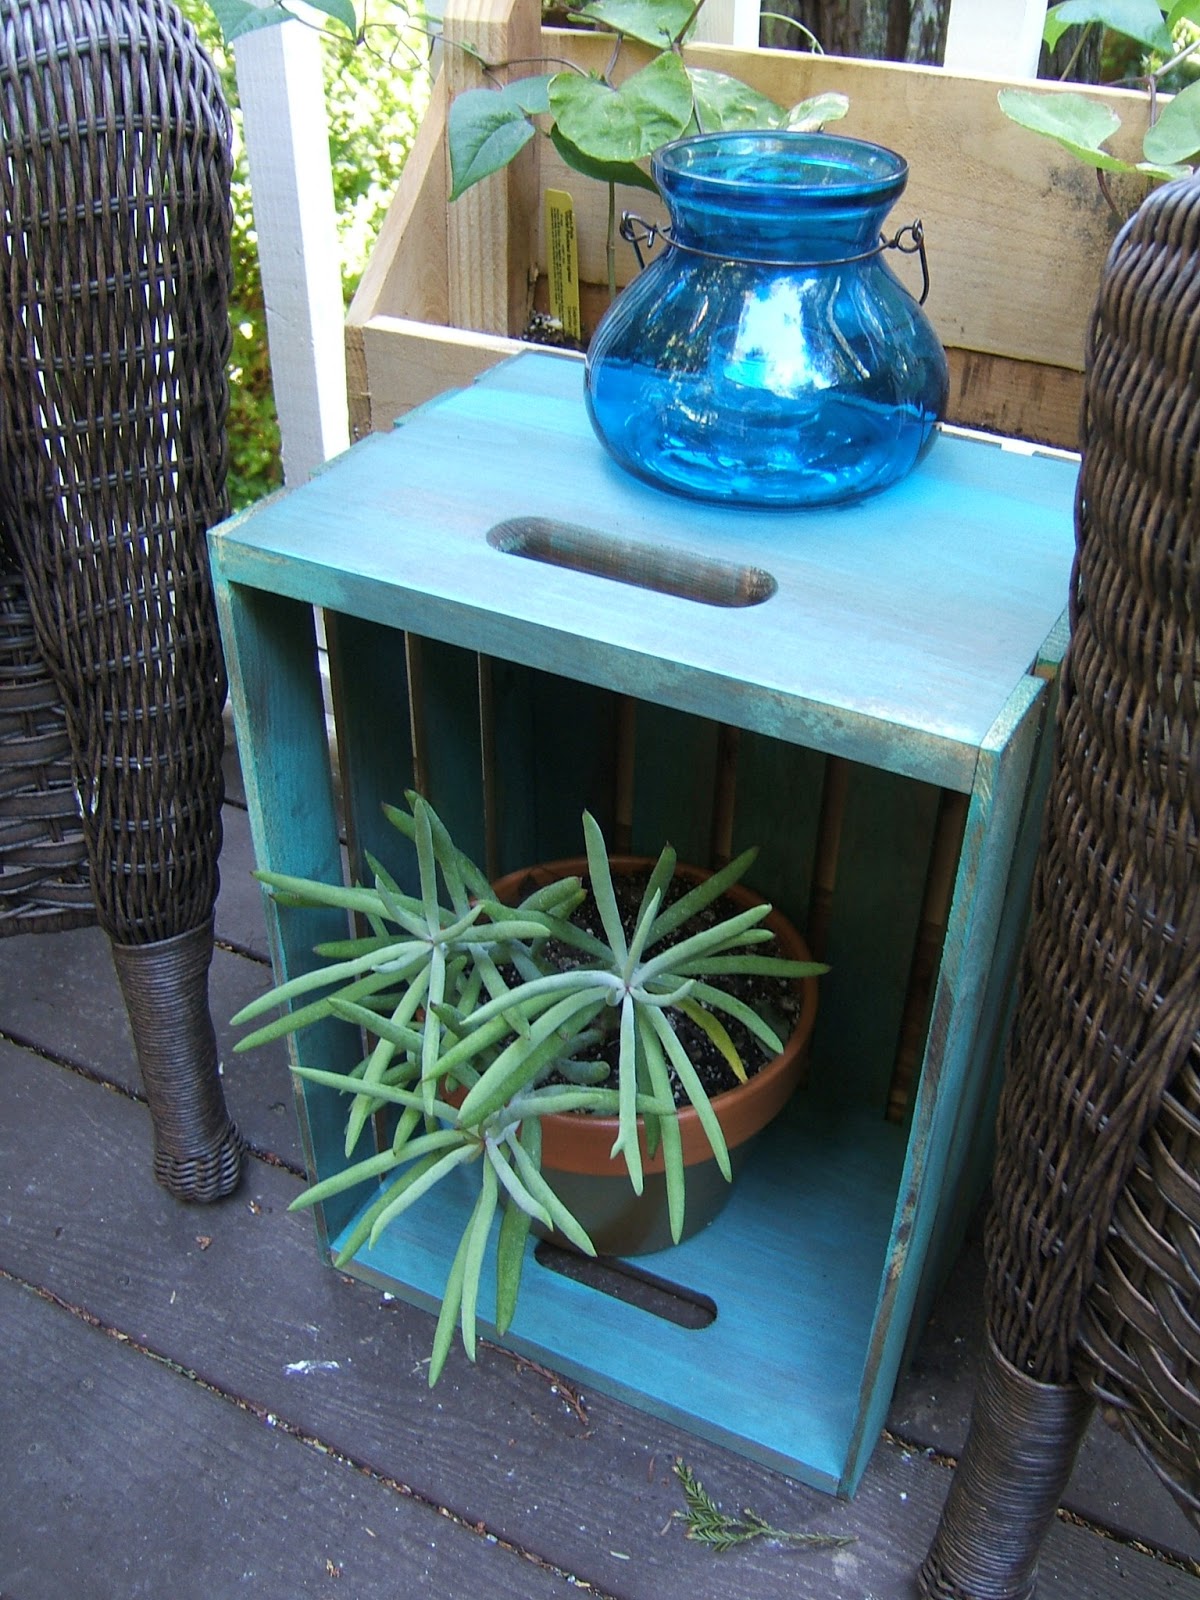
 Did I seal this? No. I could have, and so could you, but I figured - if I was going for the aged look, we might as well let these get old-ER the real way, right?  Here they are in their new home:


So yea - that's a pretty simple project! And while it does take at least a day, the actual time spent on it is way less than an hour, total.  This is one of those projects that can be going on in the background, with spectacular results.  I love those!

Now grab a drink, set it on your new table, and dream up a wild background story about how these crossed the plains with your ancestors or something.. I dunno.   Just kidding, don't lie.  You're awesome and you did these yourself - spread the word!

What projects do you have lined up for this weekend? It's supposed to be pretty hot here in Ben Lomond, so I see either a beach day, a river day, or a lot of fans & cold beer. Either way, I'm glad it's FRIDAY.....

Take care & Happy Summer,

-Jesse

Related Posts:


Linkies: FacebookPinterestInstagramTwitterSubscribe & of course, Email me.

Post a Comment

Monday, May 20, 2013

Spotlight: Fan of Succulents

Get it? A Fan of Succulents? Because these are old fan covers! Now you see it, huh?  My sister Denise sent me this super cute planter the other morning and I fell in love! Pinned that right away. What a perfect succulent planter!  And surprisingly - I have actually brainstormed in the past uses for old fan covers, who knew I'd have enough dead fans to actually think this over?  I'd seen people make them into snazzy fruit bowls before, but really - you only need maybe one of those.  These? You could go on and on with this project and have them all over the place.

For the full project tutorial, pop over to Rancho Reubidoux.

I think you could do this with newer fan covers as well, as long as they are metal. Just pop any plastic parts out, and either give it a fresh coat of spray paint or distress it and let the weather do the work.  The metal will age well regardless and look really killer with the succulents. I wonder if you slightly sanded a the paint off the metal, then left the cover in a tub of water for a few days, what would happen? Anyone done this?

What do you think of this idea, you like? I love it. Next time I see a fan at a garage sale, that puppy is coming home!

Thanks Denise for sending the idea!
Got an idea to share? Submit it here.

Entered the String Art Giveaway? It ends Thursday! Click here for details.

     -Jesse


Linkies: FacebookPinterestInstagramTwitterSubscribe & of course, Email me.

Post a Comment

Friday, December 2, 2011

Sakura goes to France, Part 2

I really liked the original Sakura table (here) and wanted to do another one.  We came across this table on a walk one day and I fell for it.  It had all the right shapes and carvings one would love, but the overall look left much to be desired.  I had to highlight those carvings, and what better way than a good distress & stain job?  Top it off with another visit from the Sakura flower punch book pages, and we have Sakura goes to France 2.0.... Here it is before:
 and here is the after!


I like how it came out, and I went a little more subtle with the flower this time. They are cute and make some very interesting phrases as your eye goes across them... This table is for sale in the shop, and will have free shipping for the holidays.  Have a great weekend!

Post a Comment

Sunday, November 14, 2010

The Kill

Hello again! Hope everyone had a great weekend. Quick side note, I've always said "Hello again" without thinking twice about it, but recently we had a night with Netflix and the movie that arrived was "Hello again" with Shelly Long.
I hate to say it, but it wasn't the greatest movie in the world, but somehow it stuck with me, and I can't stop thinking about or quoting it!  Eighties movies are so fun to watch though, I think it's something you just HAVE to see. Anyway, moving on!

We just got in a few pieces of furniture and I've been racking my brain to remember what it is CALLED. I've seen them all over and I used to know, but I'm drawing a blank! Maybe you can help:
I love the style, the raised back perfect for a lamp, leaving room for book and knick knacks underneath.  I'm toying with a few different ideas as to how to paint it, any suggestions?

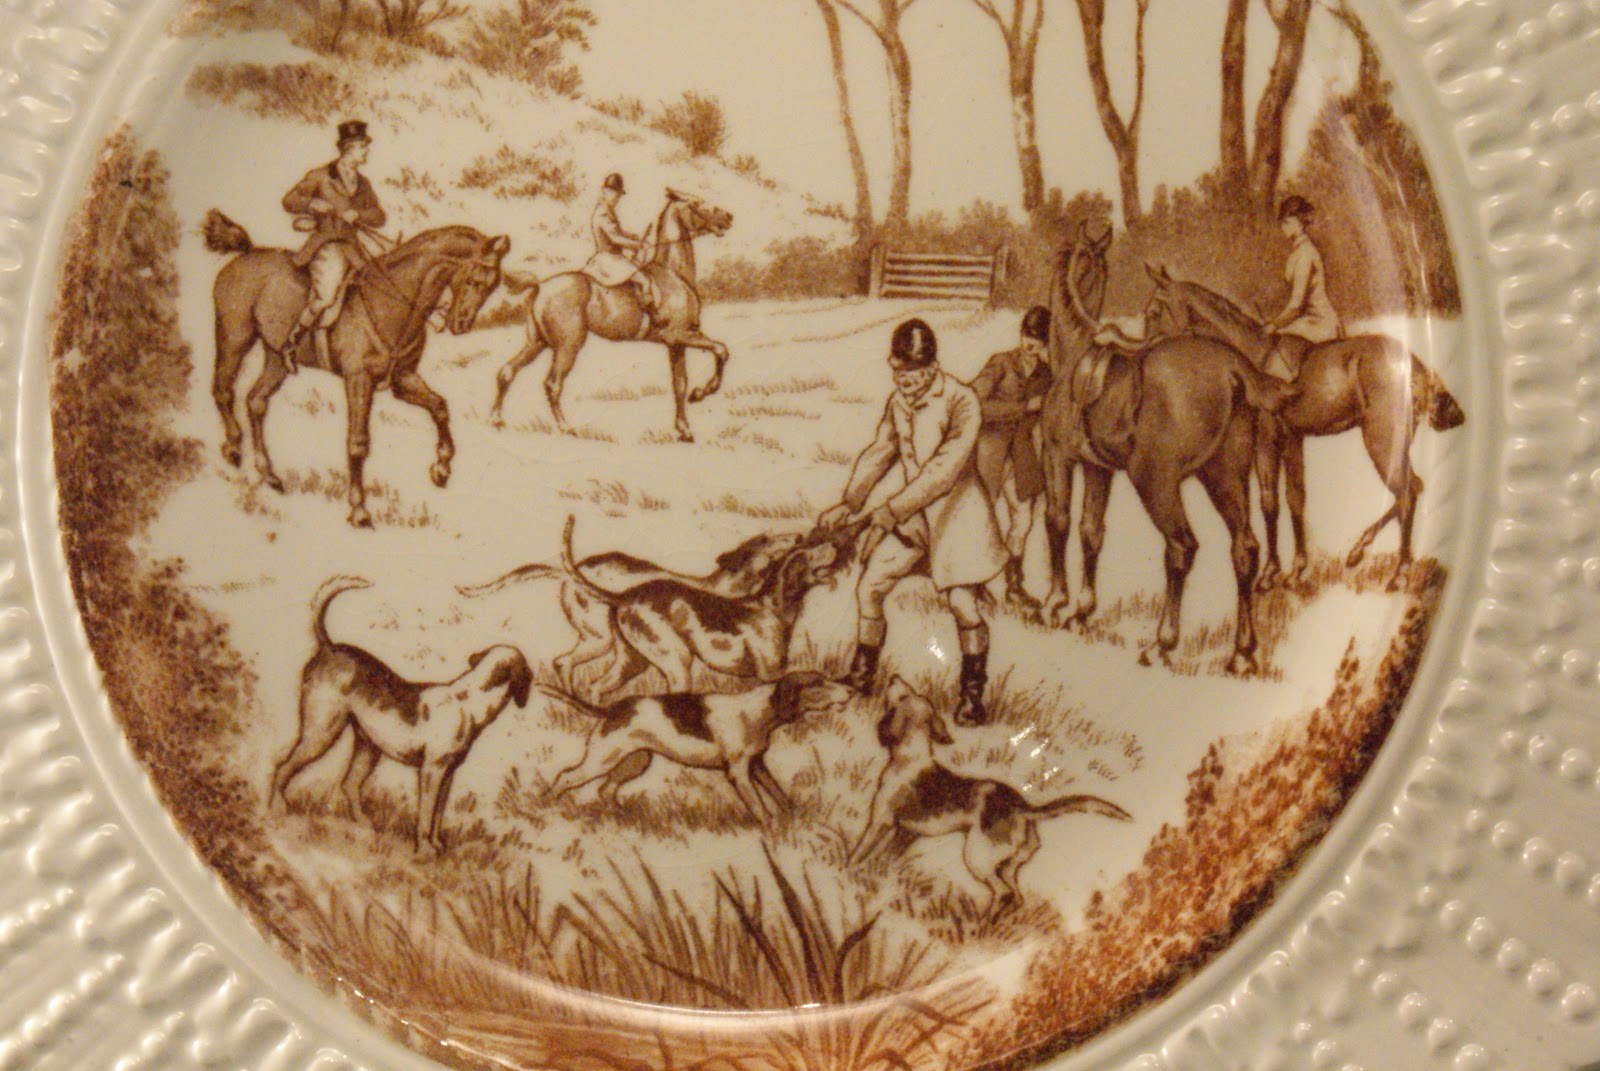
Now I usually don't talk about all the vintage things we put in the shop, simply because there can be SO many that it would hog the whole blog.  This one though, I had to show.  This plate is actually titled "The Kill". Check it out:


This has to be the most interesting plate I think I've ever seen... well, have a great day!

Post a Comment

Wednesday, September 15, 2010

Kevin's Table

Hello! Here is a beautiful table that Ross has been working on for our friend Kevin, sorry it's not for sale! I love the way it came out.
 Sadly, I don't have any before pictures, but let me tell you it was in trouble. It had a lot of stains in the top, some looked like oil. The table has a hand carved signature, and says "Jules Suppo 1953".  Almost 60 years old! Ross is going to give it another coat of stain and then seal it up for protection. 

Post a Comment

Friday, September 10, 2010

Polka Dot Chairs

... the adventure continues! I just finished putting on the fabric for the seats, and had to take a preview picture. What color do you think the chair should be? I was aiming for light blue, but now I have no idea. Remember, it's a set of four, and the back will match the seat!
In case you missed the original pictures, here they are:
Give me your ideas! Thanks!

Post a Comment

Tuesday, July 20, 2010

Honeybee Telephone Table

Remember this table? You can see the original post here. Well it's finally done! I went with Marigold yellow for the entire table, but opted for a chalkboard top and black knobs. It reminds me of a honeybee, but I stopped myself before putting accent stripes here and there. Maybe I will still do it.... we'll see!  The table is done and for sale, best of all, it packs flat!  

On the vintage front, here is an interesting wooden plaque (or tray?) with hand painted butterflies on it. I feel it's a wall plaque, but I guess it could also be a trivet or a simple serving tray. I guess it's up to the owner!  Thanks for checking out Nine Red blog, have a great one!


Post a Comment

Sunday, July 18, 2010

Super Seventies Chandelier Makeover

Here it is! The super seventies chandelier is done. This was a chandelier that was going to be thrown away during a home remodel. I had a few ideas, and eventually went with paying homage to it's 1970's roots by redoing it in retro fabric and colors.  It lights up really nicely.  I yet again forgot to take a before picture, but I have a picture of it in pieces before hand. You can really see the improvement! For sale here.
On a vintage note, Ross and I came across this really pretty serving tray and thought it would be a great addition to the shop. Click here to see it in the shop.

Have a wonderful week, the weather is great!

Post a Comment

Monday, May 17, 2010

Bud Vases

I've found more bud vases for you!  I'm happy so many people like them as much as me.  It's nice to see them go to good homes, but believe me, I enjoy having them here in the meantime! All but one of the last group of bud vases are gone (see April's Bud Vase post) and I've found more while out on my treasure hunts. Here are the newbies that are available in my shop.
Though this isn't a bud vase, I'm gonna throw it in this post anyway because it's so cute. It's an old truffle dish,  probably holds 4-5 truffles. Perfect accent to a table, I really like this piece: 

If you're interested in any of these, head over to NineRed.com and take a look. These are vintage finds, so they are the only ones I have of them. I know, I wish I had more!  In other news, things are starting to warm up around here, and I've been planting a ton of veggies. We have 15 tomatoes, 4 eight ball squash, 6 pole beans, 6 sugar snap peas, 2 grapes, a ton of herbs, 4 watermelon, 4 lemon cucumber, 8 varieties of peppers, 2 eggplants... jeez! Leftover from winter we have 12 broccoli finishing up, 6 cabbage and 6 cauliflower. Hopefully they finish up soon so I can plant other things in their space. We've been having a lot of random rains here, which is unusual, but I like it because 1) I don't have to water, and 2) we need extra water so bad! Last year we were on a strict schedule. I could only water on Tuesdays and Saturdays.  That's California for you, never know if it'll be a drought year! Have a great week everyone, keep in touch. I'm gonna hop around your blogs and see what everyone is up to!

Post a Comment
Related Posts Plugin for WordPress, Blogger...

Shareaholic