Google+ Nine Red: Lighting
Showing posts with label Lighting. Show all posts

Tuesday, January 14, 2014

Downstairs Bathroom: New, Old, Light Fixture

Tidying up the details of the downstairs bathroom, finally! Last weekend we worked on the new wood plank ceiling, and I used a nail gun for the first time. It was a life changing experience, why did I not get one sooner?? More on that soon... let's play catch up - I'd been saying I'd show you a quick run down on the light fixture, and here it is. 

Heads up, if you are planning on doing a similar, simple light fixture makeover, here is what you'll need:
  • Old light fixture, cleaned up.
  • Spray Paint. Two colors in my case.
I told you it was simple... 


As you know - we had a fluorescent light fixture in the bathroom, that I just couldn't understand WHY it was there. If you missed it, here's a peek:
Pretty bad, and the light it gave off was the worst.  If you ever want to install the most unflattering light in the world, I recommend a bare bulb fluorescent shop light. It's pretty bad.  In my brain I knew I wanted something unique, so off to the thrift stores I went, and found this:
I have to admit - I didn't pick it up at first. I walked by it, then walked around thinking & kept coming back. I could see some potential, but let's face it, it's also pretty scary... but it was solid metal & porcelain, around $15, and I knew I could at least TRY spray paint.  If it didn't work out, no big loss, right? I got impatient when I got home that night & started dismantling:
There were no big surprises or roadblocks, so the next morning it was all systems go. If you are going to redo a light, it's important to NOT lose any parts, and as you dismantle, take note of where everything went. Do this either with tons of photos, or draw out a chart.  You may think you'll remember where every washer went, but you won't. I always think I will, and I don't.   So here's my parts, nice & clean:
Then we have the big bell:
After a  lot of brainstorming, I voted on a light that would be grey exterior, yellow interior.  First up, many light coats of yellow on the interior:
That totally doesn't look yellow, but it is. Very yellow. Took about 4 thin coats, and luckily no drips. That's why you want to do THIN coats. 

I decided to reassemble the "guts" portion of the light, figuring that solid yellow would make for a seamless & clean look.  Though I did keep out the very last brass fastener, to remain brass.  (For the bottom).

So here I have it assembled, tape to protect the wires, and tape inside the sockets to protect our connections.
I decided to lay it on it's side & tackle the underside first:

After doing as much as I could from these angles, I hung the "guts" from my sawhorse and spray painted my last few coats from above. I didn't take a photo, oopsy. You get the idea! 

Note: See how at the end (far right) there is no finishing piece of hardware? That's the one I kept out.

While that dried, I went back to my bell (which was now dry) and added a few pieces of tape to the inside top (to cover the hole from within) and then painted the bell grey. I apologize for the lack of pictures, I could have sworn I took some. These are the consequences of balancing too many projects!

I was starting to really work against the light here, as shown in my impatient cell phone night photo:
Normal people allow their things to dry for 24 hours, but I needed to see it together, so I took the chance. I let it hang here for a few days, for what it's worth...

Simple makeover! Two different colors of spray paint, and an afternoon of patience.
Trying it on in the bathroom, here it is in the horrible fluorescent light:
Had to do a test run...
 This was unexpected, I love the pattern the bell makes on the ceiling, reminds me of a bio-hazard symbol:
So that's that! Simple. I really like the fixture now, even though it is in no way what I had in mind! But it's satisfying my yellow craving for this bathroom, and it's definitely one of a kind. What do you even call this style lamp?
Now, in these photos it's a plug in light, but the plan is to hard-wire it in so this puppy is operated on the light switch. Maybe even a dimmer switch... fancy....

OK - back to work! Have a good one.

     -Jesse
Leftover things to do in the bathroom:

Linkies: FacebookPinterestInstagramTwitterSubscribe & of course, Email me.

Post a Comment

Tuesday, July 23, 2013

How To: Paper Crane Chandelier

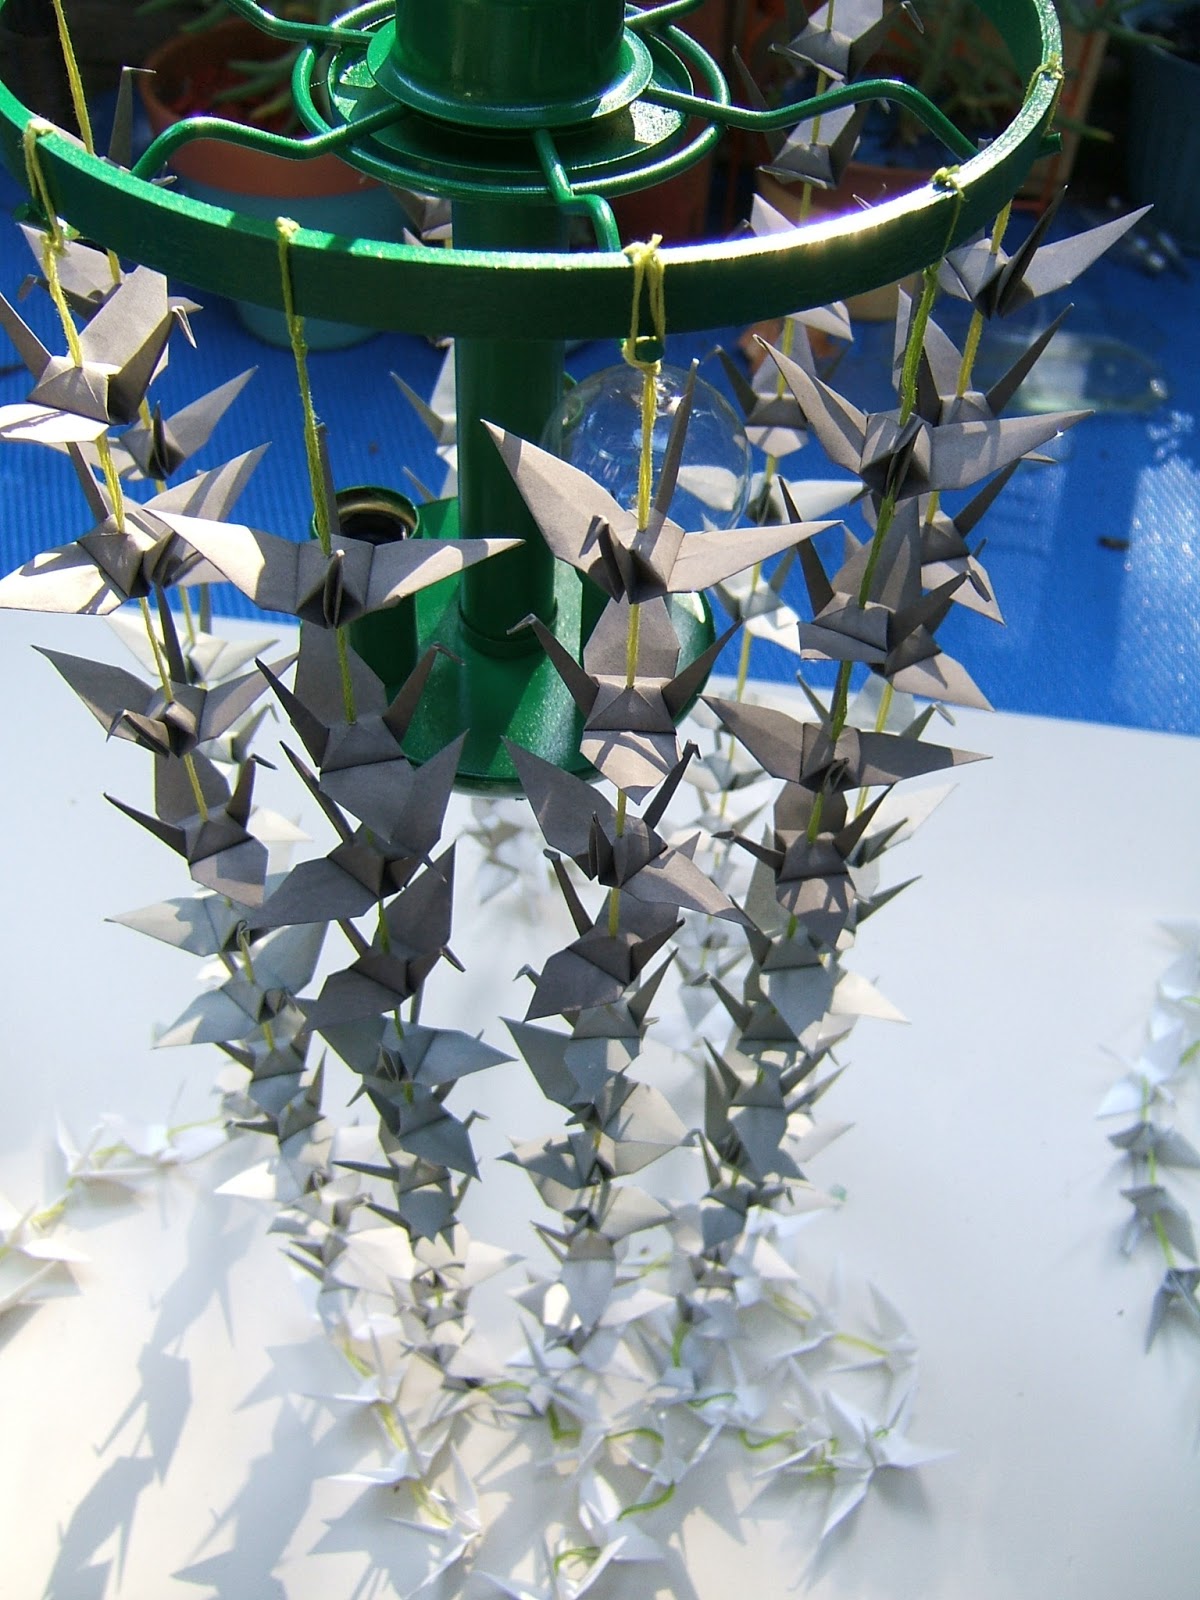
I've mentioned my Paper Crane obsession before, but I just kicked it up a notch. A while back I did a few sneak peaks on the facebook page of my finished paper crane chandelier, and now it's time to share how it's done! I'm really happy with how it came out, and decided to swap the bulbs out for nightlight bulbs, as it makes a great accent light in our living room.  The cranes send angular shadows on the wall behind it.
You'll need: 

  • Old Chandelier Frame - anything you can tie strings of cranes to will do.
  • Embroidery floss in your color choice and a needle.
  • Paints: Primer & Top coat color
  • 200 Paper Cranes - I got mine in this etsy shop, but you can also make them if you're amazing.
  • Embroidery hoop - just the inner complete circle - (if you need to add hanging room)
  • Super Glue
  • Long Extension cord or wire by the foot & a plug kit.
  • Wire Nuts - 2
  • Tape: Masking and Electrical
  • Sawhorse (optional, for hanging the light)
  • Wall Anchors & Screws (if ceiling mounting)
This project is more time consuming than it is difficult, most the steps are fairly easy.  So here's my light fixture, it's one of those 1980's ceiling mounted fixtures:

I've liked these for YEARS but hadn't thought of a use yet. I got this for $4. I love that the glass comes off so easily, and the frame is ready for whatever use you want.  Disassemble your light:
I decided to keep the wiring and the ceiling mount, because even though I'm turning this into a plug in light, I thought it would look nice to mock install it on the ceiling, instead of using a hook and chain. The wiring looked very clean, so I didn't need to replace.

Once you've taped off the wires and the sockets, start priming. I hung mine from a sawhorse.
First you prime, then you paint. You know the drill with spray paint. Nice thin coats, and REMEMBER! Recoat within ONE HOUR or AFTER 24 hours... it's crazy that this rule actually matters, as if the paint had some sort of built in timer. I re-coated about every 15 minutes.
Blurry pic, but you get the idea:
Now - I wanted more than 6 strands of cranes hanging down mine, so I decided to use an embroidery hoop to add a ring at the top of my chandelier. These simple and cheap babies are wonderfully useful:
After finding the right size, I rested it on the top and painted it green with the rest of the fixture.
Now while your top coat is drying, time to string up your cranes. Since I bought mine (from origamiyyc) I saved a ton of time here. I know, cheating, but look at it this way - I supported another DIY'er, huh? 
I wanted an ombre effect, and found that I had 50 of each of four colors. This doesn't divide evenly into 12 strands, but since I imagined semi uneven strands anyway,  I divided like so: 6 strands at 16 cranes each, 4 strands at 17 cranes each, and 2 strands at 18 cranes each. If you stay consistent with the color order, you'll get your ombre.

Just take your needle and thread, with a LONG piece of floss (folded in half, just like sewing!) and string them up through the  bottom of the crane, and out the back (top) of the crane. A double knot at the end was enough to hold the first crane, and since the floss is so thick the cranes stay up on their own. Thank goodness! I can't imagine a knot after each crane.
Do this as many times as you want, I wanted a very full look, so I did 12 strands.
After those are done, you'd better get to wiring up the light.  You DON'T want to deal with that after you have attached the birds.  I didn't need much wire, so I just chopped the end off a 12 foot extension cord:
Since I'm not rewiring, this connection was pretty simple. I matched the ribbed side of the wire, to the ribbed wire in my fixture, connected with a wire nut and wrapped it up in electrical tape. And vice versa. If you are rewiring, you can revisit the Jute Wrapped Chandelier tutorial for some wiring tips. General rule is smooth wire to black wires and ribbed wires to white wires.
I sort of bent the rim of the part that mounts to the ceiling, because I needed the wire to pass through somewhere since I'm not actually hard-wiring this to the house. 

Now, earlier you may have wondered "How did he attach that hoop the the fixture?" Fantastic question, and here's the scoop.  To hold it in place I just used hot glue, but I knew that wouldn't last forever on metal, so the trick is in the crane strands that tie to the fixture:
I tied the floss around, then crossed over and back under, a few times.  Doing this on each of the six arms creates a secure tie.  Later, we will super glue the floss to the hoop, which will secure all the knots. Here's a close up:
So just continue on, tying your crane garlands to your light.

Once you're done tying, it's important to come back and add a dot of super glue to your knots.  For some reason embroidery floss knots come loose over time, and once you've trimmed the excess string, retying will be impossible!
A lil dab'll do ya. Now plug it in, admire it, take some photos....

When it came time to flush mount to the ceiling, I held the fixture up and marked where my screws will go. I used the 2 existing holes in the mounting plate, but will be using long screws and drywall anchors to install them. Just drill a hole in your ceiling, install your anchor, then put the screws through the mounting plate and into the anchor. Done.
 My last step will be hiding the wire, but that part is boring so I figured you didn't need to be subjected to that... hah.  And now for some fun photos:


 Looking straight up:
So that's it! Took me about a day, lots of breaks and a lot of back to back episodes of Bob's Burgers on Netflix while I made the garlands. What do you think, will you give this project a try? I love how it came out, hope you do too! Here's the cover image if you want to pin it for later:
Enjoy & good luck! Send photos if you try it, I'd love to see all the different ones you all make! For more lighting projects, head to my Project Gallery and scroll down to "lighting".

-Jesse

Linkies: FacebookPinterestInstagramTwitterSubscribe & of course, Email me.

Post a Comment

Friday, June 14, 2013

Paper Crane Obsession

I love paper cranes! Always have.  For as long as I can remember I've incorporated these into my home (or childhood bedroom) decor.  Not only do I love the look of these, but you can make them yourself, they are impressive, oh so angular, and hey - you can literally do any color or pattern.  Did I mention inexpensive? Perfect. Room need a little something here or there? Whip up a team of cranes and throw 'em in a mobile.  Or whip up a garland and string it across a mantle. It's a great way to add fun & color.

I am currently working on a crane project for our living room (update, here it is! Paper Crane Chandelier), but I have a confession. I'm not folding them this time around. As much as I love folding paper cranes, I need about 200-300 for this project and I'm running short on time (isn't that always the case?).  This is where our good friend Etsy comes in.  Look what I found:

OrigamiYYC

OrigamiYYC

OrigamiYYC
Cranes! In BULK. I'm in HEAVEN.  This shop sells folded cranes, straight from Japan, for a fantastic price.  OrigamiYYC has so many beautiful color options.  I ordered 200, and they arrived surprisingly fast for coming all the way from Japan.  I got the dark grey, light grey and white combo shown above.  They are adorable and really well done! I had to share this shop, I'm just so pleased.  Do you realize the mega shortcut this is?!

So on that note, I rusted up some pins that would demonstrate some of the many ideas for uses with cranes. I did a tutorial a while back using cranes to make a Bird Cage Chandelier, which was fun - but now I'm planning a mega chandelier. 200-300 crane mega.... more on that soon.

Here's a few simple garlands, hanging straight down, that add a modern pop of white to this rustic room. So cute:
Source
It's as simple as using a needle and thread.  To get the cranes to stay in place you can tie a few knots in the thread before stringing on the next crane. If you're concerned with it eventually falling through, tie the knot, then string a small bead on.  The bead will sit between the knot and the crane holding it in place. This pin shows the spacing a little better:
Source
How about a backdrop for a party, photo-booth or any accent wall really - incorporate the colors you love:
Source
Cute paper fan-bursts there (is that what they're called?) by the way.  For me, it's all about the lighting. I love lighting. I have to hold myself back from putting a light in every spot in this house, but I mean, look at this thing:
Source
So interesting! I bet at night it casts interesting shadows and shapes all around the room. Perfect mood lighting, right?

Well stay tuned, I've got a clever little diddy in the works using these bad boys, and a HUGE thank you to OrigamiYYC for saving me so much time, I'm beyond happy and impressed. (How do they fold so many!?) ***pssst... I finished! Here is the Paper Crane Chandelier.

Have a great weekend everyone, Happy Father's Day to all the Dads out there!

-Jesse

This post was not sponsored by OrigamiYYC, I'm just really really excited about finding their shop!

Linkies: FacebookPinterestInstagramTwitterSubscribe & of course, Email me.

Post a Comment

Wednesday, March 13, 2013

How To: Jute Wrapped Chandelier

***UDATE: Guest room? Check.. See the full tour here*** 

Hello again my friends! I've just wrapped this project up (ha! wrapped...get it?!) and it came out even better than expected.  It was surprisingly easy, and costs SO much less than the popular Jute wrapped chandies that are springing up in stores these days.  Doesn't take many supplies either, and a chandelier is pretty easy to come by.  Thrift stores are usually overflowing with old brass lights no one wants, but are perfect for this project since you'll be covering the whole thing up.  Let me walk you through how I made this little baby:
This is one of the many projects associated with the New Guest Room adventure, remember I want to keep it lightly nautical? Well I thought the addition of a Jute element to the room would help me stick to that, without going over the top.  I think it came out pretty swell....  Read on!

Post a Comment

Wednesday, March 6, 2013

How-To: Gilded Feather Pendant Light

I've been on a lighting kick lately, probably because I've been obsessing over the look of the new guest room - but I have a crush on all things lighting in general anyway.  During the Design Sponge masking tape competition a bit ago I saw this little baby from Poppy Haus come through, and immediately bookmarked it so I could share with y'all eventually.  Here's the eye candy:
This pendant light is so pretty! Even prettier when you consider it's made from masking tape - amazing right?! It has all the elements that speak my language: It's a light, it's extremely affordable, it's made from things we all probably have in our homes.  I can imagine two larger ones hanging mid-height, framing a bed.  Maybe with a braided or wrapped cord (remember that post?)...Hey, I may just do this in our bedroom someday.. Hooray for new ideas while sharing ideas :)

For a full tutorial, head over to Poppy Haus and prepare to be blown away.  Heather has so many fun projects and her blog is packed with 'em. I've featured her work before when I shared this DIY Sculptural Paper Orb:
Awesome work Heather! Happy Wednesday n' stuff...

     -Jesse
 Related Posts:

Let's keep in touch: Facebook, Pinterest, Instagram, Twitter & of course, Email

Post a Comment

Related Posts Plugin for WordPress, Blogger...

Shareaholic