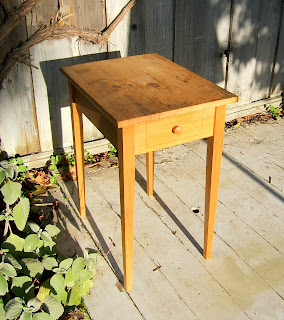
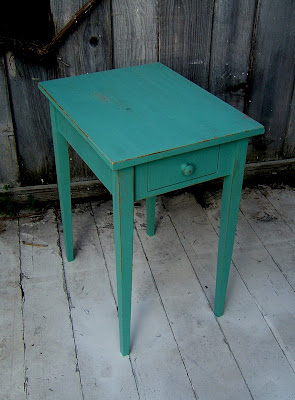
Well hello there my sweet lil side table! Or sweet now... because before this simple yet satisfying make-over, this table would have quickly been put in the back of the basement. Distressing is a popular and fun way to give furniture a fresh look, while giving the impression that your grandma made it this way decades ago (and how thoughtful of her, it happens to match your home decor!). Today we'll walk through the steps for this two color distressed effect, and some of the tricks that I've picked up along the way.
Materials:
- Electric Sander with medium to fine sanding pads. (or sandpaper and a sanding block if you don't have a sander)
- Medium Steel Wool
- Sanding Sponge - fine to medium (optional)
- White Candle (a dead tealight is perfect)
- 2 colors of paint - one for the undercoat, one for the topcoat.
- paintbrush
- plastic sandwich bags
- Watco Satin Wax (or your preferred seal)
- Plastic gloves (I know, I don't like them either, but just do it!)
Look at these water stains, the previous owner was clearly an anti-coaster household. We can fix that!
First we want to rough this table up so we can ditch some of those water stains, and give our new paint something to grab onto. I'm using my orbital sander, with velcro sanding pads. If you don't have an orbital sander you can of course sand by hand, but if you are considering re-doing furniture regularly it's worth the investment. You can pick up a good one for around $20-30. Pop your dust mask on (safety first!) and sand it smooth.
Once your table is sanded, clean off any dust and choose your undercoat. I'm not priming this table because I want the wood to show through in my final product. For my undercoat color, I'm using Martha Stewart's Persimmon Red. I love when paint companies name their products after foods! I got this at Home Depot, and the sample size sitting at $3-4 a bottle will be more than enough.
I forgot to mention that her brand of paint samples has a built in brush in the cap, how clever is that? Next up, I painted patches on the table where I will want the persimmon to show through. Prime real estate for these are edges, handles, and I like to choose a few surface areas too. This will give it the look of once being entirely persimmon.
Ah yes, wax! This is a great tip. When you are distressing from one color and trying to retain the color underneath, it's really tricky to not over distress both colors right off the table. Unless you wax. Take an old white candle, and rub wax all over the areas you painted your undercoat. The wax is going to act as a block against our next coat of paint.
For my top coat, I'm using some "oops paint" by Dutch Boy. If you haven't heard of oops paint, ask your hardware store - they almost always have an area where paints they either mixed incorrectly or customers didn't want are sold for cheap. We're talking $1-2 here folks. I've made a habit of browsing that aisle every-time I'm there, just in case..and I have racks of paint to prove it! Luckily I found a teal, and it's a dirt fighter too - so fancy...
Here's a closer look at the color:
For a larger piece you may want to break out your paint roller to save time. This table is relatively small, so I hand painted. A great tip in-between coats: put your paint brush in a plastic sandwich bag - this keeps the paint moist so you can re-use it without cleaning the brush each time.
Let's start the distressing! A medium grade steel wool is ideal for this next step. Gently rub all the areas you previously waxed until you start to see some of that undercoat show through. Try to think of areas that would receive more wear and tear for heavier distress: corners, handles, and feet tend to see a lot of traffic. A medium to fine sanding sponge is also a valuable tool. Rub the corners and edges with your sponge to let the color and wood show through, you'll see the sponge gets that paint to slip right off! Depending on your personal preference of how much distressing you like, you can take it one step further and bang the piece up with chains, screwdrivers, anything you have lying around. I once beat the side of a table with an old saw blade - what a kodak moment!
Here's a close up of the distressed front. You can see I have the red & some of the wood showing.
Step back, take a look, and pat yourself on the back. Now it's time to choose a seal, if you want to give the table some protection. I've found all the Minwax Polycrylics to be excellent clear top coats that range from satin to gloss - and I promise I wasn't paid to say that! They just never fail me. Though for this table I chose Watco Satin Wax, natural color.
The wax provides a protective barrier without adding a shine. It's a soft, natural look, that is easy to apply. Easier than you think. Dab a little on a cloth (I use old T-shirts since I have 2,000) and wipe on generously. Grab a cup of coffee, wait ten minutes, and buff it off with a dry cloth. Done! You can find this wax and other seals in the paint department of your local hardware store. So here we have our table:
See what I mean? It looks like my grandma gave it to my mom, and my mom gave it to me. Delightful. Well I hope you enjoyed my first tutorial for the Divine Minimalist! I had fun writing it. Keep an eye out for future tutorials in the School of Restoration, as I plan to hit on a variety of techniques from staining to stencils, and taping to... tiling! I had to keep the alliteration going there. Class dismissed!


Thanks for the excellent lesson...I really learned a lot about distressing and using the wax as a barrier...just genius!
ReplyDeleteVery Cool, Jess!! Beautiful as always!!! :)
ReplyDeleteThanks. I didn't know the wax tip. Fun and cool looking table!
ReplyDeleteThanks for your tutorial. I have a large piece I have been dying to distress, but have been too scared to try it.. This may have given me the courage, maybe...
ReplyDeleteThanks! I am going to attempt this on a couple of pieces of furniture! I have been scared to try it until reading your article and seeing how easy it is!
ReplyDeleteThis is exactly the kind of info I was looking for. I had the concept down (2 colors of paint, sandpaper, etc.), just not the step by step explanation. I'm about to start a frame project and I want to make them look antiqued.
ReplyDeleteThis piece came out awesome! Love your teal colors!! :)
ReplyDeleteToday, while I was at work, my sister stole my iphone and tested to see if it can survive
ReplyDeletea 25 foot drop, just so she can be a youtube sensation.
My apple ipad is now destroyed and she has 83 views. I know this is entirely off topic but I had to share it with someone!
my weblog - domestic cleaning Gauteng
Hi terrific blog! Does running a blog such as this take a lot of
ReplyDeletework? I've very little knowledge of programming but I was hoping to start my own blog soon. Anyhow, should you have any ideas or tips for new blog owners please share. I understand this is off subject but I simply wanted to ask. Appreciate it!
Feel free to surf to my weblog ... door to door delivery Gauteng
My website > Airport transfer Gauteng
Thanks for sharing your info. I really appreciate your efforts and I will be waiting for your further write ups thanks once again.
ReplyDeleteMy homepage - lymphatic Drainage cape Town
Wow, amazing blog layout! How long have you been blogging for?
ReplyDeleteyou made blogging look easy. The overall look of your web site is great, let alone the content!
Also visit my web blog :: beauty salon Boksburg
Also see my site - nail salon Boksburg
Do you mind if I quote a few of your posts as long as I provide credit and sources back to your website?
ReplyDeleteMy website is in the very same area of interest as yours and my users would really benefit from some of the information you provide here.
Please let me know if this alright with you. Thanks!
my weblog - computer courses Pietermaritzburg
It's amazing to pay a visit this site and reading the views of all friends regarding this piece of writing, while I am also eager of getting knowledge.
ReplyDeleteVisit my web-site ... waxing Cape Town
You are so cool! I do not suppose I've truly read a single thing like that before. So nice to find another person with some original thoughts on this topic. Seriously.. many thanks for starting this up. This website is one thing that is needed on the internet, someone with a little originality!
ReplyDeleteHere is my webpage ... branding
When you use the wax do you rub it all over the areas that you put the persimmon paint or just on the very edges. Does the paint distress on areas with the wax regardless of whether you want it to? I'm trying to figure out how extensive my waxing should be on the under coat of paint. Thank you so much!
ReplyDelete