Google+ Nine Red: Home Tour
Showing posts with label Home Tour. Show all posts

Saturday, March 1, 2014

Before and After: The Downstairs Bath Official Tour

Should we finally tour this bathroom or what? When we started the bathroom in...oh.. mid, November? The idea was for it to be a 1 to 2 weekend project.  Then of course Thanksgiving happened, and oh - all of December is pretty much devoted to the holidays, and then we were able to get back to work.  I'm pretty proud of our lil makeover, we did it on a budget ($300ish?) and changed the room drastically.   You can see the the post that started it all here or you can browse the many posts throughout the process by clicking here.  Quick refresher of how it looked BEFORE:
Keep that image in mind as I do my best to photograph the AFTER photos. I really, really love how it turned out.  I'll share two sets of photos, one in our fabulous vintage yellow light, that casts a warm glow all over the room - which by the way - makes your skin look amazing & clear. Yellow lights from now on, haha... Also - find project links under each photo. Get ready for a ton of photos...

Rather than replacing the existing stand, we decided to save a little cash & add some personality by giving it a face-lift.  This was a simple job, paint & rub in a stain.  Since we wanted a wall size mirror in here to make the space feel larger, we had a custom mirror cut & we built the frame ourselves.  Adding a mantle gave us room to put a few plants & trinkets, while providing a space for people to set things.


The towel rack used to be to the right of the toilet, which, was pretty awkward.  Adding a slim towel rack the width of the window provided ample hanging space while bringing yet another metal into the room. 


The plan was to make some art, but by chance I spotted this at Ross & knew it would fit perfectly.

A few thrift store scores in woods, metallics & browns + my ferns cozy up this space.
One more shot of that mirror.......


The floor was originally peel & stick linoleum, and once we started looking around on Amazon for flooring we realized peel & stick has come a long way! These were simple to put in, and give the illusion of a wood floor that I dream of. You can find them on Amazon here, we used 2 boxes totaling about $30.

Man that room is hard to photograph! Here are some daytime shots, it's been super rainy so it was STILL a challenge getting good light, but I didn't want to wait until summer to share this with y'all.  So here we go:

In a better lit bathroom you could totally see how awesome that rug is, I got it from an Etsy Seller (click here!). Here's a better shot:


So in love with that ceiling! The trim, was a... .let's just say, "learning experience". We used fence lumber (not treated with chemicals!) to achieve the rustic look (I'm too lazy to dismantle pallets, plus I hear they have super chemicals all over 'em), and did a simple whitewash before installing.  I'd say it cost us around $40.


I had wanted something in this blank corner since you could see it in the mirror, doubling it's blank-ness. It had to be small, it had to be light, it had to be living. Tah dah!

I'm really happy with the bathroom! I think we are coming in at around $300 total, which is pretty good considering we repainted, bought a new mirror & added a frame, built a mantle, redid the floors, added a custom whitewashed ceiling & scouted out all new accessories.  Thanks for touring!

-Jesse


Linkies: FacebookPinterestInstagramTwitterSubscribe & of course, Email me.

Post a Comment

Wednesday, July 17, 2013

Front Deck Details: DIY Pots & Planters

Hey! We're back from camping and I'm just now getting caught up on all my emails! (Thanks for writing, love hearing from you guys!) First thing that needs addressing, is our deck.

I love our little front deck, it's so cozy now! And sitting out there the other morning I realized - hello! -  I never shared the rest of the details of my projects from the Front Deck Tour.  There aren't too many, just a few little things some of you might be curious about.  Here's one of my favorite places to be:
It's a cozy zone, right off the kitchen.  And while it's always growing and changing, I think we gave ourselves a great start in the right direction.  I of course wanted to keep the costs low, so a lot of the efforts to make everything match were of course DIY. Here's a quick tour of the details, all things you can easily do at home for your own deck, or yard, or whatever.

I knew the colors we wanted were blues, with accents of orange & yellow since this is all totally visible from the kitchen. To make it look like a coordinated effort vs. sort of thrown together, I used the pots as a way to tie it all in. Mainly in this zone:
This area kind of sums it up, right? The main colors are here, and because things outside get that less than new  quality so quickly, I figured - if we run with that distressed look we can let these things age gracefully. Plus it's way easier than having to repaint every year!  The plants look small now, but once they are lush and overflowing this will really pull together.  The pots were a Saturday morning quick project.  Pretty straightforward:
I keep these Martha Stewart Paint sample around. They are great, the brush is INSIDE, so it's easy set up and clean up. Well, there isn't any clean up. haha..
I collected all sorts of things to be potential planters.  Affordable clay pots. Thrift store salad bowls.  A pasta strainer. A basket. Anything that could hold hold soil and hopefully had a little drainage.  Then a cup of coffee and I just did whatever, and it was fun.
The terra cotta's are my favorite. I kept the top band clay, I think it looks neat. This next pot was on sale at CVS of all places, for like $7.. I should have bought 3! I jazzed it up with paint and a little jute.
The most important step is you've GOT to seal at these pots with minwax polycrylic, or any other water proof sealer. Clay is extremely absorbent, and your paint will chip off if you get  a bunch of water under it. Outdoor paint eventually chips off anyway, but this extends the life tremendously.  Couple coats, the whole thing.  Hello, salad bowl succulent:
Oh did you spy that little orange candle holder? $1. Yep.......goodwill again. Used to look like this:
That creepy cat statue is for another post for our living room.  It doesn't look like that now!

Moving on, I found this rocker at a goodwill, and was perfect for a weird corner on our deck:
Not really my style, so I gave it the Ombre paint technique from this old tutorial. 
 Ralph and I nicknamed this Rocker "Candy Corn Sunrise":
For good reason! Totally looks like Candy Corn.  That table to the right was ALSO a thrift store find ($5!) and was made of glass and metal, so I knew it could live a life outdoors:
It was hard to paint over the brass, (fake brass I mean) because I kind of liked the shiny-gaudy quality.... but I knew it would look a little out of place by itself amongst all these colors, so to the spray paint it went.
Paired with an old colander painted blue & full of chives, a dollar store salmon plate as a catch, and next to one of the Antique Crate end tables.  For some reason those chives are growing SO slow.... but eventually it will be overflowing.  This would also look great pouring over with lettuce....

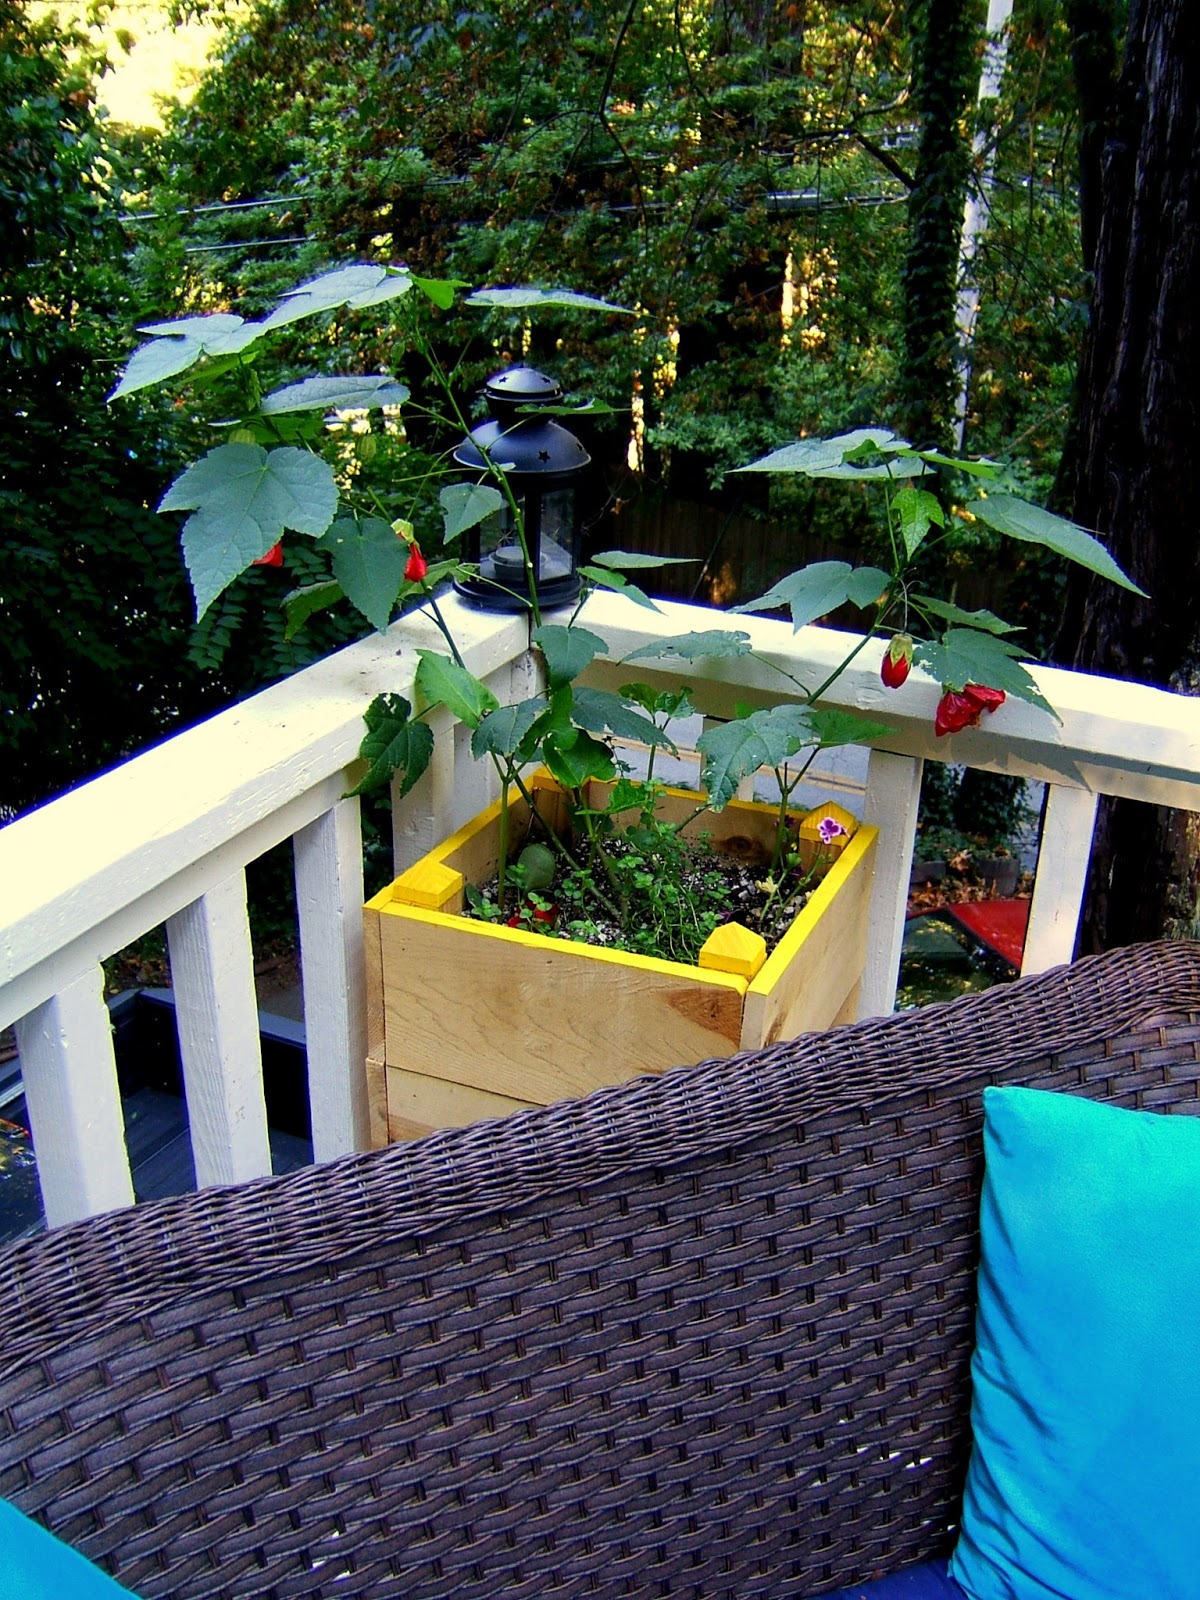
I wanted some more planters for around the deck and used a simple technique to get the exact sizes I needed.  I didn't want to hunt around, so I just got a bunch of lumber, and went crazy.  Specifically, this tall corner behind the lounge set:
It's about 3 feet tall, give or take, and was built using some 2x2's and some cedar fence posts. Cost me under $20, and fits perfectly.  Here's a quick how to that you can apply to any size planter.

It's essentially four corner 2x2's connected with cedar planks. Cut your 2x2's all to the same length (height), lay two of them down, and start connecting:
Continue until you've built two of these: Note, I left the ends undone to later act as feet. 
Then, stand the two sides up, and repeat. If you were going for a square like I was, remember you need to measure your finishing sides to be a little longer, to account for the thickness of wood that will stick out on your first two sides.
You can see how easy it would be to make this into a rectangle, just use longer sides!  See how the feet are working now?
For securing I did a combination of screw and finishing nails. Usually the end two were screwed in (easier to hold by myself!) and then I filled in with nails.  It's a good idea to line up your pieces first to make sure they all fit.
Once you've done all four sides, flip it over and start measuring the bottom:
I used more planks cut to the matching width, and a notch cut out of the corner to account for the legs. Then flip it over and seal it for a longer life. Again, minwax poly is my favorite.
I had leftover scraps and was having fun with the miter saw, so I added these little tops:
That's it. The same technique was used for the square planter behind the clay pots here:
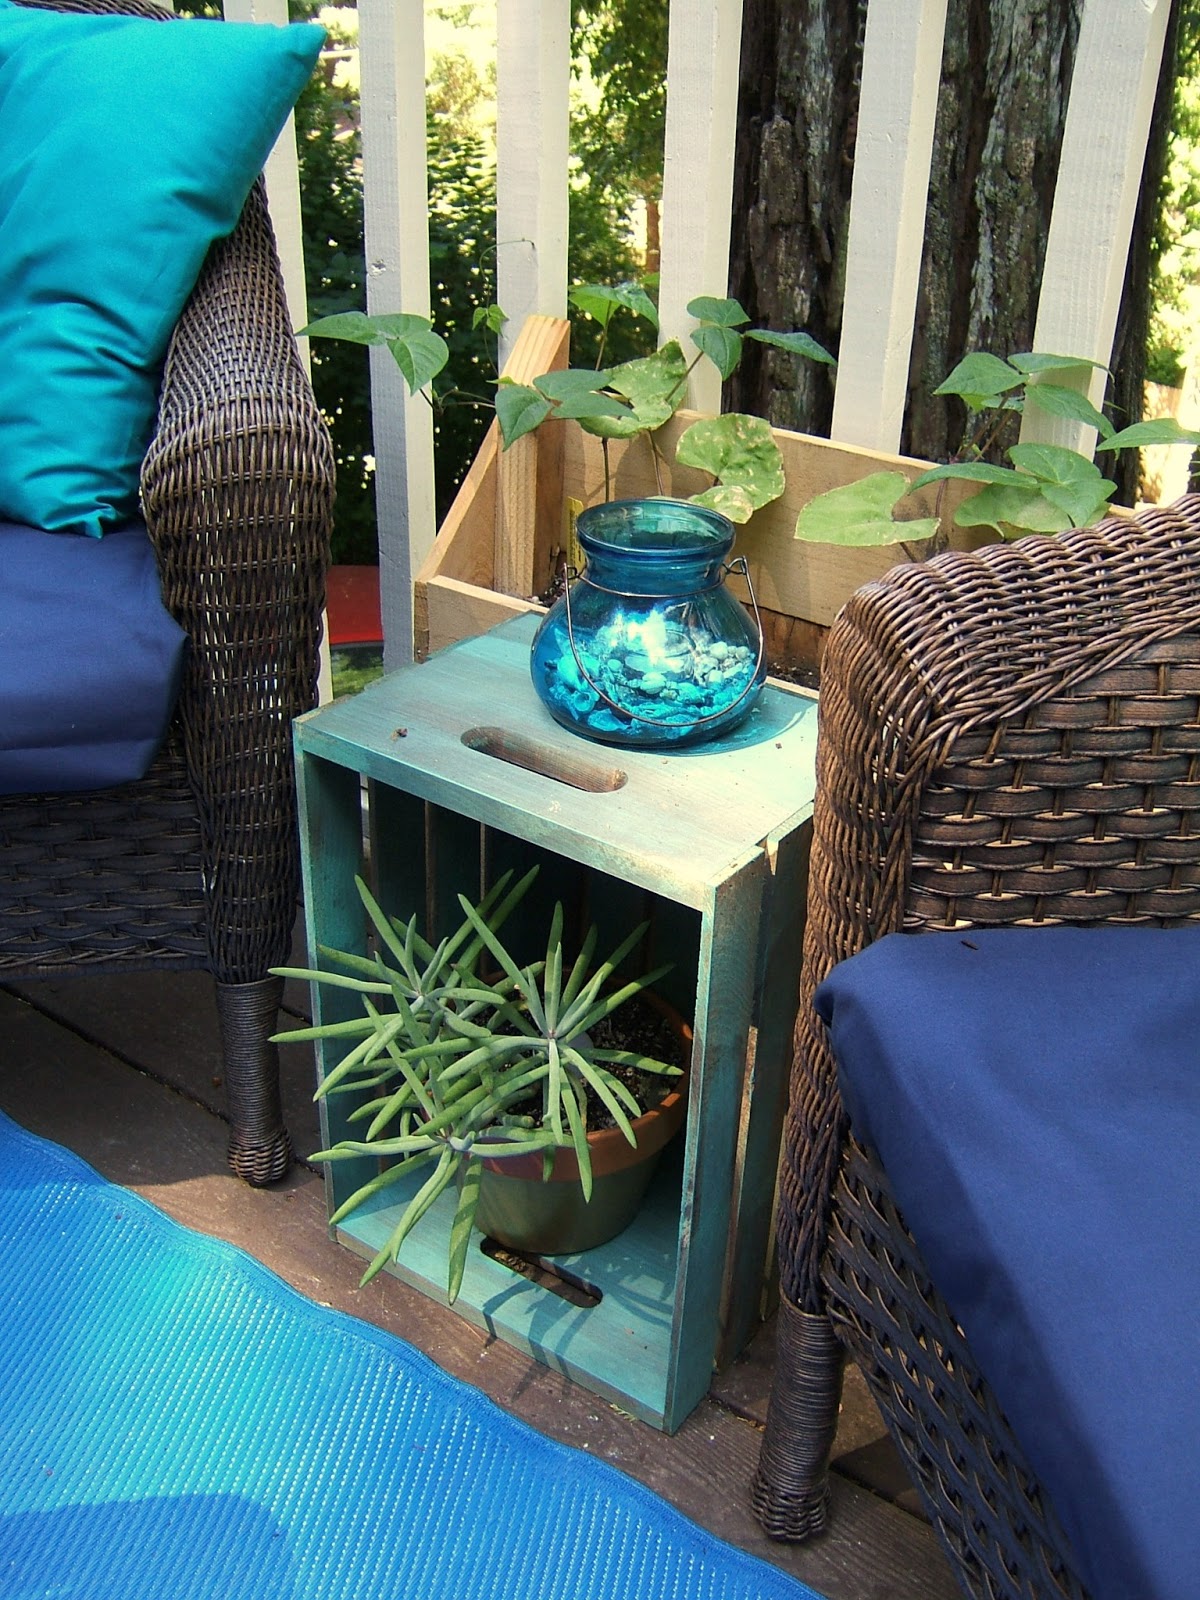
And the skinny planter behind the crates here:
Hard to see, but it's back there and full of beans. 

SO those are the finishing touches on the deck! I added some lights along the side of the house for night time, the fountain give some great ambiance... (someday would like to build a NEW fountain... but that's later)

To see the full front deck tour head over to this post.

Today we are meeting with someone regarding our retaining wall... that we have to rebuild... I'm very nervous, I know a lot of work is ahead!

Wish us luck.......

-Jesse

Linkies: FacebookPinterestInstagramTwitterSubscribe & of course, Email me.

Post a Comment

Wednesday, June 19, 2013

Front Deck Tour

**Welcome to the Front Deck! You'll find corresponding project links under each photo. Enjoy!**

Whoah... it's mid to late June? Stop it. I feel like I've been going CRAZY with projects lately... I don't know if it's the weather or the coffee I switched to, either way I love it.  I think I'd mentioned before how we were fixing up our front deck, remember the bird feeders? Well I think we're done-ish! I took a breather to get some photos to share, and heads up - most things you see on the deck are projects you can do! Of course...heh..

Here's the best angle:
What do you think? It's so bright in contrast with the forest background.  I know I'd said before that I REALLY wanted to do a large fake grass rug here (you know, the new stuff that's fancy) but it was going to be well over $300. And I'm not ready to spend that on fake grass.....yet. So this IKEA $30 outdoor rug was a much better deal...

I also see making a new fountain in our future (on the left there)... but for now I love the sound.

The deck before was completely empty. It didn't make for very cozy hangouts, but now we're out here all the time. Here's a progress shot actually, from when we first got the patio set:
Oh man those cushions were DRIVING ME CRAZY. So I covered them (with navy blue), since I couldn't find any new ones that I liked.  See how empty the pots are? This was right after I built a few of them, hint hint.... tutorial soon... They were pretty easy.

Here's the view when you first come up the stairs to the deck, from the driveway:
And a lovely close up of the cluster of miscellaneous pots and planters that help close in the back of the patio arrangement:


Isn't that tall plant awesome? It's an "Indian Rhubarb" but isn't edible.  It's also called an umbrella plant, I love it. I had wanted it to be somewhere in the yard to get really large & in charge, but Debby the Destroyer (Our deer visitor) decided she loved it as well.

I scored that orange candle holder at the goodwill - 50 cents! It used to be black. I fixed that...

Here's what I decided to use for little tables. I had been hunting the thrift shops for something I could fix up, but nothing worked. Then at the craft shop one day I saw these crates on sale for $6 each.
They WERE bright and new when I got them, and I knew just the treatment.  Remember the Antique Colorful Crates I posted about a bit ago? Yep. Now I have some too.

The candle holder in the photo above was also a goodwill score. They were missing their glass, and completely covered in gross wax.  Which is probably why no one took them home. They looked about the right size for some IKEA vases I already had, and I figured if they weren't the right size that finding a clear glass vase to fit couldn't be THAT hard, right? Well good thing I grabbed them. After freezing the wax off it was revealed that I had just paid $2 for a set of Pottery Barn lanterns.  Sweet!

Upcycling thrift store salad bowls into succulent planters.  Don't those tiles look like Cheez-its? Mmm...

Here's the view if you're standing on the blue rug, facing the front door (or what has become the front door). Yes I know, we need a new light fixture, but that's what that one on the floor is. Waiting to go up....wanna do it for me? 
That rocker came from the goodwill too, it used to be scary looking.  We nicknamed it the Candy Corn Sunrise chair... haha, ridiculous.  I wanted an Ombre fade and when I was done we realized it kind of looked like Candy Corn. Still cool, but definitely candy corn.  I totally ran out of orange paint and had to finish with yellow at the bottom. Ooops... maybe I'll fix it. Maybe I won't.


This table used to be brass colored. I had a hard time changing it, because I DO love brass, but it just wasn't right out here. I loooove the navy! Now I just need the plants to get a move on and make this area look more full & lush. Yes, that's a colander.  Eventually a colander FULL of chives. (grow little babies, grow!)

Pottery Barn candle score #2 and a few upcycled planters...
 Strawberries on the way!  Forgive the blurriness...
We grabbed these lanterns from IKEA, they are such a good deal at $3.99, and used extremely strong outdoor double sided tape to secure them to the banister:
I think they ended up giving the patio a Moroccan feel, which was a total accident.  These combined with the bright complementary colors and oops - we had a Moroccan style patio. I'll have to run with that in mind as I fine tune the details here and there. Toss in a little gold, you know the drill.

Oh, then these of course:

You can see more tutorials & tour links in my House Tour section.

So that's our patio! What outdoor projects have you been up to? I'd love to see them.  The warm weather makes me want to be outdoors 24/7. I'm writing this from outside right now... plus this is our first year "in the mountains" which is really only 15 minutes outside of Santa Cruz.  But wow, the weather is amazingly different. I was used to the fog rolling in at a moments notice, and hooded sweatshirts in July...not here. This is so different! 

Have a wonderful Wednesday everybody, thanks for tourin' with me.

-Jesse

Psst... do you like the new look of the site? Hope so!

Linkies: FacebookPinterestInstagramTwitterSubscribe & of course, Email me.


Post a Comment

Related Posts Plugin for WordPress, Blogger...

Shareaholic