Google+ Nine Red: Plants
Showing posts with label Plants. Show all posts

Thursday, June 26, 2014

Quick DIY Secret Mossy Hiding Pail

Well I guess not so secret anymore now that I've blasted this all over the internet.  Oh well, I guess if you come to my house you'll know this secret spot & head straight to it. 
Good thing for me that I don't keep anything in it! Yea, I've always had some weird obsession with hiding places. I used to hollow out books, just because it was cool. And then I'd put them on the shelf. Empty. I don't have anything to hide really, no gold coins & cash burns a hole right through my pocket.  But, during this fail-fix I couldn't resist the opportunity.  

It all started during that long winded downstairs bathroom redo, one of my accessories was to be ferns. I chose ferns, because that room is "light challenged" and I figured they'd fit right in. Look how they did:
Mind you, this is not a case of not having a green thumb, I have a bunch of healthy plants that will tell you otherwise - I gave this puppy everything I had, and he quit. Fast forward to problem #2 - I used a wood bucket.  Even though I had the fern in a separate plastic pot for drainage (I thought I thought of everything!), and sealed the heck out of the bucket, the water seeped on through.  But whatever, we all have fails & new things sprout from those, right?

I wanted to rush out and buy (see what I mean about the cash problem) something else to go here, but in an effort to try and use-what-I-have-around-here, this is what I came up with. And it's what I should have done in the first place. (sorry lil fern...)

Step 1: Paint the bottom half of the bucket. This was dual purpose, it hides the horrible water damage to the bucket, and looks all color-blocky.  Unsuspecting people will think this was the plan all along - good!
Step 2: Raise up the floor so I don't have to literally fill this bucket with moss.  This is where the secret hiding spot came in at the last minute! I hoard keep all those jars from finished Bath & Body works candles & freeze the wax out (freezing the candle is the easiest way to get the wax out - just take a butter knife to it to crack out the wax). They are super handy, and this one fit perfect:
A little newspaper padding to keep it steady......pop the lid on....
Step 3: Fill her up with moss! This is my favorite moss, it's about $26 on Amazon (find the link here) for a HUGE box of it, but you can find smaller packs too.  I use it all the time, I cover the soil in my other houseplants with it, just to make them even cuter. Because, why not? Back to the bucket:
Done! Much cleaner. I love that fluffy lime stuff. I still get my touch of green in here without having to buy a fake plant, and a hiding spot too. Again - because, why not?
From failed to fixed in like, 15 minutes. And it didn't cost me a thing since I had it all here.

Back to work on the backyard brick patio for me...  enjoy your summer!

-Jesse


Linkies: FacebookPinterestInstagramTwitterSubscribe & of course, Email me.

Post a Comment

Sunday, February 9, 2014

DIY Air Plant Sphere

I'm so excited to share this project! I had this idea a few weeks ago, and since it was finally raining in California recently, this made the perfect Rainy Day Project.
While finishing up the details of the great Bathroom Project, I had originally planned to make this pot hanger, but overflowing in ferns. Well the ferns mentioned they wanted to live on the mantle, and then I thought a pot might be too big hanging in the corner anyway. I needed something  lighter... literally and figuratively.....air plants! So Pinterest & I brainstormed (see this post) and the embroidery hoops really spoke to my heart.  I tried my idea out, and it worked - so here it is for you.  It's nothing crazy, but it felt good.  This is a very easy & satisfying project, perfect to get your crafty feet wet.  Gather this crap:
 You'll need:

  • 3 wood embroidery hoops - very cheap, I used 10" hoops.
  • Paint & Paint brush (while you're buying paint, grab a few extra colors. They're cheap & really handy)
  • Hot Glue & Glue Gun
  • Reindeer Moss - I got mine at the store, but later found a better deal here on Amazon.
  • Air Plants! I got mine from this Etsy Seller. They came fast!
First up, start painting. Pretty simple. I did mine all white, but I think I might make another one where each hoop is a different color.

Let 'em dry, you don't want your paint wiping off.
Then the fun begins! I started with the solid hoops, which is the inner portion of the embroidery hoop set.  Gently squeeze one inside the other, to make an X:
Yep. It'll be snug, but don't fret - grab the third solid hoop, and either send it inside, or wrap it on the outside of the other two. Don't worry if they move around on ya, there is going to be a lot of that during this project. Just roll with it, you can move them around as you please.
Now take the outer hoops, and loosen them up enough to add each hoop on the outside of your sphere. When you are choosing where to add them, look at the sphere and see where it's too open, and disect that area with a hoop.
Play with your sphere, and gently push around the rings until it's as you like.  You can start to tighten the 3 outer hoops hardware when you are happy with how it looks. Don't over-tighten, just do it enough to keep things from slipping.  Now, it should be pretty snug, and it'll hold itself together. If you feel yours has some loose spots, just use a lil hot glue, and watch your worries melt away....

Let's add moss already!
Sometimes your sphere may look.. lumpy? You can play with it to fix it, or just go with it. I went with it. I think it adds to the organic look of the sphere, handmade & all that, and besides - it'll be gently spinning and know will notice/care.

Back to the moss! Choose which area of your sphere will be the bottom, and start laying the moss in. A dab of hot glue, and a gentle puff of moss, voila. You're so good at this.
Keep layering until you make a nice bed for your air plants. Remember, everything you're working with weighs almost nothing, so the moss bed doesn't have to be the sturdiest thing in the world. Just overlap a few cute pieces until it looks right.
I stopped there. It was hard to stop, the moss is so pretty...  I just wanna put a lil bird in there.
Now add your air plants! Wait-wait, did you soak them? I know - they are unfortunately named air plants, but they DO need water still.  The care card says you can mist them now and then, or you can soak them for an hour a week. I prefer the soak method.

DON'T glue the air plants in. I mean, I guess you could, but why? Just let them rest on the moss, and intertwine with your new sphere/orb/cage thingy.   Also, if they are loose, it will make soaking them a million times easier.
The angle of the photo above makes either the sphere look tiny, or my hand look enormous. I assure you neither are true, the sphere is a pretty good size, and my hands are sort of normal.  I used baker's twine (new favorite stuff! Amazon linky here) to hang the little baby:


What do you think? The hardest part of this project was waiting for them to dry! I was excited to get my craft on.. haha.  I really like how it came out, and I'm so happy there were no major hurtles along the way. I would love to do a grouping of these in many sizes.  Air plants everywhere!!

Ok for your pinning pleasure, the cover shot:

Thanks for reading! If you make some, let me know! Send pictures or post them to my facebook page.

Have fun!

-Jesse

Linkies: FacebookPinterestInstagramTwitterSubscribe & of course, Email me.

Post a Comment

Monday, August 26, 2013

Curb Appeal: Part 2

Oops! I forgot to update you all when we finished chopping those ginormous bushes down in front.  So, remember in this post when we first tackled the beasts? Well we were only halfway done, and we finally finished! These things, were enormous.  We bought a chainsaw (yeeeea buddy!! Here's the one we got, it was great) and decided the easiest way to tackle them, was to chop 'em in half and clean up the damage. Check the progress out:


 Here's a wide view, it's so weird to be able to look out the windows and see more than just bushes! It's soooo barren now though! Don't worry - the bushes are still alive, they just got a much needed trim:
So the only drawback is our privacy level dropped, but since we're up high, we still have a lot of privacy inside the house. I just love that you can SEE the house now.  That water utility box... major eyesore. I'm not sure what we are allowed to do with it, so I'm just going to plant a big bush in front. I can't wait to fill up the hill with fun (deer-resistant!) flowering shrubs. 

And through the magic of the internet (Or, because we trimmed in June & I forgot to post) you can see the bushes have returned and the hill is filling up a little bit:
 The bushes are coming back but it's still kinda barren in front. This will be a big project! To keep things pretty, here's what I've got goin so far that the deer haven't eaten:
1. Lantana
2. Begonia (up high, otherwise I think they'd mow it down!)
3. Mexican Sage.

Everything else they eat, or try to eat.  I know, I know, clean that roof! Right? Well, I tried. I got up there, cleaned most of it, then got to the front and realized I was really... really...high up there. Scary! So until we get a mega ladder that will reach up there, let's hope the wind handles it.

What's your take? Is this too out in the open? Do you like homes that are cozy & private or standing proud in sight? 

Let's make it a great week!

-Jesse

Related Posts:

Linkies: FacebookPinterestInstagramTwitterSubscribe & of course, Email me.

Post a Comment

Wednesday, June 19, 2013

Front Deck Tour

**Welcome to the Front Deck! You'll find corresponding project links under each photo. Enjoy!**

Whoah... it's mid to late June? Stop it. I feel like I've been going CRAZY with projects lately... I don't know if it's the weather or the coffee I switched to, either way I love it.  I think I'd mentioned before how we were fixing up our front deck, remember the bird feeders? Well I think we're done-ish! I took a breather to get some photos to share, and heads up - most things you see on the deck are projects you can do! Of course...heh..

Here's the best angle:
What do you think? It's so bright in contrast with the forest background.  I know I'd said before that I REALLY wanted to do a large fake grass rug here (you know, the new stuff that's fancy) but it was going to be well over $300. And I'm not ready to spend that on fake grass.....yet. So this IKEA $30 outdoor rug was a much better deal...

I also see making a new fountain in our future (on the left there)... but for now I love the sound.

The deck before was completely empty. It didn't make for very cozy hangouts, but now we're out here all the time. Here's a progress shot actually, from when we first got the patio set:
Oh man those cushions were DRIVING ME CRAZY. So I covered them (with navy blue), since I couldn't find any new ones that I liked.  See how empty the pots are? This was right after I built a few of them, hint hint.... tutorial soon... They were pretty easy.

Here's the view when you first come up the stairs to the deck, from the driveway:
And a lovely close up of the cluster of miscellaneous pots and planters that help close in the back of the patio arrangement:


Isn't that tall plant awesome? It's an "Indian Rhubarb" but isn't edible.  It's also called an umbrella plant, I love it. I had wanted it to be somewhere in the yard to get really large & in charge, but Debby the Destroyer (Our deer visitor) decided she loved it as well.

I scored that orange candle holder at the goodwill - 50 cents! It used to be black. I fixed that...

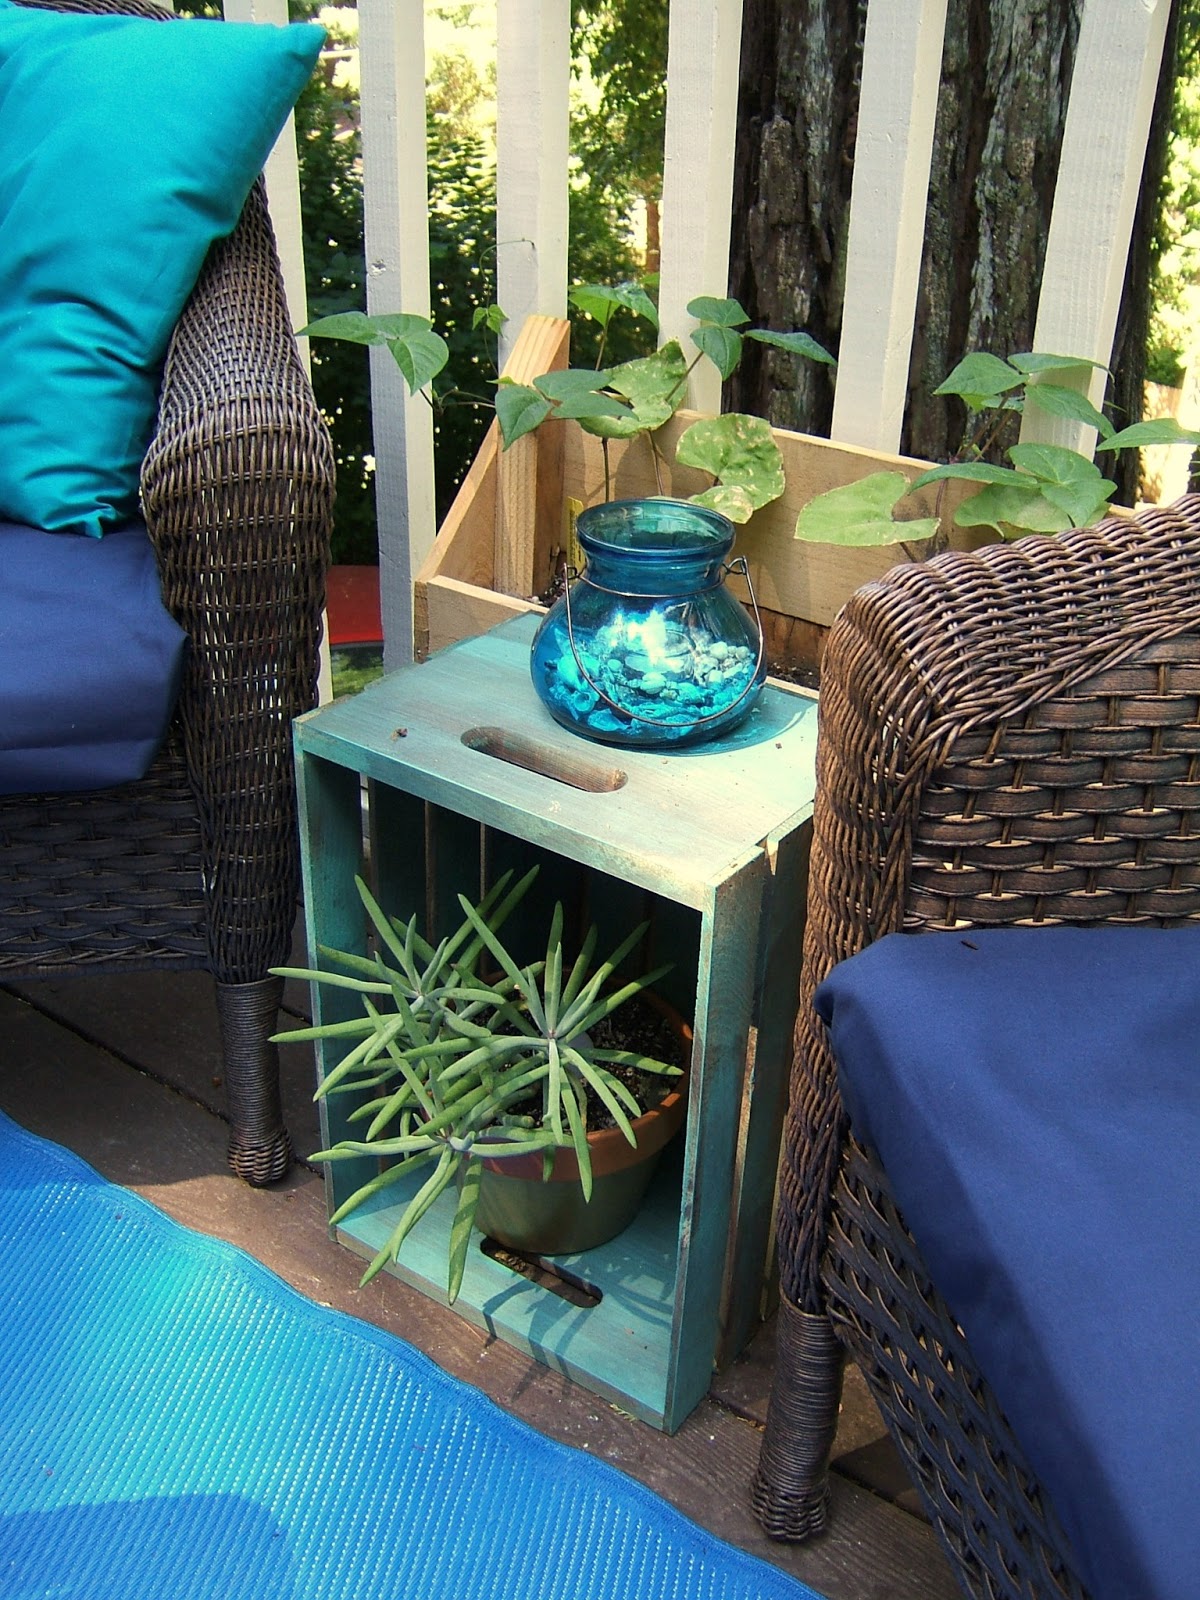
Here's what I decided to use for little tables. I had been hunting the thrift shops for something I could fix up, but nothing worked. Then at the craft shop one day I saw these crates on sale for $6 each.
They WERE bright and new when I got them, and I knew just the treatment.  Remember the Antique Colorful Crates I posted about a bit ago? Yep. Now I have some too.

The candle holder in the photo above was also a goodwill score. They were missing their glass, and completely covered in gross wax.  Which is probably why no one took them home. They looked about the right size for some IKEA vases I already had, and I figured if they weren't the right size that finding a clear glass vase to fit couldn't be THAT hard, right? Well good thing I grabbed them. After freezing the wax off it was revealed that I had just paid $2 for a set of Pottery Barn lanterns.  Sweet!

Upcycling thrift store salad bowls into succulent planters.  Don't those tiles look like Cheez-its? Mmm...

Here's the view if you're standing on the blue rug, facing the front door (or what has become the front door). Yes I know, we need a new light fixture, but that's what that one on the floor is. Waiting to go up....wanna do it for me? 
That rocker came from the goodwill too, it used to be scary looking.  We nicknamed it the Candy Corn Sunrise chair... haha, ridiculous.  I wanted an Ombre fade and when I was done we realized it kind of looked like Candy Corn. Still cool, but definitely candy corn.  I totally ran out of orange paint and had to finish with yellow at the bottom. Ooops... maybe I'll fix it. Maybe I won't.


This table used to be brass colored. I had a hard time changing it, because I DO love brass, but it just wasn't right out here. I loooove the navy! Now I just need the plants to get a move on and make this area look more full & lush. Yes, that's a colander.  Eventually a colander FULL of chives. (grow little babies, grow!)

Pottery Barn candle score #2 and a few upcycled planters...
 Strawberries on the way!  Forgive the blurriness...
We grabbed these lanterns from IKEA, they are such a good deal at $3.99, and used extremely strong outdoor double sided tape to secure them to the banister:
I think they ended up giving the patio a Moroccan feel, which was a total accident.  These combined with the bright complementary colors and oops - we had a Moroccan style patio. I'll have to run with that in mind as I fine tune the details here and there. Toss in a little gold, you know the drill.

Oh, then these of course:

You can see more tutorials & tour links in my House Tour section.

So that's our patio! What outdoor projects have you been up to? I'd love to see them.  The warm weather makes me want to be outdoors 24/7. I'm writing this from outside right now... plus this is our first year "in the mountains" which is really only 15 minutes outside of Santa Cruz.  But wow, the weather is amazingly different. I was used to the fog rolling in at a moments notice, and hooded sweatshirts in July...not here. This is so different! 

Have a wonderful Wednesday everybody, thanks for tourin' with me.

-Jesse

Psst... do you like the new look of the site? Hope so!

Linkies: FacebookPinterestInstagramTwitterSubscribe & of course, Email me.


Post a Comment

Friday, April 26, 2013

DIY Concrete Firebowl

I've been majorly in the spirit of all things patio lately, after fixing up our front porch, to brainstorming space saving planters for our deck, I can't stop planning ahead for warm summer nights out there.  I saw these amazing do it yourself concrete fire bowls recently from the blog B3HD,  check them out:
Lookin' good fire-bowl....and YEA...  This IS a do it yourself project!  Ever worked with concrete? You're about to - this weekend you should get outside and make yourself a whole set.  Heck, make everyone a set. You just need some concrete, some bowls, and some time.  See the full tutorial on the awesome blog B3HD, and if you do this facebook me your photos! I get totally inspired to get to work when I see what y'all are up to..   This same process would make killer planters, don't you think?

Have a glorious weekend!
     -Jesse

Up Next: Meet Otis the Owl, my latest string art design. 

Keepin' connected: Facebook, Pinterest, Instagram, Twitter, Subscribe & of course, Email me.

Post a Comment

Wednesday, April 17, 2013

9 Space Saving Herb Gardens

Hello! Been by your local nursery lately? Yep - the baby plants are arriving by the truckload and I want every last one of them to come home with me.  Every year since the dawn of time I've had a vegetable garden, and since we're in a new place this year, it's time to start fresh.  I'm not exactly sure what part of the yard gets the most sun, but I DO know that our front deck gets blasted for about 4 hours a day - which to me means it's begging for an herb garden.  Which, being right off the kitchen, will be extremely handy! So I've got a blank slate, and took a minute (OK, two hours...) to trudge through the internet and find some pretty neat planter ideas.  All of which either have DIY instructions (yay!) or could easily be figured out how to make. Here are my 9 favorites.

For me, vertical really gets my attention. I want maximize my planting space without sacrificing the whole deck, take a look at this beautiful planter wall that's been incorporated into a pergola:
Source: Susan Cohan Gardens
Or  how about something hanging? This example is for indoor plants, but I can see adapting this for the outdoors fairly easily. Longer pieces of wood to hold maybe 2-3 pots per shelf, and perhaps a way to anchor the bottom to the ground so they don't fly all over in the wind...

Post a Comment

Friday, January 11, 2013

Staghorn Fern Lovies & Kitchen Paint

I love plants, indoors & out.  I have a lot of houseplants, and after this move - some of them are not adjusting so well.  The light is a bit less here, and the daytime temperatures a bit lower, so I sit & wait and see who can tough it out, and who will sadly leave my life.  But, there's not much I can do aside from dramatically altering the house, landscape, and microclimate, I just have to look forward and find some plants who will like our new situation. I immediately thought of, the Staghorn Fern:
Photo Credit: Anythingology
I love these! They are so bold, and wall mount? Yes please! One thing I love about Ferns is how they are  perfectly fine with a low light situation, thank goodness because

Post a Comment

Thursday, October 18, 2012

School of Restoration: Color Block Stool Tutorial

Welcome to another session in the School of Restoration!  So, after all the fun we had with spray paint for the Ombre Chair tutorial, I really wanted to do it again - but differently. Enter, the color block! You see this a lot in fashion right now, pairing up contrasting colors in "blocks".  What do you think of my stool up here? It was sturdy, but boring, and I wanted to give it some new life, and I chose some regal colors too... navy blue, white, and solid gold feet! Ok, not solid gold, but they look it.  I used to say no to gold, but lately I've been really diggin' it. Ok, on with the show, this is a fairly easy tutorial - but I have a few tips ahead to help give you that coveted clean line.  I had no leaks on this one folks, scouts honor here - absolutely. no. leaks. Finally!

Materials:
  • A sturdy stool, or other interesting furniture
  • Electric Sander
  • Medium & Fine Sanding pads
  • Sanding Sponge
  • Tape
  • Masking paper (newspaper works too, but these rolls are handy dandy)
  • Spray paints:  Primer, 3 colors, Clear Seal (I'm using high gloss baby!)
  • Dropcloth (old sheets work too, and they are almost free at the goodwill)
  • Cute stuff to put on top of it after.
Let's begin!


Post a Comment

Tuesday, July 10, 2012

How To: Succulent Dresser

A while back in one of my Pinterest Picks posts I featured succulent furniture.  Now, I just chose these images straight off pinterest - and wouldn't you know what came through Shelterness not too long ago? The full tutorial to make that cute dresser!

Post a Comment

Thursday, May 31, 2012

How To: Mosaic Planter

As it gets warmer, we all naturally want to start fixing up our yards and patios.  I love all the beautiful planters I see in the stores, but I don't love the price!  All you need is a little creativity, plus a few inspiring pictures to get you motivated, and you can come up with some amazing planters for your patio at a fraction of the price. 

Today I want to share this really neat tutorial from Centsational Girl, a planter with a beautiful mosaic tile finish.  A lot of people are scared to death of tile, and I used to be too - but once you try it the first time, you'll be hooked. It's so easy, and the outcome is so impressive that you'll want to tile everything! Plus, the hardware stores carry these sheets of tile (I'm sure you've seen) which lets you place 100 or so tiles in one step. Talk about a time saver! The possibilities with tiling are endless, but today let's hone in one style. Take a look:


Post a Comment

Monday, May 7, 2012

How To: Vertical Garden

I keep seeing this Home Depot commercial where in about 30 seconds, you see this lady build a vertical planter box, fill it, plant it, and hang it... Well it goes by so fast you can barely see what or how she did it, and I've been searching for it. I finally found it and thought I should share, though I wish this project was as fast as hers! When you watch the video it's a little overwhelming, but they have printable instructions that really brings it down to a manageable speed.


Post a Comment

Related Posts Plugin for WordPress, Blogger...

Shareaholic