Google+ Nine Red: January 2014

Friday, January 24, 2014

DIY Air Plant Hanger Collection

Hello again! I'm trapped in the house while a plumber fixes our water heater.   It was a leaky pipe, and while some of you may say "why didn't you try to fix it?!" - well - sometimes you have to know where to draw the line in DIY land. And the thought of us screwing it up and losing hot water all together while we wait for a pro to come clean up the mess, sounded horrifying.  And cold.  Anyway,  I've had a gallon of coffee - what a perfect time for me to waste the morning on Pinterest! As we polish up the details in kitten's bathroom the downstairs bathroom, I really wanted another plant in there.  I was going to do this terra-cotta hanger from Design*Sponge but thought it might be too bulky for that tiny room.  A few brainstorms lighter I realized, what could be lighter than an air plant? And the search began. I haven't decided yet who's taking the lead, or if I'll invent some newbie, but here are my faves:
Did I mention they are mostly D.I.Y.? Even better... I have buckets of craft supplies around this place, I'm sure I can get away with not buying a THING (except for the plants) for one of these beauties:
DIY Himmeli Air Plant Hanger from Smile & Wave
Have you noticed a trend with all the Himmeli stuff floating around? Well, it's popular because it's gorgeous, and this copper & geometric spectacle has taken my heart.  I had to look up what himmeli meant before I would allow myself to use the word, and luckily it's a simple definition:
  1. A type of hanging, mobile decoration made of straw or other similar material. (Source)
Hmm, pretty spot on. Easy enough.
Upside Down Air Plant Hangers
Heeey! I love these, and even though I strayed from Design Sponge's other plant hanger, they reeled me in with this one.  Don't those look like ceramic? They aren't.  Check out the full tutorial here.
Wall Hanging Air Plant Sculptures
Now these are different, instead of hanging from the ceiling they took it to a wall mount.  I love the hand sculpted look, very clean & light - which is what I'm aiming for.  Plus, they take very few materials. Nail, Wire, Clay... Hop over to BHG for the tutorial.
Hanging Terrariums on Chive
Ah, nothing better than a classic. These, obviously, aren't DIY at all, unless you're an amazing glass blower - in which case - sister get in touch!  I'd love to learn glass blowing, or at least beg someone who blows glass to make me something pretty.  Found these on Chive.
Himmeli Air Plant Hangers
Keeping with that Himmeli spirit, you have these gorgeous wonders... Now, you may be able to figure out how to make those, but you also may just want to support the person on Etsy who did, either way - these are adorable.  Hey, notice they are using spider plants instead of air plants? I wonder if that would work.. check out their shop. So many Himmeli goodies..
Now this little diddy, doesn't have a source (so frustrating when that happens on Pinterest) but, you can pretty much figure out what's going on here. I like the use of embroidery hoops because they are clean, circular, and something I have too many of.  Yarn, I mean, who doesn't have that lying around? This is definitely a cute & quick fix.

I've saved the best for last...
Gaaah! How do you spell the sound of a jaw dropping? That curtain of air plants is absolutely stunning, and might just end up as an installation on our patio this summer. Scratch that, remove the word might and insert definitely will end up on our patio.  Again, Pinterest failed me and the source led to a close up photo of it, but I'm grateful to have even seen it at all.  It looks like either thread or fishing line, strung around air plants. Fan..tastic. and simple.

What do you think? Air plants gonna make a debut in your home? Don't be misled by the name though, air plants do still need a little water depending on their placement. Whether it be a misting every few weeks, or a 2 hour monthly dunk in a bowl of water.  Whoever you get them from should have plenty of care instructions for your new baby.  There's like 3 million on Etsy, and every nursery in America is probably slinging these things by now.

Which hanger is your favorite? What other awesome plant holders have you made or seen around? 

Enjoy that weekend folks!

     -Jesse

Psst... saw this after I posted, check out Very Shannon's mega round up of DIY hangers... so cool!


Linkies: FacebookPinterestInstagramTwitterSubscribe & of course, Email me.

Post a Comment

Tuesday, January 21, 2014

DIY White Wood Ceiling


We're done! Well, sort of. We have to add some trim, but that can be another post. This was so much easier than I expected.  We'd been brainstorming wood ceiling ideas,  and felt pretty confident in tackling this.  I'm so happy with the results, I want to do it to every room in the house!

It's really rustic, but clean, & adds to our mountain-ey, cabin-ey home... while staying light & fresh.  If you want to do something like this in your house, I say do it. It's amazingly easy & satisfying. Here's what you need:
  • Wood planks - we were going to use bender board so it would be lightweight, but I couldn't find it. So, we used lightweight cedar fence boards instead.  $1.38 each!
  • White Paint (Semi Gloss, Paint + Primer in one)
  • Paint gun (optional)
  • Nail gun + 2" nails (ours connects to the air compressor)
  • Air Compressor (if you'll be using the nail & paint guns)
  • Saw (we used our DeWalt Miter Saw, my favorite toy)
  • Measuring Tape
  • Stud Finder
  • Drill + spade bit, if you need to make a hole for wires to come through.
First up, you want to paint your boards.  You could cut your boards first if you like, but we chose to paint them first, so that while they dried we could go in the room and do measurements, etc.

Here's Ralph:
We've had some amazing weather lately, which is good for working outside, but really really bad for California. We are now in a drought, yikes... 

Anyway, everyone all lined up on a giant dropcloth:
I adore my paint gun. It attached to the air compressor, and makes painting 3 million times easier.   Here's the one we use: HVLP Paint Gun.  Not paid to tell you that either btw, it just really has saved me hours of time! You want to mix a little floetrol in with your paint first, so it runs out of the gun easier & spreads out on your surface better.
It's about a 1:4 ratio.  1 part floetrol to 4 parts paint.  
  • TIP: If you want stark white boards, seal or prime your boards FIRST.  Cedar fence posts are amazingly thirsty, and sucked up a LOT of paint. Luckily we liked the look, or it would have been frustrating.  I think any seal would do, even plan white glue would have been fine I bet.

 Boards all done, see how thirsty they were:
Now while that dries, pop back in the house and start planning out the space.  You want these  boards to stay in the ceiling, so find the studs.  Our boards will be going the shorter distance of the room (across), which is perpendicular to our studs, which go the length of the room.  This way we can nail through the boards at each stud, making it sturdy.
***If your studs are not going perpendicular to the way you want your boards, put a few small pieces of wood before the planks that DO nail into the wood. In short, you're making a second set of studs, that connect to the ones under the drywall, but these will be outside the drywall, giving you a strong set of beams to nail into. Email me if that totally didn't make sense.
Here's our nasty ceiling, with our matching nasty light: 

 The texture wasn't sitting well with me, and Ralph agreed. Nast.  But makes a great before shot.
Use your stud finder to find your studs. This is a great time to make jokes about the stud finder. Heh...
Run the stud finder along the ceiling, and when it beeps to tell you there's a stud, make a mark. Doing this over and over all over the place will quickly give you an idea of where & which way the studs lie. Draw lines along the studs so you know where to nail. 

Paint dry on your boards? Great. Start measuring your ceiling and cutting boards. You probably want to cut one at a time if you think your room isn't exactly straight, like ours. Hold each piece in place before you nail, to make sure it fits. 

Now gear up with lots of protection.  This was my first time using a nail gun, and I was a little nervous after reading the warnings.  They really put the fear in you in those manuals! 
Safety first.. ha! So dorky, but at least I have my eyes and ears unharmed.  I tested the nail gun on a few scraps to make sure my settings were correct (read your manual), and then nailed each board one by one. 
Nail guns are amazing! So fast.  Our studs were on the sides (pretty common) and one down the middle. 

Once we reached the light fixture, we paused, turned off the power to the room, and finally took down that hideous fixture! 
Beautiful. 
Now we were going to keep the electrical box in it's place, and run a chain to our new fixture.  So, with the power off, we measured the distance from the wall as well as the adjacent board, to the wires, and knew that was where we needed a hole in our next board. And, it worked:
Don't turn that power on until your wires are sealed up! Don't risk it with electricity. After we ran the wires through the hole, we put the new light up & temporarily connected it.  We sealed everything in electrical tape, so we didn't accidentally touch it. 

Then, we just... kept going... here's a thousand pictures:


I love it! The only things left to do is add some trim so it looks built in, and put a mounting plate over our electrical work. Did you notice a few paw prints in the photos? Yea... while our boards dried, a lovely raccoon came by and walked all over them. This was also after we cleaned up all our paint, of course! We figured we'd paint over it later, but now... I kind of want to keep them? Hehe...See if you can find them.

So that's it! This was really easy, and the crown will be the perfect finishing touch.  What do you think? Wanna do it?

Have a great one!

-Jesse

Leftover things to do in the bathroom:

Linkies: FacebookPinterestInstagramTwitterSubscribe & of course, Email me.

Post a Comment

Thursday, January 16, 2014

5 Inspiring Wood Ceilings

As we finish the details of our downstairs bathroom, we wanted to tackle one of the final details.  The wood plank ceiling! So I wanted to take a moment to browse the interwebs for examples, to get a good feel for what we're going for.  Check out a few of my favorite examples, is this something you can see yourself doing in your home?
This project from Maple Leaves & Sycamore Trees (one of my favorite blogs) may have been what started the ceiling obsession for me.  Beforehand I was obsessed with wood accent walls, until it moved on up. I mean, just look at it! Those are pallets... 

However, for our tiny bathroom, I knew white would HAVE to be the way to go, to keep it clean & open. If that's even possible in that lil place.  Let's let some pictures speak for themselves:
White Beam Ceiling
Stark White Bathroom Ceiling
Long Planks with Perpendicular bulky beams
Pure Plank Heaven
Yep. Gonna go with white. After seeing these bright & airy rooms, I was pretty confident we could add some texture & interest to the boring drywall ceiling, without closing in the room too much.  As a bonus you can easily slap on more white paint down the line.  Even the nails showing adds so much!

So we jumped in.  We've started in on ours already, still wrapping it up & will have photos soon. Let me just say, the nail gun = new best friend. Have you done something like this in your home? Would you, if you haven't?

    -Jesse

Linkies: FacebookPinterestInstagramTwitterSubscribe & of course, Email me.

Post a Comment

Tuesday, January 14, 2014

Downstairs Bathroom: New, Old, Light Fixture

Tidying up the details of the downstairs bathroom, finally! Last weekend we worked on the new wood plank ceiling, and I used a nail gun for the first time. It was a life changing experience, why did I not get one sooner?? More on that soon... let's play catch up - I'd been saying I'd show you a quick run down on the light fixture, and here it is. 

Heads up, if you are planning on doing a similar, simple light fixture makeover, here is what you'll need:
  • Old light fixture, cleaned up.
  • Spray Paint. Two colors in my case.
I told you it was simple... 


As you know - we had a fluorescent light fixture in the bathroom, that I just couldn't understand WHY it was there. If you missed it, here's a peek:
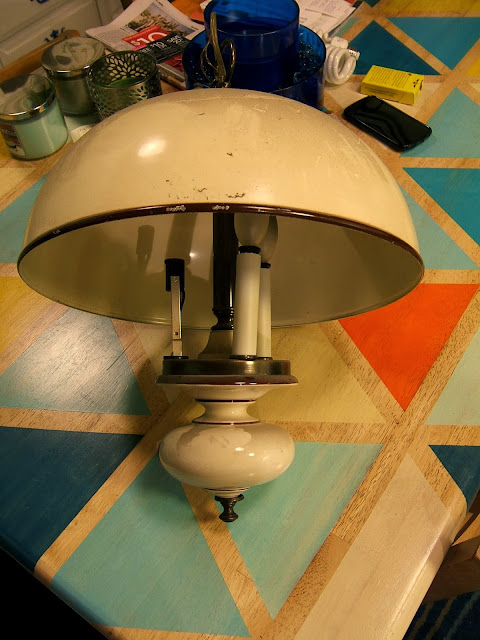
Pretty bad, and the light it gave off was the worst.  If you ever want to install the most unflattering light in the world, I recommend a bare bulb fluorescent shop light. It's pretty bad.  In my brain I knew I wanted something unique, so off to the thrift stores I went, and found this:
I have to admit - I didn't pick it up at first. I walked by it, then walked around thinking & kept coming back. I could see some potential, but let's face it, it's also pretty scary... but it was solid metal & porcelain, around $15, and I knew I could at least TRY spray paint.  If it didn't work out, no big loss, right? I got impatient when I got home that night & started dismantling:
There were no big surprises or roadblocks, so the next morning it was all systems go. If you are going to redo a light, it's important to NOT lose any parts, and as you dismantle, take note of where everything went. Do this either with tons of photos, or draw out a chart.  You may think you'll remember where every washer went, but you won't. I always think I will, and I don't.   So here's my parts, nice & clean:
Then we have the big bell:
After a  lot of brainstorming, I voted on a light that would be grey exterior, yellow interior.  First up, many light coats of yellow on the interior:
That totally doesn't look yellow, but it is. Very yellow. Took about 4 thin coats, and luckily no drips. That's why you want to do THIN coats. 

I decided to reassemble the "guts" portion of the light, figuring that solid yellow would make for a seamless & clean look.  Though I did keep out the very last brass fastener, to remain brass.  (For the bottom).

So here I have it assembled, tape to protect the wires, and tape inside the sockets to protect our connections.
I decided to lay it on it's side & tackle the underside first:

After doing as much as I could from these angles, I hung the "guts" from my sawhorse and spray painted my last few coats from above. I didn't take a photo, oopsy. You get the idea! 

Note: See how at the end (far right) there is no finishing piece of hardware? That's the one I kept out.

While that dried, I went back to my bell (which was now dry) and added a few pieces of tape to the inside top (to cover the hole from within) and then painted the bell grey. I apologize for the lack of pictures, I could have sworn I took some. These are the consequences of balancing too many projects!

I was starting to really work against the light here, as shown in my impatient cell phone night photo:
Normal people allow their things to dry for 24 hours, but I needed to see it together, so I took the chance. I let it hang here for a few days, for what it's worth...

Simple makeover! Two different colors of spray paint, and an afternoon of patience.
Trying it on in the bathroom, here it is in the horrible fluorescent light:
Had to do a test run...
 This was unexpected, I love the pattern the bell makes on the ceiling, reminds me of a bio-hazard symbol:
So that's that! Simple. I really like the fixture now, even though it is in no way what I had in mind! But it's satisfying my yellow craving for this bathroom, and it's definitely one of a kind. What do you even call this style lamp?
Now, in these photos it's a plug in light, but the plan is to hard-wire it in so this puppy is operated on the light switch. Maybe even a dimmer switch... fancy....

OK - back to work! Have a good one.

     -Jesse
Leftover things to do in the bathroom:

Linkies: FacebookPinterestInstagramTwitterSubscribe & of course, Email me.

Post a Comment

Related Posts Plugin for WordPress, Blogger...

Shareaholic