Google+ Nine Red: Paper
Showing posts with label Paper. Show all posts

Tuesday, July 23, 2013

How To: Paper Crane Chandelier

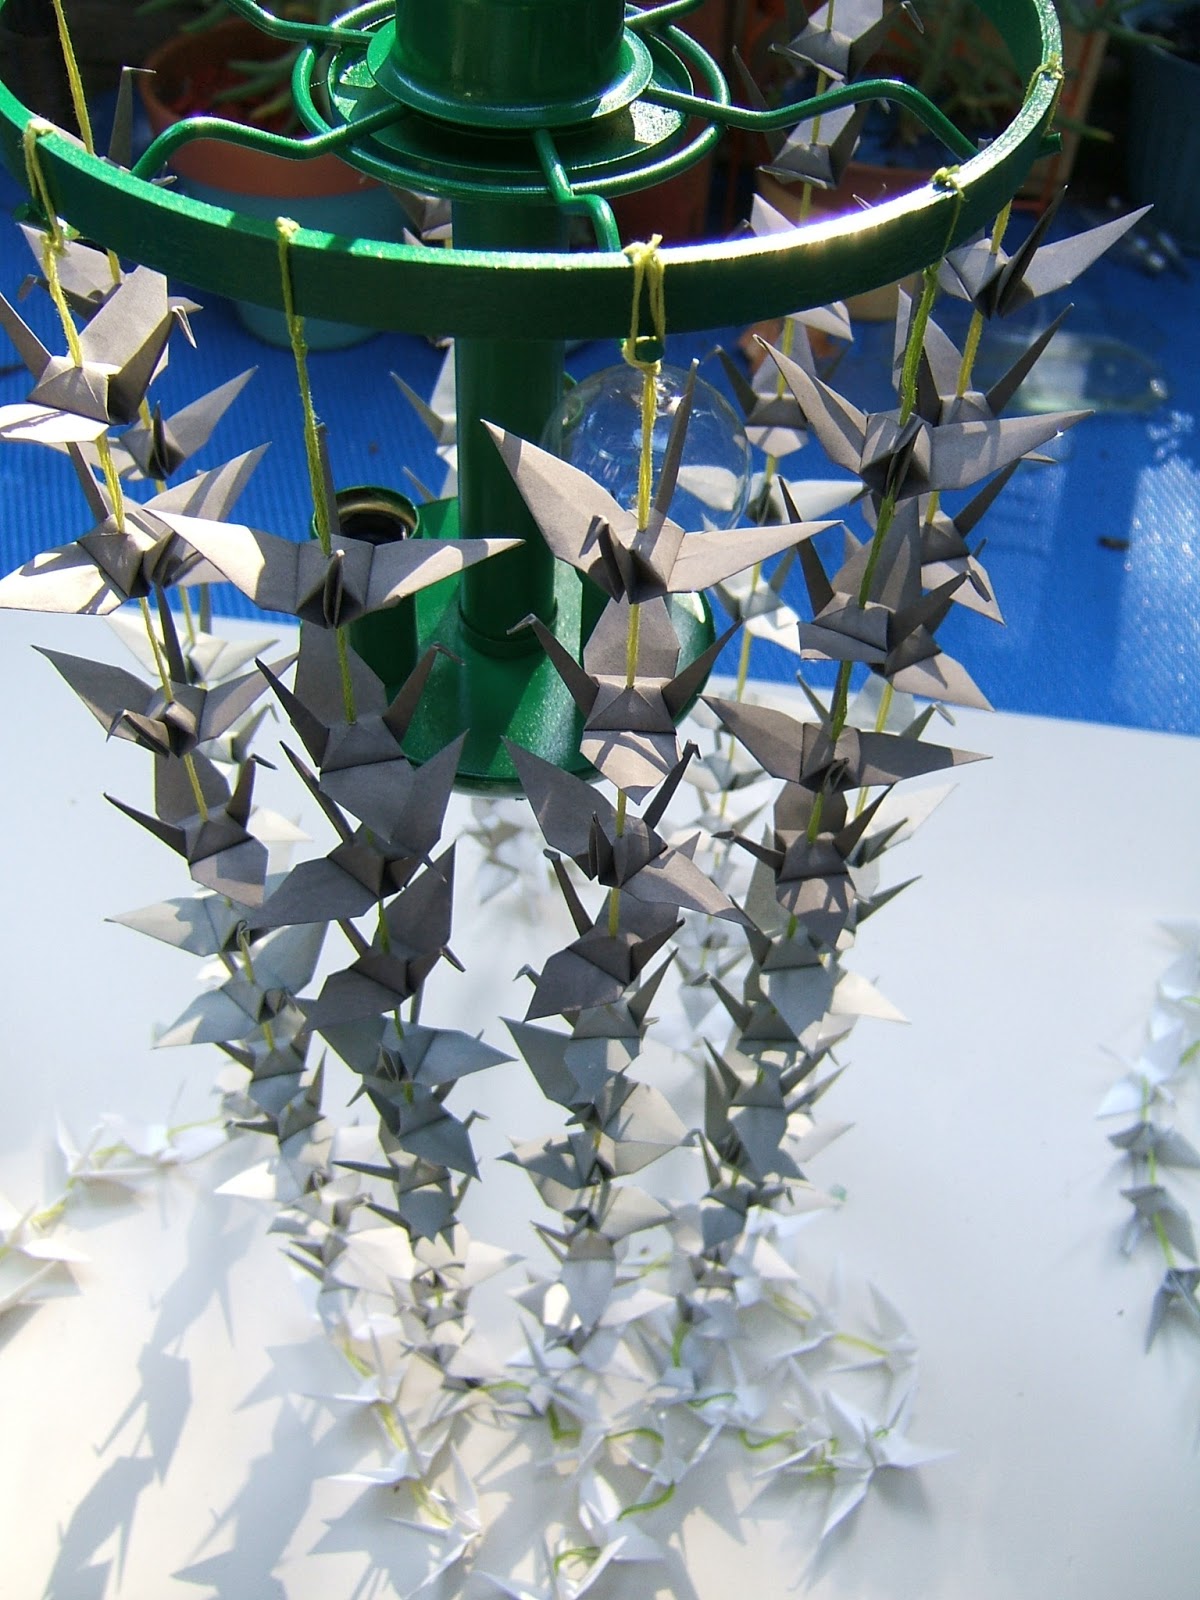
I've mentioned my Paper Crane obsession before, but I just kicked it up a notch. A while back I did a few sneak peaks on the facebook page of my finished paper crane chandelier, and now it's time to share how it's done! I'm really happy with how it came out, and decided to swap the bulbs out for nightlight bulbs, as it makes a great accent light in our living room.  The cranes send angular shadows on the wall behind it.
You'll need: 

  • Old Chandelier Frame - anything you can tie strings of cranes to will do.
  • Embroidery floss in your color choice and a needle.
  • Paints: Primer & Top coat color
  • 200 Paper Cranes - I got mine in this etsy shop, but you can also make them if you're amazing.
  • Embroidery hoop - just the inner complete circle - (if you need to add hanging room)
  • Super Glue
  • Long Extension cord or wire by the foot & a plug kit.
  • Wire Nuts - 2
  • Tape: Masking and Electrical
  • Sawhorse (optional, for hanging the light)
  • Wall Anchors & Screws (if ceiling mounting)
This project is more time consuming than it is difficult, most the steps are fairly easy.  So here's my light fixture, it's one of those 1980's ceiling mounted fixtures:

I've liked these for YEARS but hadn't thought of a use yet. I got this for $4. I love that the glass comes off so easily, and the frame is ready for whatever use you want.  Disassemble your light:
I decided to keep the wiring and the ceiling mount, because even though I'm turning this into a plug in light, I thought it would look nice to mock install it on the ceiling, instead of using a hook and chain. The wiring looked very clean, so I didn't need to replace.

Once you've taped off the wires and the sockets, start priming. I hung mine from a sawhorse.
First you prime, then you paint. You know the drill with spray paint. Nice thin coats, and REMEMBER! Recoat within ONE HOUR or AFTER 24 hours... it's crazy that this rule actually matters, as if the paint had some sort of built in timer. I re-coated about every 15 minutes.
Blurry pic, but you get the idea:
Now - I wanted more than 6 strands of cranes hanging down mine, so I decided to use an embroidery hoop to add a ring at the top of my chandelier. These simple and cheap babies are wonderfully useful:
After finding the right size, I rested it on the top and painted it green with the rest of the fixture.
Now while your top coat is drying, time to string up your cranes. Since I bought mine (from origamiyyc) I saved a ton of time here. I know, cheating, but look at it this way - I supported another DIY'er, huh? 
I wanted an ombre effect, and found that I had 50 of each of four colors. This doesn't divide evenly into 12 strands, but since I imagined semi uneven strands anyway,  I divided like so: 6 strands at 16 cranes each, 4 strands at 17 cranes each, and 2 strands at 18 cranes each. If you stay consistent with the color order, you'll get your ombre.

Just take your needle and thread, with a LONG piece of floss (folded in half, just like sewing!) and string them up through the  bottom of the crane, and out the back (top) of the crane. A double knot at the end was enough to hold the first crane, and since the floss is so thick the cranes stay up on their own. Thank goodness! I can't imagine a knot after each crane.
Do this as many times as you want, I wanted a very full look, so I did 12 strands.
After those are done, you'd better get to wiring up the light.  You DON'T want to deal with that after you have attached the birds.  I didn't need much wire, so I just chopped the end off a 12 foot extension cord:
Since I'm not rewiring, this connection was pretty simple. I matched the ribbed side of the wire, to the ribbed wire in my fixture, connected with a wire nut and wrapped it up in electrical tape. And vice versa. If you are rewiring, you can revisit the Jute Wrapped Chandelier tutorial for some wiring tips. General rule is smooth wire to black wires and ribbed wires to white wires.
I sort of bent the rim of the part that mounts to the ceiling, because I needed the wire to pass through somewhere since I'm not actually hard-wiring this to the house. 

Now, earlier you may have wondered "How did he attach that hoop the the fixture?" Fantastic question, and here's the scoop.  To hold it in place I just used hot glue, but I knew that wouldn't last forever on metal, so the trick is in the crane strands that tie to the fixture:
I tied the floss around, then crossed over and back under, a few times.  Doing this on each of the six arms creates a secure tie.  Later, we will super glue the floss to the hoop, which will secure all the knots. Here's a close up:
So just continue on, tying your crane garlands to your light.

Once you're done tying, it's important to come back and add a dot of super glue to your knots.  For some reason embroidery floss knots come loose over time, and once you've trimmed the excess string, retying will be impossible!
A lil dab'll do ya. Now plug it in, admire it, take some photos....

When it came time to flush mount to the ceiling, I held the fixture up and marked where my screws will go. I used the 2 existing holes in the mounting plate, but will be using long screws and drywall anchors to install them. Just drill a hole in your ceiling, install your anchor, then put the screws through the mounting plate and into the anchor. Done.
 My last step will be hiding the wire, but that part is boring so I figured you didn't need to be subjected to that... hah.  And now for some fun photos:


 Looking straight up:
So that's it! Took me about a day, lots of breaks and a lot of back to back episodes of Bob's Burgers on Netflix while I made the garlands. What do you think, will you give this project a try? I love how it came out, hope you do too! Here's the cover image if you want to pin it for later:
Enjoy & good luck! Send photos if you try it, I'd love to see all the different ones you all make! For more lighting projects, head to my Project Gallery and scroll down to "lighting".

-Jesse

Linkies: FacebookPinterestInstagramTwitterSubscribe & of course, Email me.

Post a Comment

Friday, June 14, 2013

Paper Crane Obsession

I love paper cranes! Always have.  For as long as I can remember I've incorporated these into my home (or childhood bedroom) decor.  Not only do I love the look of these, but you can make them yourself, they are impressive, oh so angular, and hey - you can literally do any color or pattern.  Did I mention inexpensive? Perfect. Room need a little something here or there? Whip up a team of cranes and throw 'em in a mobile.  Or whip up a garland and string it across a mantle. It's a great way to add fun & color.

I am currently working on a crane project for our living room (update, here it is! Paper Crane Chandelier), but I have a confession. I'm not folding them this time around. As much as I love folding paper cranes, I need about 200-300 for this project and I'm running short on time (isn't that always the case?).  This is where our good friend Etsy comes in.  Look what I found:

OrigamiYYC

OrigamiYYC

OrigamiYYC
Cranes! In BULK. I'm in HEAVEN.  This shop sells folded cranes, straight from Japan, for a fantastic price.  OrigamiYYC has so many beautiful color options.  I ordered 200, and they arrived surprisingly fast for coming all the way from Japan.  I got the dark grey, light grey and white combo shown above.  They are adorable and really well done! I had to share this shop, I'm just so pleased.  Do you realize the mega shortcut this is?!

So on that note, I rusted up some pins that would demonstrate some of the many ideas for uses with cranes. I did a tutorial a while back using cranes to make a Bird Cage Chandelier, which was fun - but now I'm planning a mega chandelier. 200-300 crane mega.... more on that soon.

Here's a few simple garlands, hanging straight down, that add a modern pop of white to this rustic room. So cute:
Source
It's as simple as using a needle and thread.  To get the cranes to stay in place you can tie a few knots in the thread before stringing on the next crane. If you're concerned with it eventually falling through, tie the knot, then string a small bead on.  The bead will sit between the knot and the crane holding it in place. This pin shows the spacing a little better:
Source
How about a backdrop for a party, photo-booth or any accent wall really - incorporate the colors you love:
Source
Cute paper fan-bursts there (is that what they're called?) by the way.  For me, it's all about the lighting. I love lighting. I have to hold myself back from putting a light in every spot in this house, but I mean, look at this thing:
Source
So interesting! I bet at night it casts interesting shadows and shapes all around the room. Perfect mood lighting, right?

Well stay tuned, I've got a clever little diddy in the works using these bad boys, and a HUGE thank you to OrigamiYYC for saving me so much time, I'm beyond happy and impressed. (How do they fold so many!?) ***pssst... I finished! Here is the Paper Crane Chandelier.

Have a great weekend everyone, Happy Father's Day to all the Dads out there!

-Jesse

This post was not sponsored by OrigamiYYC, I'm just really really excited about finding their shop!

Linkies: FacebookPinterestInstagramTwitterSubscribe & of course, Email me.

Post a Comment

Monday, April 8, 2013

DIY: Message in a Bottle & Aging Paper

"Sendin out an S.O.S." - hehe,  now you're going to have that song in your head all day, like I did.  Your welcome! So, this is easy. It shouldn't really even be a tutorial, but what the heck - perhaps you don't know the art of aging paper, in which case, I can tell ya.  Write a message, age it, and throw it in a bottle.  Simple enough, right? Perfect lil project to get your crafty self all warmed up & ready to take on bigger things. It's easy, fun, satisfying - that's what I love about these mini projects.  So - the guest room is beachy-nautical, and I know I said I wouldn't go over the top with the theme, but I couldn't resist this. Theme or not. It's just cute:

***UDATE: Guest room? Check.. See the full tour here*** 
Yo-ho, look what we have here. Isn't that cute? Yes - yes that Charles Shaw wine, the infamous "Two Buck Chuck" which has actually gone up to $2.50.  Only the finest for me and my messages.  Truth be told, I don't know a thing about wine - and anytime someone tells me important information about some, you can see it going in one ear and out the other.  My brain just doesn't have a file for that info. Wait I'm wrong - I can tell you whether it's red, or white. Or if it's not wine at all. That's about it.  Now ask me what's the best paint & finish for your project & I'll talk your ear off... but I'm off topic.

As to "Annual Message" - well, these messages clearly aren't going out to sea, so who are they for? Us. I wanted to write my future self a letter about what we're up to, so I had a few sips of the wine (don't wanna waste it!) and wrote a two page letter about how things are here.  My goal is to read it eventually, in at least a year, and then do it again.  Yea, yea, super cheesy - but I love that kind of junk.

Wanna make these? Let's do it!

Post a Comment

Monday, February 25, 2013

How To: Fish Scale Light

Last week I talked about possibly making the Cardboard Chandelier for the upstairs bedroom, and then I remembered this gorgeous DIY Fish Scale Light I saw on Design*Sponge:
OK - wow... Pretty sure this light kicked the cardboard chandy out of the race for the upstairs bedroom. (Sorry little fella...another time...) The colors are so rich, and I love how it's fish scale inspired so it's not entirely theme-ey like with eyes and fins and such.  The rope really ties into the natucial suggestion of it all too, which, coincidentally is what we're going for in that room. The hint of nautical without the life preservers, oars, and beach fence headboards.  (Nothing against those, this is just a tiny room and needs only a hint!) Think Deep blues, greys, Navy & red. So much fun!

I've rambled long enough, hop over to Design*Sponge for the full tutorial, which I just realized was written by Kara Paslay, one of the most creative people in the whole wide world. She shows a really cool technique to make these circles, involving wax paper and an iron. Good times!

What do you think, is this a go for your home too? Have a great day everyone!
     -Jesse

Related Posts:
Up Next: New Paint, New Room....moving the guest room upstairs. 
Let's keep in touch: Facebook, Pinterest, Instagram, Twitter & of course, Email

Post a Comment

Friday, February 22, 2013

DIY Party Decorations and Tamale Party

Last weekend we threw a Tamale making party. It was really fun, definitely a lot of work but everyone pitched in & we were eating amazing Tamales in no time.  I, of course, wanted to decorate for this party. It's probably the real reason I wanted to have a party in the first place, who knows!  Decor ups aren't essential for a good time, but in my opinion I think they set the vibe.  You walk into a party that's all dolled up, & your subconscious says oh yea, this is gonna be fun.  I had absolutely no interest in paying for decorations though, so I made really easy paper bunting from things I had around the house. And now I'll show you how to!
Paper. String. Tape. Maybe some staples.  So easy! 

Post a Comment

Tuesday, February 19, 2013

How To: Cardboard Chandelier

Back to work today, eh? I'm so sorry... but not really because I (like many!) started back to work yesterday.  So I felt your pain.  But hey, tell your boss you're going home early because you have more important things to do, like tackle this adorable cardboard chandelier:
Sorry Boss! Just can't compete with something this sweet.  I saw this project on How-To Tuesday on Etsy a while back, and have always kept it in mind for just the right time.  This last weekend we got the wild idea to empty out two of our bedrooms and switch them entirely (I can explain...later...with pictures!), which now has me brainstorming the details of it all.  My favorite is figuring out the lighting, I want something unique and fun - this might just fit the bill. One big, one small.... hanging out.....

Head over to Etsy's How-To Tuesday for the full instructional.  Have a great "Monday", as odd as that may sound, it's all how you look at it, right? Sure...

Until next time, hugs! Oh - did you enter my String Art Giveaway on Better After yet? There's still time! Clicky clicky...

     -Jesse

Up Next: Dare we paint that fireplace? Let's think about it first....

Let's keep in touch: Facebook, Pinterest, Instagram, Twitter & of course, Email

Post a Comment

Monday, February 4, 2013

How To: DIY 3-D Paper Ball

Good morning! So I guess that groundhog has decided we'll have an early spring, huh? I'll take it, that's just the news I wanted to hear from that furry little rodent.  With spring comes color, life, and the urge to start redecorating!  Remember the DIY 3-D paper wall art post?  Well check this out, I was browsing around my idea board this morning and these totally caught my eye (again!):
These meet the qualifications for me to love them. Made of paper? Check. Textural & 3-D? Check. Affordable? Checkmate!  There's nothing like a project that

Post a Comment

Friday, January 18, 2013

How To: 3-D Paper Wall Art

Said it before, and I'll say it again - I love me some paper projects.  I have no idea why it appeals to me so much, maybe because it's cheap & readily available? Who knows, all I do know is that paper can be transformed into seemingly endless creations, with new ones everyday. I was mulling around the world wide web (remember when it was called that?!) thinking of some possible ideas for a big blank space in our kitchen. I wanted colors, texture, I may have wanted this:
Photo Credit: Shelterness
Cue the Angels singing, isn't it pretty?? I love it, and granted

Post a Comment

Monday, December 17, 2012

A Fresh Start

Good Morning! It's the final week before Christmas, can you believe that? I haven't done a thing, and that's fine.  We have our tree, which was surprising enough, but it has yet to be decorated.  It has lights, but the ornaments haven't made their way to the tree, yet.  And you know what? I like it.  Eh, we have a few days, right? Last week was so crazy, quite a few things didn't get done, and I didn't have time to write - sorry! 

Do you ever have those days or weeks where you just try to do everything and then some? Man, that was last week for me.  I felt like I had a million things I wanted to do, and I was running around trying to do them all - which leads to not much getting done, or at least not very well.  So this week I'm starting fresh, and taking the advice of one of the greatest fortune cookies ever: Live in the moment.  That couldn't have come at a more perfect time, what with the holidays, and our move.. I'm getting ahead of myself, & setting unrealistic expectations.  So this week will start with a deep breath, a fresh start, and a big cup of coffee. 

Ok - no more whining.  Even though we haven't decked our halls, doesn't mean I haven't thought about what we would be doing to bring in the holiday spirit.  In the past year or so, I've gradually fallen deeply in love with the whole midcentury style, so I pulled up a few ideas for a midcentury holiday, and found some really cool ideas..
Not sure if I could make the switch from a live tree to an aluminum one, but this one looks so interesting, it's worth a try some year.  Put a colorful spotlight on there...  Here's a fireplace that we have actually been scouring eBay to find, I would love one of these in our place:
I love paper, and I love projects, these mid-century style ornaments are easy, and so cute:
Of course, they are from Design*Sponge...head there for a full tutorial. 

So anyway, how are you all doing, ready for the holidays?  What are your mantras that get you through the busy times?  Enjoy the season, live in the moment, and Happy Holidays everyone!

      -Jesse

Post a Comment

Thursday, October 25, 2012

How To: Origami Star Lantern

Oh man, oh man - I love Origami! I always have. I've always had a place in my heart for it, don't know why. It could be part of my fascination with all things Japan, or my love of all things paper.  I used to do a lot of Origami but set it aside for a while.  When Ralph & I decorated for the Sushi Party, we made a few little cranes & such to place around, and it reignited my interest in the paper folding arts. I'm especially impressed when Origami can be made into something not only decorative but useful, like bowls & boxes. And now, the Origami Star Lantern:
Photo Credits: How About Orange & Passengers on a little spaceship
Let's have some collective ooh's and aah's shalle we?! So cute.  One piece of paper, many folds, super adorable.  You will be seeing these around our house, especially when decorating for the Holidays comes up (suprisingly close!)  Don't worry, the candle is actually inside of a glass votive, not just sitting dangerously in the paper. They've really thought of everything...

These can be used for a lot of different things, bowls, potpourri, or put a frog in there and use it for ikebana.  Or upside down, poke a hole in the back or each and put the low wattage Christmas lights in them.  Just think how many you can make if you swindle your friends & children into helping, haha!  I love the colored ones but I think the white is my favorite.  Head over to the adorably named blog, Passengers on a Little Spaceship for the full tutorial.  Which, by the way, is amazingly detailed!

Enjoy!

Keep in touch: Facebook - Twitter - Pinterest.

Post a Comment

Friday, August 24, 2012

How To: Paper Dot Mobile

Mobiles are traditionally popular over cribs & in childrens rooms, but I have always thought they are so colorful and fun that they can (and should) be used anywhere in the house.  I love that they gently and quietly move in the breeze of the room.  I stumbled across a super cute paper mobile tutorial, and it inspired me to round up a few fun ideas & share them all with you. Whether over a crib or over a desk, these easy DIY mobiles bring a little fun wherever you need it:


Post a Comment

Wednesday, March 28, 2012

Party Time: DIY Decor

Spring has sprung, officially.  This week has been cold and rainy here, and I can't help but think forward to all the summer parties and bbq's ahead!  I love a good party, we all do - but more so, I love to decorate for a good party!  Though after the food and beverages have been bought, there isn't always a lot of room left in the budget for the decorations, am I right?  Don't let that stop you though - you can still make your party sparkle with a few affordable supplies, a few internet searches, and a few good movies to pass the time.  While I won't bombard you with all the great ideas I've come across in one long post, I plan to post pretty regularly in a section I call: Party Time! Today's Party Time will be using one of my favorite (and cheap!) materials, paper!

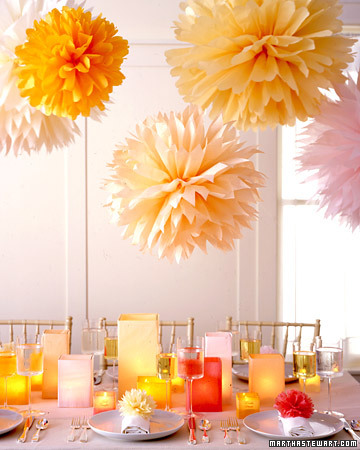
Let's start with the increasingly popular tissue paper pom pom:
These are great!  They don't take you that long, they aren't that difficult, and they make a really great impression at a party.  Plus, tissue paper is so affordable and comes in so many colors!  You could hang just a few here and there, or go all out and have a swarm of them.  If you have multiple areas, try hanging odd numbers of them over each table or area.  I think odd numbers are fantastic.  Here is the tutorial on Martha Stewart's site.

Up next we have Paper Bunting:
I had seen these before and never knew it was called bunting.  "...They have a different word for everything." -Steve Martin!  Soon as I found that out, it opened up a whole new world of techniques to me.  The first few (rough) ones I had done, I used paper and a stapler - but tape, jeez! Why did I not think of that? Faster, easier, more attractive.  You could easily whip up a great set of bunting for your next bash, also at an extremely low cost.  Again, paper & string come in so many great colors that this theme is up to you.  I'm really into the Ombre thing lately (oh, you noticed?) so my next party will definitely have a fade! I found two great tutorials for bunting:
and

Last but not least for today, an old-y but a good-y, is the classic paper lantern.  Remember these from elementary school? I have used these time & time again for party decorations. Take a look:
 
These are such a good standby, and surprisingly few people know how to make them - so you're sure to impress.  Luckily, I found some wonderful tutorials on the interweb for ya.  In the above shot, a paper lantern is used around a glass vase to transform it into a table lantern - this one's new to me so I'm really excited to have found it.  What a clever little candle holder!   In the second we have the hanging lantern, but with a rounded edge, framing the divider of a room.  Using patterned paper is fun here too, or stringing the lanterns up like a garland.  I can't find a good example of that unfortunately, so I will just have to do a whole tutorial on that soon (oh darn!).  Here are the tutorials I've come across:
Design Sponge: DIY Wednesdays
and
Lucky Dylan Weddings

Don't forget these colorful mobiles I posted about before, the sewing machine technique is also extremely helpful & can be used with a wide variety of shapes.

What are you favorite party decoration ideas?  Send them in to me here so I can share them in a future segment of Party Time.  I set up a Party Time Pinterest board as well, click here.  Special thanks to these lovely blogs who have posted tutorials of their work, head over to their blogs and spread the love.  It's party time!

Post a Comment

Tuesday, March 20, 2012

Triple Layer Cut Canvas

A short while back, I showed you my new found love project - cut canvas.  Well now I love them even more.  After that post, my sister and I were talking about them, and she mentioned she'd love some for a wall in her house. I started telling her about some variation ideas I had for them and she was all for it.  Her birthday was right around the corner so I thought, perfect! So, with the good feedback, I set off and tried a little experiment in layering.  Let me show you first before I ramble on about 'em.  Warning: I made a huge mistake in not taking progress pics (again!) - but luckily my mom is a photography queen and finding pics from the birthday party was a piece of cake.  (Ha! Get it? Cake?! So cheesy.)  First up, is the finished product in it's handmade frame on a dark grey wall:
 Next against a lighter wall:
 Here is my one good progress picture, I kind of like the all white on red thing going here:
 I love how this project came out and plan to do so many more! My thumbs on the other hand, are begging me not to! I'm not going to lie, the results are worth it, but using an exacto knife for this many cuts, three times... is really a workout on the digits.  You have to push a big harder too to get through the canvas. It was SO worth it though. Here's the canvas at the party, look at my beautiful gift wrapping behind it.  Yep - plastic trash bag, what choice did I have? It was raining!
 Now the hard part will be deciding which wall to put it on in their house.  Here it is on her beautiful blue wall ( I LOVE that color, don't you?)
 and on the darker green wall:
Which wall do you think is best? Cast your vote in the comments section!  I'm so happy she liked it, and that it turned out like it did in my head.  I'm glad I got to try out the idea! I have a few plans & changes for the next one, I learned a lot this round.

If you are planning on trying your hand at this, let me pass along a few tips and tricks that I figured out:
  • Draw and plan out your design on the backside.  This will help keep things lined up in the finished product.  Since you won't have all 3 stacked as you work, it takes a lot of planning to make sure everything lines up.  
  • Stack & hold up to the light.  I can't tell you how many times I stacked them up between cuts and held them up to a bright bulb.  This let me see where things were actually lining up.
  • Paint the back of your canvas in mod podge to help keep it stiff during cutting and in the long run.
  • Hairspray? I didn't use it, but I wondered if it might also help it stay stiff?
  • No islands or peninsulas! When you're cutting, be sure your design doesn't leave any "islands" - because obviously there is nothing left to hold them up.  Peninsulas would be long hanging strands, or peninsulas, of canvas that aren't connected to another side.  These are risky because they will likely curl as it gets older.
  • Book press after painting. 
  • Stretch your thumbs!
I'll do a whole tutorial on these soon, because I just realized that the above list could go on and on! So I promise I'll do a tutorial!

So what do you think? Have a great week!

Post a Comment

Related Posts Plugin for WordPress, Blogger...

Shareaholic